Last updated: 22 September 2005
|
Last updated: 22 September 2005 |
This page documents the Meade Deep Sky Imager and DSI Pro comments, tips, and photos. Contributions welcome. In order to showcase the DSI you may occasionally see images taken with other telescopes on this page.
Subject:	Re: Meade DSI  usb 1.0 vs 2.0
Sent:	Tuesday, September 20, 2005 10:13:21
From:	Stephen Bird (stephen.bird@btconnect.com)
Both the DSI and DSI Pro work best with USB2.0, but both are backwards
compatible with USB1.1, however, the download time for images
particularly when using the complex features means you will need to grab
a cup of coffee between each frame exposure on USB1. The answer is get a
USB2.0 upgrade for your PC, for a desktop they run out at $25 for a 4
port card, and for a laptop a PCIMIA USB2.0 card is around $40.

As to power requirements, the DSI needs the full power 500mA capability
of the USB port. This could mean a powered hub and making sure that you
have no other USB devices plugged in, sharing the same power supply that
you commonly see in most PC's.

If you don't have a full power port, rated at 500mA, you can expect the
drivers not to load during setup, and / or the camera to fail to
initiate when plugged in to the USB port.

Regards

Stephen Bird
And:
When using the new drizzle features with the DSI and ETX, particularly
extended view, the time to see an image on screen and obtain results is
extended due to the Autostarsuite guiding the ETX between visible frames
to produce the mozaic image. By using USB2.0 as opposed to USB1.1,
shortens the download time for each visible and guide frame and thus
sees a faster result overall. With the DSI Pro having to repeat the
process for the IR, R, G and B planes, does make getting good results
both time consuming and difficult. I don't have anything reasonable as
yet, but I am hopeful.

Regards

Stephen Bird
Subject:	Mead DSI  usb 1.0 vs 2.0
Sent:	Sunday, September 18, 2005 16:50:45
From:	JOHN PALADINI (jpaladin1@suscom.net)
First let me thank you and your site for solving power problem with DSI

I have a few questions

1) I have read that using DSI at USB 1.0 reduces capability -- The only
thing I noticed is that focus was a bit harder --- what else I'm I
missing?

2) Does any one out there know how much power DSI uses in milliamps?

thank you
John
Mike here: USB 1 is slower than USB 2. So the speed at which the image data transfers from the DSI to the computer is what changes. By the way, the DSI is USB 1.1 (I think); the DSI Pro is 2.0. I don't know the power draw.
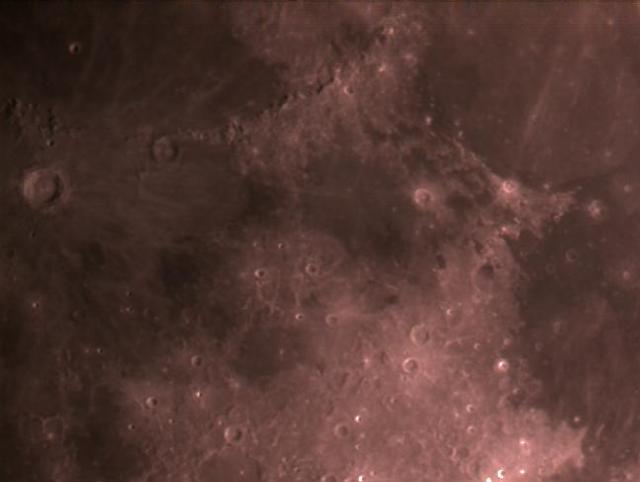
Subject: Meade DSI Moon shot Sent: Wednesday, September 14, 2005 05:59:14 From: Hancock, Monte (Monte.Hancock@Essexcorp.com) I shot the attached central Moon field using the Meade DSI with my 10" Celestron reflector. Telescope tracking plus DSI registration on bright spot used. Moon11.jpg is the final stacked image. The final result (Moon_11_adj_3.jpg) was made "upright" (rotated 180 degrees) contrast enhanced and brightened using Microsoft Office Picture Manager (comes native with Office suite). Date: September 13, 2005 Time: 2030 EDT Location: Melbourne, Florida (~80.4W/28.2N) DSI mode: Moon Seeing: fair (no cloud cover, slight haze, ambient light from small urban residential area) Frame exposure: ~10 ms (was doing a lot of fiddling around, didn't note the exact exp's for this shot; sorry) Image "Quality" required to use in stacking: 50% Number of Frames stacked: 196 Duration of collection: ~180 seconds--Monte Hancock

Subject:	DSI driver
Sent:	Saturday, September 10, 2005 18:07:35
From:	Victor Grycenkov (vic_grycenkov@hotmail.com)
I was wondering if you could help me out?  I upgraded my laptop to work
with Meade's DSI and when I went to load my software, the disk had
corrupted data, so I was unable to load the drivers for the DSI.  Is
there anywhere I can get the drivers?  Autostar doesn't want to work...

Thanks!
Vic

I have been cursed with open eyes and a conscience
-MK Wren

my homepage:  www.homepage.mac.com/grycenkov
Mike here: Contact Meade; they will probably send you a CD-ROM.
Subject:	DSI recognition problems
Sent:	Thursday, September 8, 2005 15:29:46
From:	Insleymike@aol.com (Insleymike@aol.com)
I have had now for 8 months a Meade DSI which at first performed
marginally well on my desktop (which is of little use out in the field)
and which took about 15 minutes to download on my laptop (USB1.1)

I have upgraded my laptop to USB2 via PCMIA card and increased my memory
and hard drive and am now on Windows XP. Although my PC recognises that
a USB device has been inserted, it does not recognise the driver
software. I have now loaded Upgrade 2 as well as 3 and still the driver
is not recognised. Bob Shutan (whom I bought it from) still says that it
is the PC and not the DSI.

I have taken it to the office and tried it out on machines with Win 98,
Win 2000, Win ME and Win XP. It will not recognise the driver in any
setting and my old faithful (?) desktop PC now refuses to recognise it.
Am I doing something wrong? or should I just send it back to Bob while
it is still under warranty?

Kindest regards

Mike Insley
Scotland
Mike here: The DSI may require more power than your USB port may be supplying. If you have a powered-hub try that. If you are using a USB hub already, try using the DSI without it.
And:
Thanks for the advise.

Bought a powered hub today but it still fails to recognise the driver
against the added DSI

best regards

Mike Insley
Mike here: Hum, could be a Windows problem.
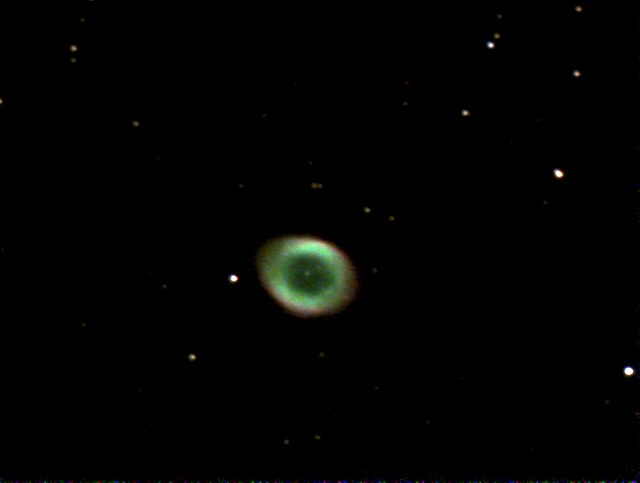
Subject:	New M57 picture (DSI on LX90)
Sent:	Wednesday, September 7, 2005 11:19:03
From:	Niall J. Saunders (niall@njs101.com)
At last I have managed to get time to play with my four month-old DSI-C
imager, and a five-hour session yielded the following image (amongst
others that I don't think are worthy of your reader's attention !!)

The setup I used was my LX-90; polar-mounted on a home-brew, all steel
wedge; in turn mounted on an all steel home-brew pier (the combination
of which was less than ideal, necessitating a sand-filled wooden box
around the pier to dampen oscillations); all located in my all wooden
home-brew, roll-off-roof observatory. I spent a few hours tweaking
collimation as close to perfect as I could get things (I use an
ultra-small pinhole in aluminium foil wrapped around a 60W light bulb
some 100 feet from the scope to give me an artificial star for this),
and another few hours doing a spreadsheet-based training exercise (the
results of which confirmed that my training values have remained
virtually identical to those obtained almost a year ago - despite a full
strip and rebuild of my LX90 in the meantime. Obviously this was effort
that is well rewarded). I also used my final incarnation of the Hartmann
mask to ensure focus was as perfect as seeing conditions permitted.

I imaged using 10-second exposures, unguided, for a total of 68 images -
giving a total effective exposure time of just over ten minutes. The
resulting image is based on the 'live' stacking produced by the all-new
Meade DSI 'Envisage' software. This was set up with a Gain of 100, an
Offset of 65, an Evaluation Count of 5, and a Quality Threshold of 65%.
All images were processed and saved as BMP files. Auto Contrast was
enabled and both Contrast and Shadow Enhance were set to 1. Dark Frames
had just been recorded and were subtracted from all images.

I then post-processed in Corel Paint, specifically converting the 24-bit
image to a 48-bit image, and then splitting this image into R, G and B
layers, before histogram equalizing such that each layer was just fully
saturating, and each layer was stretched to give full black. The layers
were then recombined and a threshold was set to get rid of any residual
'greys' at, or near, the 0,0,0 black-level (this actually meant that
anything below about 10,10,10 was changed to 0,0,0). The image was
converted back to 24-bit, and then resampled at 300%x300%, with
anti-aliasing 'on' (this gives a very 'natural enhancement based on a
3x3 grid around the original 'real' image pixel, and allows the original
image to print very nicely on 8x10 glossy media). After the re-scaling,
I applied a 100% Adaptive Unsharp Mask - and the result is what you see.

It is certainly incredible to see the difference between the end result,
and the attached 'raw' frame from the initial sequence!

Now all I need is another clear Friday or Saturday night, and permission
from my darling wife, Margaret, to 'go out and play' all night!!

Clear Skies
Niall Saunders
Clinterty Observatories
Aberdeen, NE Scotland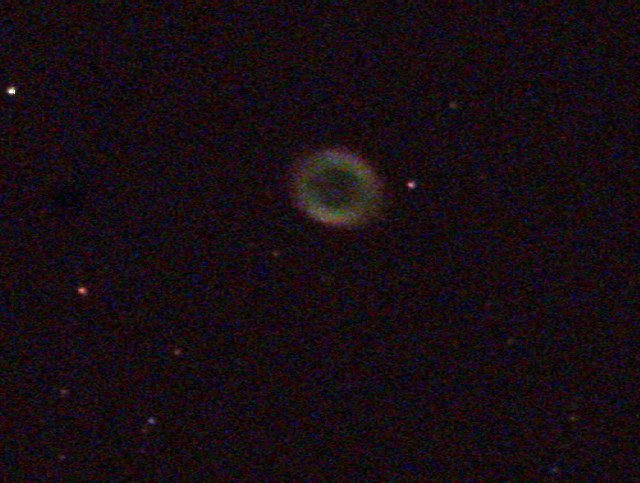
Subject:	Re: DSI pro
Sent:	Monday, August 29, 2005 13:00:59
From:	Stephen Bird (stephen.bird@btconnect.com)
The DSI Pro is an ideal choice for the ETX125, as with all these things
it is just a matter of practice.

The picture you sent me is of dust specks, but they could be anywhere in
the optical path, including the DSI chip, the filters or on one of the
telescope lenses.

Your picture is actually almost focussed on the dust specs, rather than
a distant object so you may find that when focussed on a distant object
you cannot see the dust specks so cleaning is not required. If you
recall when looking through an eyepiece at stars, if you adjust the
telescope slightly out of focus, the stars look like rings or donuts. In
this image you have produced the same effect with out of focus dust
grains.

Setting up the focus on a distant building with an eyepiece and then
changing to the DSI will not produce an image from the DSI in focus
without a lot of further adjustment of the focus control on the ETX.
This is because you cannot make a standard eyepiece parfocal with the
DSI Pro. This is due to the design of the DSI Pro, with the filter
slider.

What you need to do is set up the ETX in daylight pointing at your
distant building, using an eyepiece. Then switch the eyepiece for the
DSI Pro. Now adjust the focus control on the ETX until you get a
focussed image on screen. You will need to adjust the focus control on
the ETX a lot. It is surprising how much you will need to adjust it,
this is just a feature of the DSI Pro working with the ETX.

Of course when you switch back from the DSI Pro to an eyepiece, you will
need to readjust the focus control on the ETX, which will require once
again a lot of adjustment.

Despite what the DSI Pro manual says, you cannot make a standard
eyepiece parfocal with the DSI Pro. It order to make it parfocal you
would need an eyepiece barrel extender to increase the length of the
eyepiece barrel where it is inserted into the eyepiece tube on the ETX.

You can buy such an extender, and a focal reducer to increase the DSI
Pro's field of view from:

http://www.opticstar.com/Astro-Accessories-Imagers-SAC.asp?s=9d22bf50-8c7b-4615-82b8-2c56a9225868&p=0_10_5_0_0_1

Hope this helps.

Regards

Stephen Bird

----- Original Message -----
From:  Palle
Dear Steven
I have with great pleasure been reading your article about DSI pro. I
hope you don't mind that I am writing to You.

It is not possible to find much help here in Denmark because the DSI pro
just came on the market last week.

The dealer told me I was the first to buy.

I  bought it to use with my ETX 125, and I must say I have experienced
some difficulties.

To try the camera I made a setup focusing on a far distant building with
my 9.6 mm eyepiece, which I expect to have app. the same field of view
as the DSI. I could not get a picture at all and found out that the
PCM/CIA card in my labtop did not deliever enough current.

I then tried the build in usb2 port and now I could see that the camera
tried to produce pictures. But in no way could I get something I could
recognize. I then started to search the web and found your paper.

I also tried the camera towards a well lit white wall and there are a
lot of spots on the image, always in the same position. Maybe it is dirt
on the chip. I attached a test picture with this mail and maybe you will
have a look and send me a comment.

In your opinion, is the DSI a bad choise for my telescope, because of
the focal length.

Sincerly Yours
Palle
DK Denmark
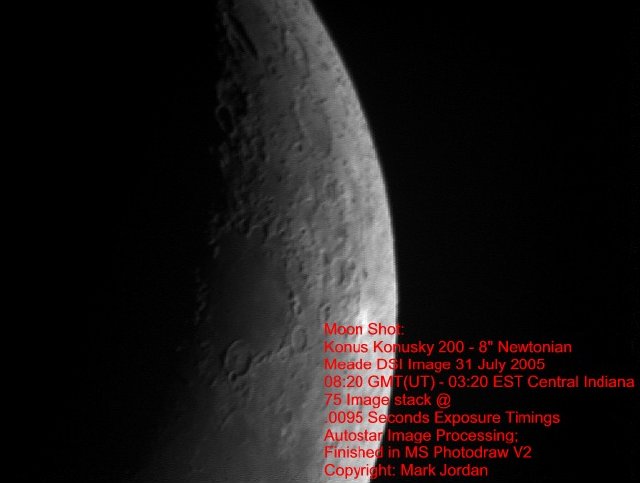
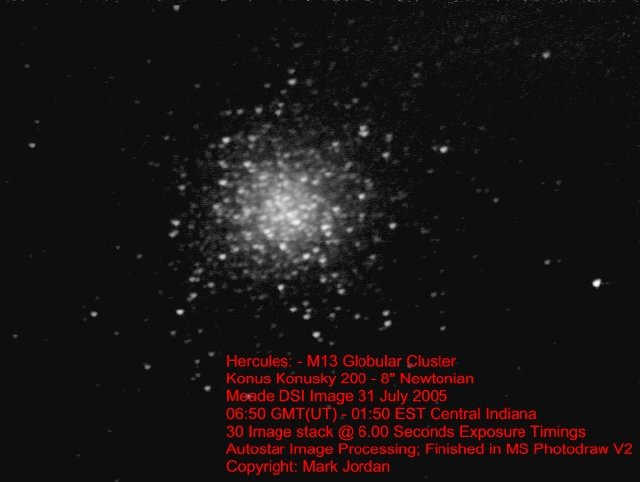
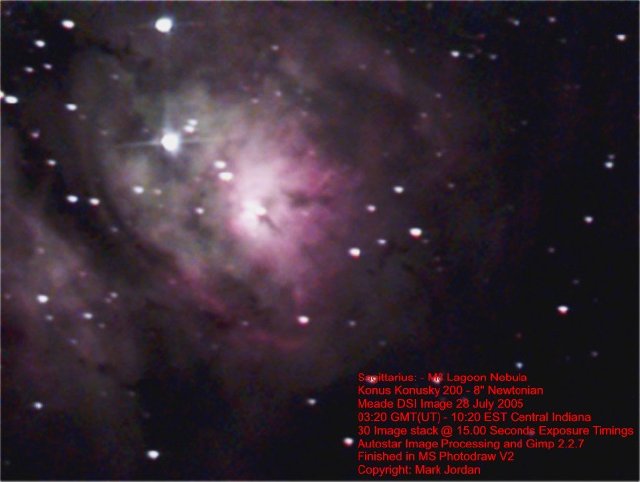
Subject:	Reply for David Sensibello DSI Exposure Timings
Sent:	Monday, August 8, 2005 21:25:04
From:	M. J. The Madjordainain (madjordainian@insightbb.com)
Dave as Mike has stated your exposure timings are too long for Jupiter.
I have gone to .0225secs or less using my 8" Newtonian with no Hartman
mask, full aperture open, much more than that and the image becomes over
exposed. On your ETX125 the best thing to do is probably kick your
timings down to about 0.0880 seconds to start and kick it up or down
from there depending on how your exposure looks in the live window.
Have the auto-contrast turned off after your initial capture on Jupiter
@ 1.00 seconds, and once you've got the timings set to give you a decent
looking live window kick it back another 10% - 20% as the Fits3p
exposures will come out a bit brighter than what you see in the live
window or the image window.  Another point is when you open the file in
Autostar Image Processing open it in mono and then use the Image Scale
to scale the image down to a more focused presentation.

Straight out of the Image Processing manual:

"The Scale dialog allows you to modify the contrast and brightness of
the image in a variety of ways.  Scaling is a two step process. The
first step is to Prescale the image. This selects the range of data to
be mapped to the 256 available levels. The second step is final Scaling
of the image."

Another thing is if you are looking for a way to shoot a WYSIWYG image,
change from Fits3P to Bitmap or JPG for your save process, with those
formats what you see on the live window is pretty much what you get for
your finished image.  While not as flexible for processing as the Fits3P
format, you can still do some processing in about any decent photo
editing - graphics editing software.  You wouldn't be able to process
out the really finer details as well, but it all depends on what you
want to do with the finished images.

Hope this helps,

Good luck Dave!
And:
Here are a few more images to help out Dave, I have the information on
exposure timings listed on the images.  There are a variety of types of
imaging targets from the moon to deep space objects, I hope this message
isn't too large due to the included images.  Hope these help out!

Mark Jordan

AKA: The Mad One
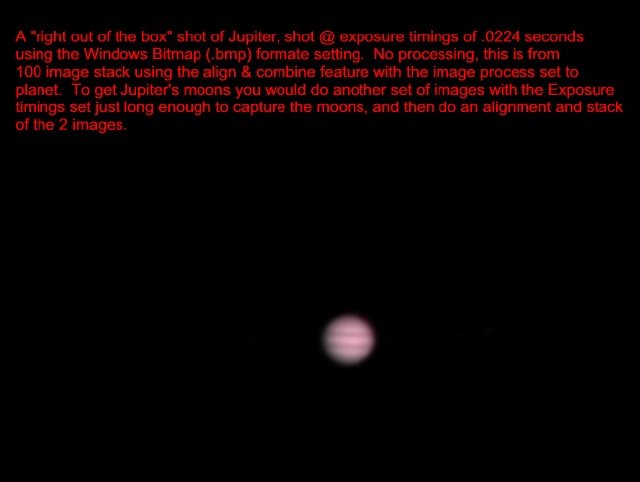
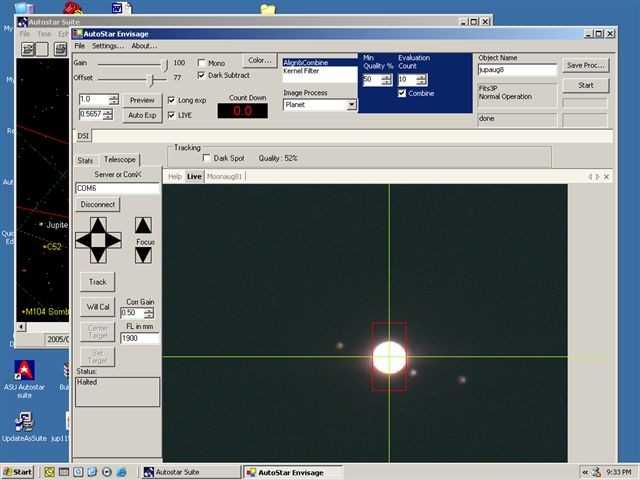
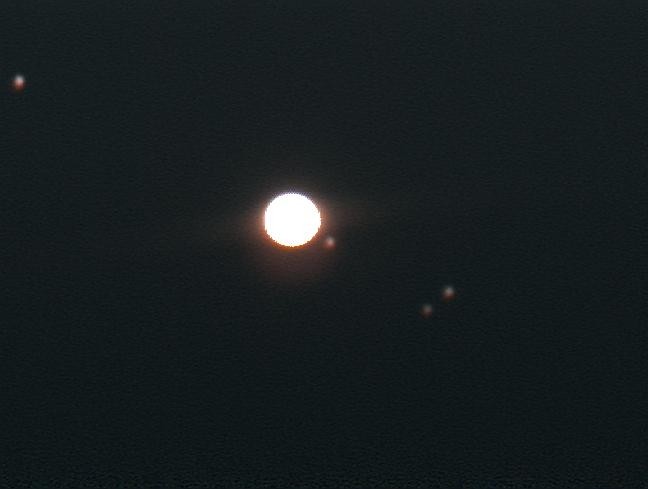
Subject: dsi Sent: Monday, August 8, 2005 08:42:30 From: dave (Dave@usfinancialservice.com) I was wondering if you could take a look at this screen shot of Jupiter this is about as clear as I can get it I am using a etx-125 with autostar and a dsi I cant seen to get any detail of the planet I wonder if I need some kind of light filter? the only filter i am using is the ir filter that came with the dsi unit. I can get the quality up to about 115% but it looks the same as this or is this just as good as it gets?Mike here: Jupiter is being overexposed. You need to shorten the exposure. I don't have a DSI but it is more sensitive than the LPI and maybe you can't shorten the exposure enough.thanks in advance David Sensibello
Subject:	Re: DSI Pro posting
Sent:	Wednesday, August 3, 2005 02:35:37
From:	Stephen Bird (stephen.bird@btconnect.com)
The DSI Pro may have problems when attaching a camera lens to it. The
removable nosepiece is a T mount thread, so there are a number of
adaptors that COULD be purchased to connect a camera type lens to the
DSI Pro. HOWEVER, unlike the standard color DSI model, the black and
white DSI Pro model has a filter slider housing fixed to it. If you look
at the photos of each model on the Meade website you can see the
difference (http://www.meade.com/dsipro/index.html and
http://www.meade.com/dsi/index.html). What this will do is to pose two
potential problems that you need to be aware of before deciding to
purchase the DSI Pro specifically for such use. Parts are not easily
interchangeable between the models even if available, so your options
are limited.

1. The filter slider housing will add a space of about 3/4" between the
imaging chip and the T mount adaptor, you then need to factor in the
space the adaptor adds, say 1/2" typically, before your attached lens.
This large gap between the imaging chip and the lens may cause problems
obtaining focus and even vignetting issues.

2. Whilst there is no reason why the filter slider should not be in
place to take pictures, and with the filters in place (or stray light
will be a problem), you will need to be aware of the mounting
difficulties to any scope via a piggyback mounting; in terms of, the USB
cable exits at say the 12 'o' clock position, the filter slider will
then protrude at the 9'o' clock and 3'o' clock position. This limits the
type of mounting you can use, and the manner in which it can be mounted.

With the DSI standard model, any T mount adaptor will hold the camera
lens closer to the imaging chip (in fact proprietary adaptors for the
standard model DSI do have a designed spacer of around 1/2" to allow
focus), and the lack of the filter slider housing between the imaging
chip and T thread, means that you could get a choice of mounting the
standard DSI with the USB cable at either the 3, 9 or 12 'o' clock
poistions via a piggyback adaptor for your scope.

If you can get to a dealer with both the DSI models in stock, have a
good look at each, and you can then see the potential problems. Failing
that have a really good look at the Meade website and the pictures of
each model.

Whilst I have used a DSI standard model with a lens attached, and you
can purchase proprietary adaptors, e.g., from Astro Engineering, DSI
Wide Camera Cradle (AC593, AC594, AC595, AC596, depending on lens thread
type),
http://www.telescopehouse.co.uk/page.aspx?theLang=001lngdef&pointerid=
2879DC3B49E74D23A1FBB4136C6D07AD&action=lnk , I am not sure it would
work with the DSI Pro due to the filter slider, and focus issues. Astro
Engineering do have a US website and I would imagine that it is on
Mike's links page, or you can find it via their main web-site at
http://www.astro-engineering.com/.

Hope this helps.

Regards

Stephen Bird

----- Original Message -----
Hi Stephen,

I read your note about the DSI Pro and your first light experiences with
it -thanks for posting this!

I am thinking about buying a DSI Pro myself and am interested in
attaching a C-mount or CS-mount lens to it.  From Meade's limited info
on their site I can not tell much about the likelihood of this
succeeding.  But from your note I have learned already several key
things: the nose piece is threaded in (might take a C-mount lens or
adapter for it), the shell comes off (might build my own shell/box to
take a C-mount lens, and attaching a TEC stage might not be too far
fetched.

Can you tell if the threads on the nose piece might take a C mount lens?
The back focus distance is another thing, but it might be close?

Thanks again for posting your experiences.

Cheers,
Chris

Subject: *DSI Pro - First Impressions*
Sent: Sunday, June 19, 2005 11:55:57
From: Stephen Bird (stephen.bird@btconnect.com)
One for the astrophotography / Meade DSI folder. I did give Meade a hard
time for their past sins, but the DSI Pro goes someway to redeeming
them. So I thought I better offer some constructive comments on first
light.


--
Christopher Clark
Director of Product Development
Forza Silicon Corp.
Pasadena, CA 91101
www.forzasilicon.com
And:
Hi Stephen,

Thanks for your excellent response and wealth of information. This gives
me a lot to think about.

In the Meade adds I did notice the filter slide slot/track hardware
mounted on the top of the DSI Pro cover plate and suspected this alone
probably pushes any lens out of focus.  The more I look at this the more
I feel it will probably take a custom front plate to get it right.  The
USB connector/cable issue will be another challenge to solve.  I think
these are both solvable problems I can tackle and still makes the DSI
Pro very interesting.

My primary interest in the DSI Pro is for wide field of view imaging and
would be an upgrade from the PC164C camera I now use.  The Sony sensor
in the PC164C is excellent for this application, but desperately needs a
lower noise readout stage and integration capability to reach its noise
floor potential (video rate imaging has its limits).  Thus the my
interest in the DSI Pro.

Thanks again for your excellent comments and great ideas - much
appreciated!

cheers,
Chris
And:
Chris,

The filter slider housing can be unscrewed from the DSI Pro body, but it
leaves you with no way of attaching the lens. All you are left with is
the DSI Pro flat underbody with the imaging chip cover slip exposed
through a 3/8" square window with neoprene seal in the underbody, and
the four screw holes.

If you could get the underbody from a standard DSI, you could change it
over for the DSI Pro underbody I think, as the top body and image sensor
position are the same, which would then allow you to reach focus, as a T
mount to camera lens adaptor would then fit directly. Filters would then
need to be fitted one at a time into T mount adaptor to achieve RGB
filtering. The IR filter for the standard DSI is a proprietary item that
fits within the T mount aperture.

This would mean a strip down of the DSI and camera lens each time to get
the R,G,B and L planes for any colour shot. the filter slider of course
is designed to avoid this.

It is a shame Meade did not make the filter slider housing a T thread
fitting both sides, to allow alternate filter cartridges to be fitted or
wide angle lenses to achieve easy focus.

Such is life.

Are you aware of the drizzle features of the DSI Pro? Using the maximum
settings and a field doubler, it is possible to get a seamless mozaic
image 45min x 34min, though I have to confess I have got this far yet,
but the UK distributor were singing the praises of the results they got
when testing the other week. You do end up with a 10MB image file for
each plane, so you need to shoot things as a single frame per color
plane and combine after the imaging session. It also requires a pretty
hefty PC spec.

Drizzle is explained in outline on the Meade website.

Regards

Stephen Bird
Return to the top of this page.
Go to the June-July 2005 DSI Page.
Go to the May 2005 DSI Page.
Go to the March-April 2005 DSI Page.
Go to the January-February 2005 DSI Page.
Go to the 2004 DSI Page.
Go back to the Astrophotography Page.
Go back to my ETX Home Page.