USING SETTING CIRCLES
Last updated: 17 February 2010
USING SETTING CIRCLES |
Introduction -
To newcomers to astronomy there is a certain "mystique" surrounding those numbered "dials" which come as standard equipment on a quality equatorial telescope. A telescope equipped with an equatorial mount is one which can be correctly "aimed" at celestial north (Figure 1) thereby allowing the easy tracking of celestial objects as the earth turns on its axis. Once so aligned, the telescope - through the motions of the equatorial mounting - is able to "keep up" with the object through just one slight motion compensating for the earth's rotation.
Believe it or not....faint objects in the sky CAN BE located without the use of a microprocessor and a hand paddle!
To allow an observer from anywhere in the world to access (without an AutoStar) an object that might be too faint to see with the naked eye, the sky is mapped much like the Earth's globe. On Earth, the sphere of our planet is marked through latitude and longitude and all permanent objects on its surface are mapped accoringly. To understand the coordinates of the sky - declination and right ascension - you must first understand how they correlate with these similar positional measurements on Earth.
Because they are so distant and do not appear to change, it has allowed astronomers over the centuries to catalog and accurately map the stars, the many clusters, galaxies and nebulae within them into catalogs and star atlas. So, this method of charting the sky into right ascension and declination allows us to map the celestial objects on the celestial sphere just like latitude and longitude on the sphere of our Earth have allowed us to geographically specify the location of each and every city, mountain, lake, and even HOUSE on the surface of our planet!
----------------------------
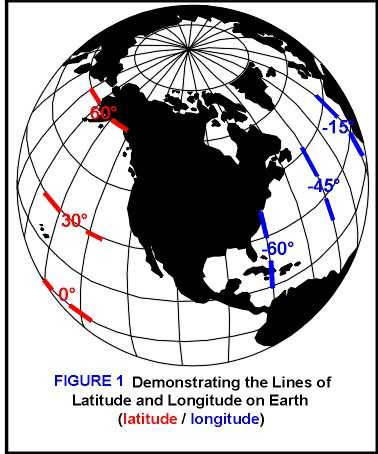
Latitude and "Declination" -
Latitude is the NORTH/SOUTH measurement of the earth, in degrees from the equator (0°) to the north pole (+90°) or to the south pole (-90°). As an example, the city of Arlington, Virginia is located from the equator toward the north pole at about Latitude +37°. By contrast, the southern hemisphere city of Melbourne, Australia is positioned from the equator to the SOUTH pole at about Latitude -37°. No matter east-to-west on earth, the measurement of latitude remains the same.

In the mapping of the sky, the equivalent (north-to-south) measurement of latitude is called "declination" and is measured - like on the earth's sphere - from the celestial equator (0°) north (positive degrees) and south (negative degrees). Thus, "Celestial North" is +90° while "Celestial South" measures -90°. If an imaginary line is drawn through the earth, extending through both the south pole and the north pole, this line would point in either direction to the "Celestial Poles," south and north, respectively. In the northern hemisphere, this imaginary line extends spaceward toward the relatively bright star POLARIS in the constellation of Ursa Major, and is used as a guide for aligning telescope equatorial mountings as described in "Kochab's Clock," Part 5 of the "ETX Enhancement Guide..." series on this web site. Unfortunately, no such bright star exists at or near the south celestial pole. No matter where you are on earth, from an east-west standpoint, the measurement of Latitude remains the same. "Figure 2" shows lines of declination - similar to "latitude" - in the sky in relation to the position and angle of the Earth.
Longtitude and "Right Ascension" -
On Earth the mapping of EAST/WEST direction is in degrees of Longitude. Arbitrarily beginning at the Royal Observatory in Greenwich, England (0° Longitude), longitude is measured eastward (positive degrees) and westward (negative degrees). At the International Date Line, both "meet" and equal a common 180°. For example Memphis, the southern city in the United States, is nearly one-quarter the way WESTWARD around the globe from Greenwich, at a latitude of -91°; going the other direction from Greenwich, the Russian city of Yartsavo is almost one-quarter EASTWARD, at +90°. As with east-west direction to measure latitude, it does not matter if you are north or south of the equator to measure longitude.
The measurement of east-west direction of the sky is markedly different than Longitude on Earth. Called Right Ascension in the celestial sphere, it is measured NOT in degrees, but in hours, minutes and seconds, just like a clock for good reason. Each hour of right ascension equals 15° of sky.
Our 24-hour clock is measured in solar time, the time it takes for the Earth to rotate one complete time on its axis, measured from midnight to midnight. Because it is measured relative to the sun, this is a very accurate and little-changing period of 24 hours. But - if measured relative to the stars, and not the sun, the Earth keeps different time - sidereal time. This is because, in addition to spinning on its axis the Earth is ALSO revolving around the sun, one complete trip every 365 days. This results in a very slight differences between star time (sidereal) and local time (solar) of about four (4) minutes each day.
In simple terms....since this is not a treatise on celestial mechanics.....a star that is EXACTLY OVERHEAD tonight at 10 p.m. local time will pass directly overhead tomorrow night at about 9:56 p.m., or four minutes earlier. In one month, that difference in sidereal vs solar time is a whopping two hours (30 days x 4 min/day = 120 minutes)! This "gain" results in different constellations and stars gradually rising earlier each successive night. Eventually, there will be different constellations seen at different seasons. But in the course of a lifetime....each season will ALWAYS show its own set of constellations!
-----------------------------
Apparent Motions of the Stars Throughout the Year - The Earth's Revolution: Our "Year" - Local Mean Time vs. "Star Time"
Because of the difference in sidereal time and local solar time, (resulting in all stars appearing to rise about 3 minutes 57 seconds earlier each successive night) you will note that the reference stars will change monthly as a result. This constitutes the Earth's "Year." Thus, your ideal reference stars are those identified as bright and visible, close to your desired object for that particular night you are observing.
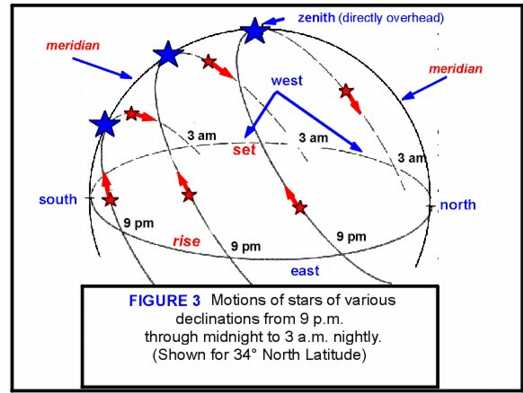
Apparent Motions of the Stars In One Night - The Earth's Rotation: Our "Day"
As the Earth turns on its axis in its 24-hour day, the stars appear to rotate from east-to-west throughout the course of every night. A star rising a 9 p.m. will - at midnight - be on the meridian, an imaginary line extending from the North Star, Polaris, directly overhead and continuing to the due south horizon (this is as high as ANY star of a particular declination will reach from your location); the same star will set at approximately 3 a.m. (See Figure 3
---------------------------
A Note About Star Motions and Using Setting Circles Through the Course of the Evening -
IT IS NOT ADVISABLE TO USE THE SAME REFERENCE STAR FOR SETTING CIRCLE ACCURACY THROUGHOUT THE NIGHT; as described following, always choose a reference star (particularly for setting circle and computer navigation) CLOSE TO THE OBJECT/AREA you wish to explore. This will increase your accuracy for telescope pointing via circles or computer (as well as assist you in quickly learning the many fascinating stars and constellations of the nighttime sky!). OR, you might choose to re-set the RA circle (as described following) and simply move from your present object's coordinates to those of the new object you wish to view!
---------------------------
PRESENTING YOUR ETX / LX SETTING CIRCLES!
POLAR ORIENTATION MODE AND THE USE OF SETTING CIRCLES
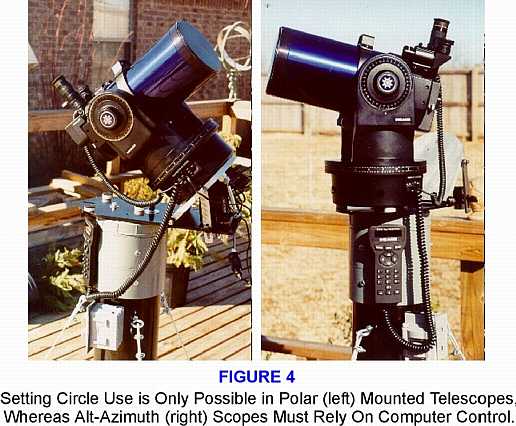
By now you have undoubtedly figured out that "Alt-Azimuth" celestial alignment (one of the wonderful options with AutoStar and the ETX / LX scopes) and using setting circles DON'T MIX. You must use "Polar Mode" ("SETUP / TELESCOPE / MOUNT / POLAR") and be tracking with the fork arms tilted to your latitude toward the NCP (see my "Enhancement Guide....", Part 3 and Part 5 for celestial Polar alignment and "home position").
Regardless of if you are a dyed-in-the-wool Polar user (as am I) or a devout Alt-Azimuth activist (as most of you), you STILL must understand how about celestial motions (my crash course above) and HOW to use those mysterious setting circles.
What, for example, would you DO if the batteries went dead? If you were at an observing party and the AutoStar fried? If there was a blackout in Los Angeles? Most of you would be dead-in-the-water as far as finding your ways around the sky....that's what! So at least let's study the basics of setting circle use!
The telescope has TWO types of setting circles (well, "three" if you include the telescope's computer LED), one for DECLINATION and the other for RIGHT ASCENSION. Remembering that "declination," like "latitude" NEVER changes from moment to moment, the DEC CIRCLE will always be fixed, reading sky angles that do not change (unless the setting circle has inadvertently been moved or jostled from a correct position [SEE "Enhancement Guide....Kochab's Clock," Part 5 on very accurate DEC CIRCLE adjustment setting]).
On the other hand the RIGHT ASCENSION (RA) CIRCLE moves its reading very slowly as the telescope moves to keep track of the objects it is centered on. It follows the TELESCOPE and not the pointer on the base! Therefore, EVERY TIME you change objects, you MUST reset your RA CIRCLE to find that object, as described following. That one step is the only difficult procedure (and it's not hard, if you remember to do it!) about using setting circles!
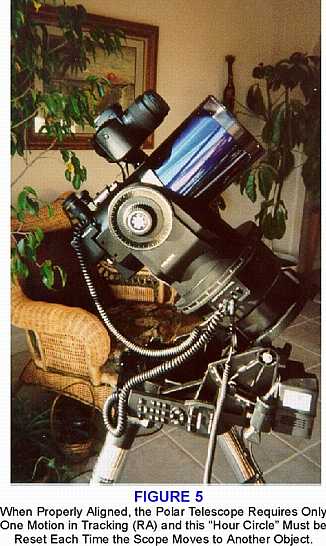
Figure 5 shows an ETX 125 that is aligned in Polar position and ready to go; in this setup, motions of the telescope can be maintained and objects found manually without any power whatsoever.
THE DECLINATION SETTING CIRCLE
Noting the description of declination from above, and that every reading will always be somewhere between "0" (celestial equator) and "90" (the North Celestial Pole) degrees or between "-0" and "-90" degrees (south of the celestial equator), once the circle is precisely set, it should give good readings throughout the night provided that you have properly leveled the telescope and set it up in a very good Polar alignment.

I routinely check my setting circle using the method described in the "ETX Enhancement Guide....." Part 5 each night before observing; to adequately assure good polar alignment on a portable telescope, you MUST check (and reset) the DEC circle at the beginning of each observing session anyway. It seems that no matter HOW firmly you secure the circle to a precise position, it is prone to slip from accidental motion or even against the inner part of the telescope as you move it!
Every object in the sky has a fixed "degree" of declination in the sky; the only variable is where YOU are to observe it (your latitude and longitude on Earth). A polar-aligned ETX or LX telescope that is properly set up will read your latitude exactly when the base is level and the Optical Tube Assembly is pointing "straight up" in the sky.
At this position, the scale on the DEC CIRCLE will read "[your latitude]" in degrees; now turning the telescope southward until you reach the CELESTIAL EQUATOR, you will notice that the numbers decrease until actually reading "0", the actual declination for the Celestial Equator. If you go the opposite direction and turn the telescope northward until the circle reads "90" degrees, you will then be pointing VERY close to the north star, Polaris.
No matter WHAT bright star you point your scope to and center, the DEC CIRCLE will read the exact (if you are aligned well) declination for that star as you can get either from AutoStar directories or from a good astro reference book. This is true no matter what time of night you access the star, nor what day (night) of the year. More about declination in a moment. Note in Figure 7 that the setting circle is set to the coordinates of the bright star Vega, or about +38 degrees.
RIGHT ASCENSION SETTING CIRCLE
The right ascension circle is not so easy to keep up with, for the reasons of star vs. earth motion described previously. We do not need to go into celestial mechanics here, but suffice it to say that the RA circle will continually have to be adjusted relative to the pointer EACH time you move the telescope to another object. As an example in this Guide, we are "starting" with a reference star, VEGA which is easy to find; we will be moving FROM Vega to a telescope-only visible object - MESSIER 57, the ring nebula nearby. The RA circle in Figure 7 is set to the right ascension of Vega: "18h 35m." If your clock drive is running, the pointer will NOT be pointing to "18 35" in a short while, but Vega will still be centered in your telescope; hence the need to re-set the circle each move.

This large circle moves freely (a bit too freely in my opinion) around the "turntable" of the Meade telescopes and care must be exercised when using the circle as it is only fastened into its circle via a small piece of fragile tape at one junction (see Figure 8). Rotate the circle to "dial in" your RA using two hands evenly spaced 180 degrees across the circle; once positioned, it stays very well, even though it may seem too loose to do so.
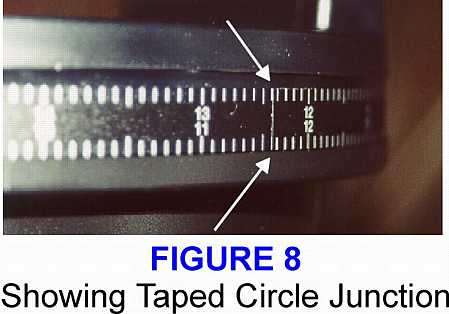
[MAINTENANCE TIP: Figure 8 shows the delicate junction of the RA setting circle "tape." This frequently comes unglued and if so, merely take the two cut ends and match carefully the increment marks to re-attach. ONE DROP of regular "model cement" or similar will re-attach the circle, as will a small piece of permanent "double stick" tape, but: 1) DO NOT apply so much glue or tape that it sticks to the surface of the scope "turntable" and prevents the circle from adjustment; and 2) NEVER get so tight as to prevent easy motion of it as you attempt to rotated the numbered strip.]
NOTE that there are two (2) sets of values on your ETX / LX setting circle; as you are looking from the base of the scope (with the numbers right-side-up) you will be using the TOP row of numbers if observing from the Northern Hemisphere and the BOTTOM set if from the Southern Hemisphere. In the north, the numbers INCREASE in RA the farther east you move your telescope.
The RA CIRCLE is marked in HOURS and increments of hours; just like a clock, RA has an "hour" that is subdivided into 60 "minutes" which in turn is divided into even smaller increments, "seconds", 60 of them. Your RA circle has major marks at each hour, and a lesser mark halfway between them (30' arc). Each very small mark in between represents a distance in angular measure of 5' arc.
An HOUR of right ascension is about 15 degree of sky, so it is a large increment; for simplicity, you can assume that if you have Vega centered at 10 p.m. and wait an hour with your motor turned off....there will be an object - not Vega - in your eyepiece ONE HOUR later that has an RA of just about 19h 55m and the exact declination as the bright star!
A TEST SEARCH FOR MESSIER 57
Using the circles is a very simple task and requires only to 1) properly align and level the telescope before starting; 2) remember to move the RA circle each time you proceed to another object after observing the current one.
1) FIND A REFERENCE STAR - A complete list of bright reference stars is included with maps on my "Alignment Star Charts" found on this web site under "Observational Guides;" merely select your star (find one close and within the season you are observing) and access the coordinates THROUGH AUTOSTAR: "Select / Object / Star / Named / [scroll to desired star and press enter, then scroll to RA and DEC]. For this "test" we use the bright summer star "Vega" at R.A. 18h 35m and DEC. + 38 degree 44'.
Always select a bright star NEAR the object you wish to find; look through reference guides and find any star that you can center in your finder/scope with a RA and DEC value very close to the object being sought.
2) With motors tracking, CENTER Vega (or whatever star) in the main telescope and lock on it. Immediately go check your DEC circle to see if it reads CLOSE to +38 degrees; if it is off a bit do not worry, just take whichever direction it may be off into consideration when moving the scope to the desired object.
3) Check in your eyepiece to make sure Vega is still centered and put in a LOW POWER EYEPIECE; now go to your RA circle and carefully (using the "upper numbers" if in the Northern Hemisphere) rotate the circle until your pointer shows the position in Figure 4, "18h 35m". REMEMBER as you look at the circle, the numbers INCREASE from 18h toward the LEFT; thus 18 35 is the first small mark TO THE LEFT past the half-way (30') major mark toward "19h".
4) Immediately after dialing in the coordinates in RA of this reference star, UNLOCK THE SCOPE polar axis and rotate until it turns to the RA reading of the hunted object: RA = 18h 53m (See Figure 9); clamp securely and immediately go to the DEC circle for adjustment. Your telescope will NOW be tracking at the correct RA for your selected object!
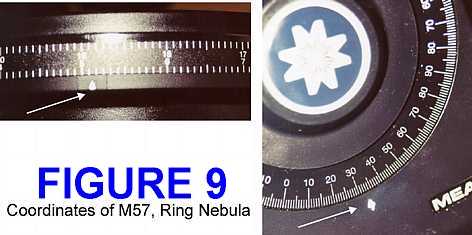
5) Unlock the DEC axis and slightly rotate the scope until the DEC circle reads "33" degrees which is close enough to get M-57 into the low-power field of view; lock the DEC axis and look into the eyepiece of the telescope; you should have the Ring Nebula very close to center! (note DEC circle in Figure 9).
----------------------------
You have done well, but the Ring Nebula is VERY CLOSE to Vega; to conclude, try the acid test: use Vega again as your "starting star" and let's use the setting circles to locate the "Whirlpool Galaxy," Messier 51 much farther away in Canes Venatici. Use the AutoStar to find the exact RA and DEC of M-51 and find it via Vega.
REMEMBER! Some time has gone by since you acquired M-57 with your circles, so the RA circle NO LONGER READS the RA of Vega! Use your flashlight and re-set the circle to the coordinate of your reference stareach time you prepare to move to the next object! You should, however, NOT have to reset the DEC reading at all.
You''ll be surprised how accurate you will be....how fun it is to access "by yourself," sans AutoStar....and just how much fun you can have if "the lights go out!"
P. Clay Sherrod / Arkansas Sky Observatory / Petit Jean Mountain, Arkansas
Return to the top of this page.
Go back to the Observational Guides & References page.
Go back to my ETX Home Page.