SHOWCASE PRODUCTS
Last updated: 25 June 2001
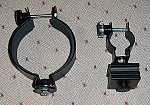 Don Spencer (ECDON@aol.com) adds: "Just wanted to drop you a note on the ETX-60 piggy back setup from www.scopetronix.com. The initial setup is pretty straight forward. You mount the camera to the piggy back mount, then slide, what basicly looks like a C clamp(it has a rubber strip to protect the OTA), down the OTA. My reccomendation is to slide it all the way to the forks. (note: make sure the dec locks are secure). You secure
  the adapter with a bolt and a screw down knob. Then, you mount the counter weights to whatever eye piece you are using. It is best that when you mount your camera, to mount it without the a lense and after you have slewed to the area or object to be photographed. I have tried mounting the camera after the 2 star alignment, then use the autostar to find my object, but it the weight of the camera and lense were too heavy for the motors and they would slip. I was able to take a 15 minute exposure of M13 without having to adjust the tracking, using my SLR and it's 45mm lense. I will try this setup using a 200mm telephoto lense, but am afraid the weight may be too much for the motors."
Piggyback astrophotography is a painless and rewarding experience, even for the novice amateur astronomer who has never attempt celestial photography. Using a camera simply mounted on a tripod is a good start to astrophotography: Comets are easily captured by the standard camera lens (50mm) with exposure of up to five (5) minutes without any noticeable star trailing because of the motion of the Earth as it is turning on its axis. However, with longer lenses (telephotos) and with longer exposures that may reveal finer detail in the same comet, or fainter stars and galaxies, the stars soon become trails of light as the Earth moves...and the camera remains still.
With the introduction of Meade's ETX series of telescopes a "natural" was born for piggyback photography. The husky little equatorial fork mount with its accurate right ascension electric drive made way for the perfect base on which to put a "driven camera."
Although the ETX 90 is certainly adequate for piggyback photography with standard 35mm Single Lens Reflex (SLR) cameras, large telephoto lenses and larger format cameras (such as the 2-1/4") may get a little heavy for the smaller telescope. A much more massive base is provided through the ETX 125, the 5" Maksutov of the same design, and for this telescope, SCOPETRONIX has designed and manufacturer an ideal mounting for piggyback astrophotography.
DOUBLES AS A TUBE COUNTERWEIGHT -
 But there's more to the Scopetronix piggyback mount....it ALSO doubles as a wonderful TUBE COUNTERWEIGHT set for the ETX! That's right - if you prefer CCD or prime focus mounted cameras on the "tail end" of the ETX, now your counter-balancing blues are over. Simply mount a set of any combination of the four (4) adequate weights provided as standard equipment (see photo on the right), and mount the piggyback ring toward the FRONT of your ETX, and balancing that heavy accessory is a breeze!
A threaded coupler nut allows the additional mode of this well-thought-out accessory; the hand bolt can accept any, or all of the four weights in combination to match the weight of a heavy eyepiece-end accessory; for heaviest objects, the ring is merely pushed forward (toward the corrector lens) for additional weight offset.
MOUNTING THE PIGGYBACK/COUNTERWEIGHT RING -
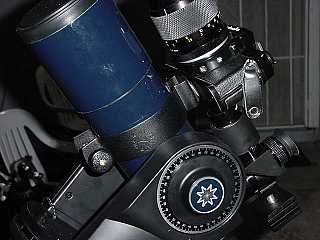
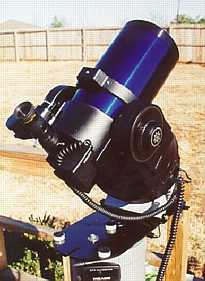 The Scopetronix piggyback/counterweight ring assembly mounts firmly and easily onto the optical tube assembly (OTA) of either the ETX 125 or ETX 90 (yes, they make one for each; ETX-90 model is $50) as seen in the photo
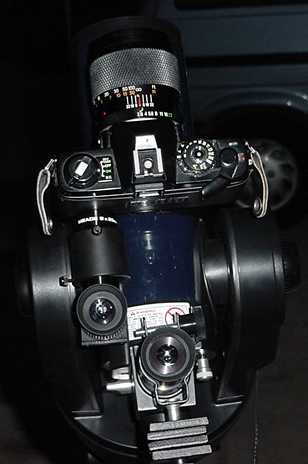
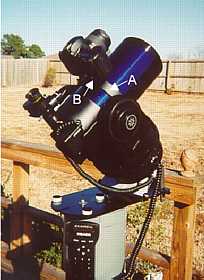 on the right; with the camera plate atop the tube assembly, the standard Meade finder is still accessible and the camera can be located far enough forward to prevent interference with the eyepiece (left photo).
The mounting ring and weights are well painted a semi-flat black, very closely matching the same finish of the ETX plastic mount and rear cell components; thus it looks as good as it works. I leave mine on all the time.
To mount the ring requires that it be completely loosened at first, as the finish-sensitive - but firm - foam lining is very tight when new. It slips over the far (lens) end and down all the way to rest snugly against the two fork arms, as seen in righthand photo. Once in place carefully tighten the easily-accessible thumb knob to secure in place.
WORD OF CAUTION! I suspected when looking at the generous room for adjustment on the locking knob that it might be possible to OVERTIGHTEN the clamp, and there is a tendency to do just that. I intentionally over-tightened one night and did a rigorous star test through the telescope when the seeing conditions were very steady. Sure enough, the torque could be easily detected through mechanical strain against the OTA; I backed off steadily until the out-of-focus star image appeared concentric and tested the piggyback ring for slipping and stability.
It was NOT loose; the firm grip held it tightly in place, but there was not flexure from the foam. Even when the locking knob seemed too loose, the ring held firm with a Canon camera attached.
ATTACHING THE CAMERA -
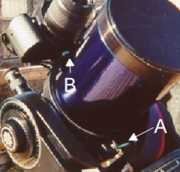 Putting the camera atop the piggyback plate can be quite tricky and not just at first. Since the ring fits closely against the OTA (seen easily in the photo on the right), there is little room to maneuver between the camera and OTA to cinch down the 1/4-20 tripod bolt into the camera. Three hands would have definitely helped.
However, this is not a flaw in my opinion, not by any means. The only alternative would have been to place the camera mounting plate HIGHER from the ring itself, making it unwieldy and prone to vibrations. Once the camera is attached, it will be there for a while, so it is not that big of an issue.
I found that - once the threading actually engaged into the 1/4-20 threads on the bottom of the camera - it was EASIER to rotate the camera to tighten into position than it was the hand knob. I tried this several times and using the camera to tighten is by far the best alternative, particularly in the dark.
USING THE WEIGHTS FOR PIGGYBACK MOUNTING -
When the camera is attached piggyback, you have the opposite weight distribution problem than I mentioned with the CCD or prime focus camera. Indeed, here, the weight is shifted to the FRONT of the short OTA, causing the ETX to be even MORE front heavy than it is factory-designed!
Scopetronix has easily remedied this weight offset with its same four (4) weights which again can be used in any combination (from one to all 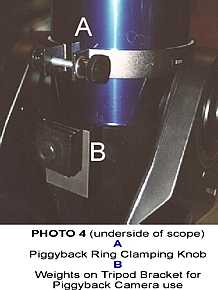 four) to achieve the desired weight offset. The weights and small hand knob (see photo on the left) are merely attached in whatever combination into the standard ETX tripod plate on the underside of the OTA; many novice observers do not even realize this camera tripod plate is even there! The hand bolt easily screws directly into EITHER of the two available 1/4-20 holes (use the front one if the weight is minimal and the rear hole if the weights alone are NOT enough weight).
To check balance, merely unclamp the DEC (Azimuth for ETX-EC) clamp and push the OTA back and forth in the fork arms. REMEMBER! the ETX, particularly the EC version, is designed to be slightly FRONT HEAVY, so do not totally balance the system. Allow the front to always be a little "loaded" in the fork arms.
When the camera is NOT in use, you must remember to detach the weight set to allow for proper balance in standard visual tracking.
A NOTE ABOUT BALANCING -
In piggyback photography a fork mount is much easier to balance than with a German equatorial. Scopetronix design and adaptability allows quick and easy balancing in both axes of rotation. As mentioned, first check your OTA in the forks (declination or altitude); if you are using in Alt-az mode, this is the only balancing you need to check. If on the other hand you are using the ETX in Polar mode, which I prefer particularly for long astrophotography, then you MUST assure that the RA (azimuth) axis is precisely balanced! Unlike the declination axis, you want good balance here, no "loading" in one direction or the other. Keep in mind that this balance of the RA axis will likely CHANGE as your telescope is pointed to different areas of the sky. It is very important, both for quality photos and for minimum abuse on the drive motor, to assure proper balance in right ascension.
-----------------
Is it a good addition to an ETX accessory case? You be the judge; the UNGUIDED photograph of the Pleiades lasted 20 minutes and three cups of coffee while my heavy Canon camera and 200mm rode atop my ETX 125 and the Scopetronix piggyback/counterweight combo. It may score points with you, but to me it's a KNOCKOUT!
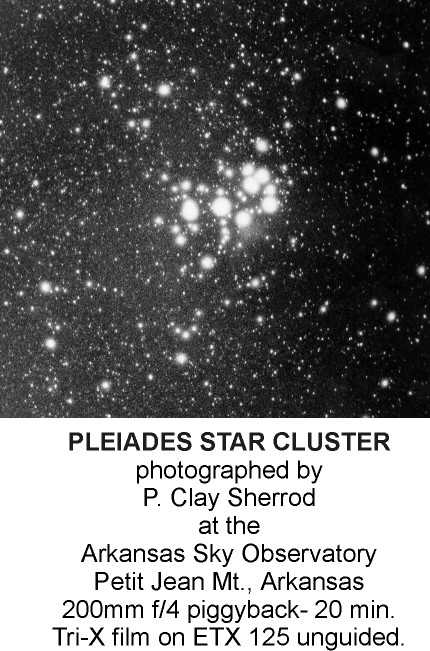
In the beginning, I was curious to see just what variations on what has become a common theme a company like Scopetronix - known for its clever innovations, particularly for the ETX - could produce in something like a piggyback ring. Well, they showed me....combining the wonderful ease of a "full-service" piggyback mount with a wonderfully-versatile tube counterweight set for ANY application convinced me....
....Scopetronix is always one step ahead of the competition when it comes to ETX innovation!
P. Clay Sherrod
Arkansas Sky Observatory
Conway / Petit Jean Mountain
Arkansas