Last updated: 23 September 2004
|
Last updated: 23 September 2004 |
Sent: Thursday, September 23, 2004 01:00:27 From: Brian Nolan & Sue Lacey (briansue@netspace.net.au) First of all, thanks for your fabulous web site. It makes an enormous difference. Without Weasner.com the ETX would be more of an annoying toy than an amazing tool for amateur astronomers. Certainly it tipped the scales in favour of my purchasing the 105. When I first heard of starmap-printed dew shields I thought they were merely decorative, or just plain gimmicky. Then I read a review on Cloudy Nights and I began to wonder if I was missing something. A common criticism of GOTO scopes is that they discourage newcomers from learning the night sky. Certainly, my ability to recognise constellations could stand to be improved. Having a star map conveniently accessible would probably help a lot. Also, it would be nice to have an instant guide to tell me which stars are ideally placed for aligning the Autostar, or for performing a SYNC prior to GOTOing to some nearby DSO. (Dare I say it? Sky Atlas can be a bit unwieldy sometimes, and occasionally I simply cannot be bothered printing out a star chart!) Obviously your readers have access to computers. Probably most of them have some sort of star charting software, and no doubt quite a few own some kind of image manipulation program as well. (In my case, that's SkyChart III and Photoshop, but probably any would do.) These things were all I needed to make a transparent star-map "skin" for my home-made dew shield. In SkyChart, trial and error led me to nominate a fictional location at 0 degrees latitude and 0 degrees longitude. Turn off the horizon mask, set projection to mercator and co-ordinates to equatorial, and make sure the "draw object labels" and "draw planets" options are turned off. (SkyChart also allows you to choose several other elements you might want to include, such as grid lines and the ecliptic, and to specify their colour.) Now save the image as a PDF file when pretending to print it (in landscape orientation), then open the PDF file in Photoshop. In Photoshop I trimmed things to suit my latitude (42 degrees south), flipped it horizontally, then I labelled a few DSOs, stars, and the constellations. (Make sure to flip horizontaly BEFORE labelling any objects.) Then I resized things to fit the dew shield's length and circumference, flipped the images horizontally again, and then printed them onto a couple of A4 inkjet transparencies. (Flipping the images horizontally a second time means that you end up with a mirror-image sky map on the printed side of the transparency. This allows you to place the printed surface face down against the dewshield, which means the ink is "sandwiched" between the dew shield and the transparency, and thus protected from friction and moisture. I think people will see what I mean if they look closely at the "mirror-image" of Scorpius on the computer screen in the photo.)Some careful trimming with a knife or rotary cutter, a few well-placed strips of double-sided adhesive tape, and voila! A bit fiddly, perhaps, but nothing too fancy (or expensive), and I suspect that anyone who's interested could replicate this with other commonly available programs (perhaps even more easily). The photos show you all the materials I used, as well as the end result. The dew shield occupies practically no space at all, since it retracts all the way down to the fork arms, in which position the dew shield no longer protrudes past the corrector plate (admittedly, I had to re-position my red dot finder). 
Of course, this one is just a prototype. When the ink cartridge finally runs out, I'll refill it with white ink and print myself a white starmap. Then I'll make a dew shield out of some darker plastic. (Probably I'll choose a particular shade of blue...) But in the meantime, this one fills the bill nicely. More to the point, I find that I actually use it, rotating it slightly every hour to match it up with the stars overhead. (It is much more intuitive, informative, and easy to use than your average planisphere.) As a consequence, I'm getting much better at identifying constellations. Also, optimal alignment stars are instantly obvious. A glance tells me the names of the DSOs that are currently viewable, and choosing the best stars to SYNC on is a cinch. 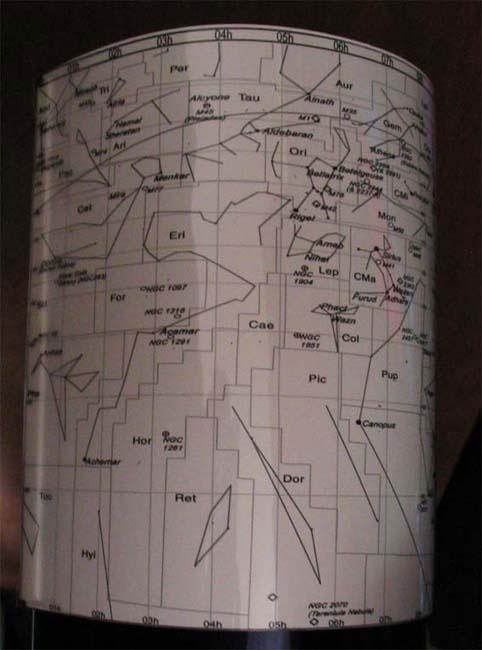
In summary, like all good accessories, this one allows me to locate more quickly the objects that I want to view, so that I can spend more of my time simply marvelling at them through the eyepiece. (Hell, I might even make a bigger one for my dob!) Maybe other ETXers would be interested in this fairly simple and inexpensive project. Either way, keep up the good work. (I'm off to design myself a moon map...) All the best. And cheers from Hobart, Tasmania. Regards, Brian Nolan. 
Return to the top of this page.
Go back to the Tech Tips page.
Go back to the ETX Home Page.