Last updated: 12 August 2005
|
Last updated: 12 August 2005 |
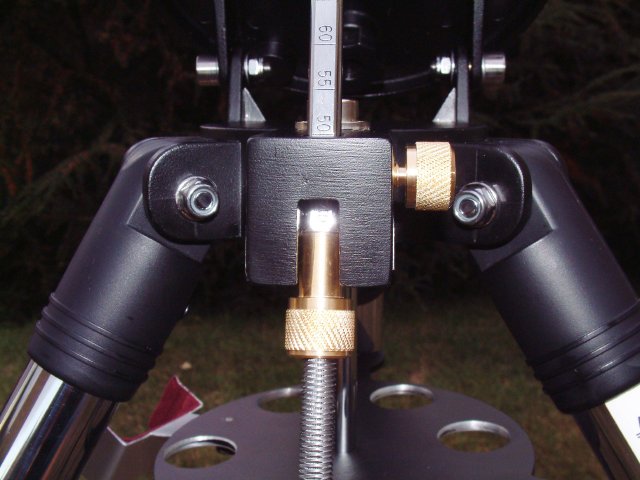
Sent: Thursday, August 11, 2005 05:04:54 From: Terry Godfrey (terry.godfrey@materials.oxford.ac.uk) I have owned an ETX125 supplied with the 884 tripod for a couple of years and have always been disappointed with the tripod due to excessive play in the tilting plate axis, excessive play in the latitude adjusting bar clamp and the lack of fine tuning when setting HOME in Polar mode. I recently dismantled the tripod into its component parts and saw ways to improve all these faults - things that Meade could and should have done at the manufacturing stage. The remedies outlined below should only be considered by ETX owners who have access to a metal working lathe and an electric pillar drill. Do not be tempted to drill holes with a hand-held drill! The Tilt Stage Axis: Meade relies on passing an M8 screw (8mm metric thread which actually has an outside diameter of typically 7.8mm) through oversize clearance holes (typically 8.5mm diameter)in the Tilt plate and Base plate of the tripod. It is hardly surprising that the tilt axis is sloppy. Tightening the self locking nuts is not the answer as this will not prevent axial slop BUT will increase wear on the relatively soft aluminium alloy plates. Also having the sharp screw threads rubbing on the plates' mounting holes is also poor design. Solution: 1)I enlarged the holes in the Tilt and Base plates to 11.0mm diameter. NOTE: It is essential to firmly clamp the component, making sure the hole to be enlarged is perfectly at right-angles and CENTRED on the drill. I would recommend running the drill at high speed and using intermediate sized drills i.e. 9.5 and 10.5mm rather than drilling out in one bite. 2) I discarded the 25mm long M8 set screws supplied by Meade in favour of 25mm M8 bolts with a smooth shank of 15mm length and a threaded portion of 10mm length which is all that is needed to secure the components. I re-used the Meade washers and self locking nuts. 3) I machined a couple of brass sleeves 12mm long (one for each bolt) such that the outside diameter was a smooth sliding fit in the new holes of the tilt and base plates and the inner diameter was a similar sliding fit over the smooth shank of the bolts. 4) When the Tilt Stage is reassembled (a little grease should coat the sleeves' surfaces) , the result is silky smooth with no axial slop. The self locking nuts should be tightened sufficiently to prevent end float of the bolts and NOT rub on the plates. The Latitude Clamp bar: When dismantling the tripod components I was staggered to find that Meade had wrapped Sellotape around the clamp bar to "improve" the fit in the tripod base plate. With the Sellotape removed and the clamp bar reassembled in the tripod base, there was unacceptable movement of the latitude bar with the Clamp bar fully tightened (hence Meade's solution with the Sellotape!). Solution: I had no choice but to machine a new Clamp bar with an external diameter to produce a sliding fit in the tripod base (after first cleaning paint out of the holes!). Fine Tuning Latitude Adjustment for Polar mode (see photograph): Even if your 884 Tripod does not suffer from any of the defects that mine used to, being able to fine tune your local latitude when setting HOME in Polar mode is easily attained with a modification so simple I don't know why Meade hasn't already incorporated it (perhaps they have - my tripod is 2 years old).1) Remove the Latitude bar from the tripod by first unscrewing the cross bar at the upper end that supports the scope in Alt-Azimuth setup and then slacken the clamp bar. 2) The diameter of Meade's Latitude bar is just right for cutting an M10 thread (metric thread 10mm diameter) on the lower portion. It is not necessary to thread the entire length of the Latitude bar - just sufficient for your observing latitudes. The design of the Set knob (see below) allows for you to see your local latitude as engraved by Meade on the bar. This allows for a speedy but rough setting. For example: my latitude is approx. 50 and the threaded portion extends to approximately 35. 3) A Set knob is machined for the Latitude bar. I chose a diameter of 20mm by 20mm tall internally threaded M10 and extended the top for a further 20mm with an outside diameter of 14mm chamfered at the top face. The inside diameter of this section being 10.5mm (i.e clearance - not threaded). When setting HOME in Polar mode, it is not necessary to clamp the Latitude bar - the weight of the scope will ensure a positive contact with the Set knob allowing fine alterations to be made. When adjustments are complete, lock the Altitude bar with the Clamp bar. Regards Terry Godfrey Oxford, UK 
Return to the top of this page.
Go back to the Tech Tips page.
Go back to the ETX Home Page.