Last updated: 16 January 2010
|
Last updated: 16 January 2010 |
Subject:	MEADE #825 VIEWFINDER CROSSHAIRS - REPAIR REPORT
Sent:	Friday, January 15, 2010 23:43:59
From:	Rodger Jones (rodger@cyber-jones.com)
I damaged the cross hairs in my Meade 8x25 finder scope a couple years
ago trying to clean it.

Doh!
Now that I have a reflex sight, I thought I would "go for broke" and try
to repair the finder myself as I have not been able to find a
replacement.

I found the article from Nohr Tillman on your site (below). It was VERY
helpful. You prevented my "exloratory surgery" from becoming a mess. I
thought I would pass on another source for very thin wire: Headphones. I
knew that speakers used very thin coil wire and I assumed headphone wire
would be even thinner. I had some old headphones...freebies from an
airline flight..and broke open one side, removed the magnet and found a
coil of wire. From what I can tell, looking under a magnifier, the wire
is actually *thinner* than the original cross hair wire. I presume wire
thickness would vary from headphone set to set headphone.

Thanks again for maintaining this site and posting these great articles.
Thanks to Nohr for passing on the technique.

Rodger Jones
Tomball, Texas, USA
Mike here: I recently replaced the crosshairs on my Meade 8x50 finderscope that is on my 8" LX200-ACF. You can read my report and what I used for crosshairs on my Cassiopeia Observatory web site.
Sent:	Tuesday, April 14, 2009 16:39:06
From:	Nohr Tillman (ntillm01@yahoo.com)
Summary: My attempt at a fix to the #825 right angle viewfinder
crosshairs, damaged while cleaning the old glue off the helicoid focuser
to epoxy it back together.

Preface: This might help some folks who A) still use an optical
finderscope and B) have been unfortunate to have theirs come apart for
any reason.. It seemed a shame to throw the rest of the optics away and
get another just because the crosshair ring got damaged so I thought it
worth the repair attempt. I would assess that this job requires
precision tools, strong light and the skill and patience to tie fishing
flys. Otherwise, one is just going to get frustrated.

Crosshairs for the #825 viewfinder are fine wires stretched across a
ring and glued in place. As such, any touch with anything will knock
them un-straight. Straightening the originals is futile, so replacement
is required. Since the helicoid mechanism is detached from the mirror
housing (it fell apart right?), the ring that used to hold the crosshair
wires can be unscrewed and removed. I used a hobby knife to clean out
the groove where the wires were glued, then cleaned it up with isopropyl
or denatured alcohol.

Replacement wire was single strands of electrical wire from a
sacrificial battery compartment wire (not the ETX, but very similar).
The trick to obtaining a straight line with the wires is tension until
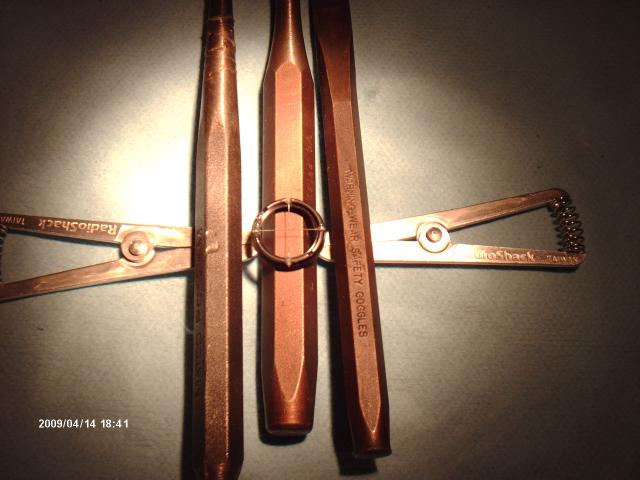
you glue them in place. I had hobby-store electronic soldering heat-sink
clamps that held the wire well, and weighted them down with common drift
punches. Once everything was stable and in place, it was time for glue.
A two-part, household 6-minute set epoxy was used in this experiment,
and seems to hold well. (I "practiced" redoing each about five times to
get the technique right.) Only one axis at a time can be done with my
economy setup. I let the whole thing rest for a few hours before
trimming the excess wire off with a hobby knife at the threads of the
ring. The picture shows the fifth (and last, I hope) attempt just after
gluing.

I'll guarantee I'm not the first to have strung wires for crosshairs,
but thought the setup might be fun to share. (How whacked am I for
trying this at home?)

Nohr Tillman
Troy, MI, USA, Earth

And:
From:	P. Clay Sherrod (drclay@tcworks.net)
Thanks for sending.....
I have a couple of comments:
1) The wires that you used....are they obviously larger than the
original cross-hairs that were in the finder?   Most folks find that
replacing the crosshairs typically leads to a lack of material to
provide fine enough hairs to make the crosshairs not take up a great
part of the finder field.

2) Your comment about those who still use an optical finderscope:  by
all means, I consider the BEST finder a small optical finder.  There is
simply no substitute:  not the LNT, not a red dot, no TelRad or any
fancy gadget.  A finder is just that:  a scope to find things to center
it up in the telescope.

I am glad that you took the time to repair yours and get it right.
Congrats and thanks for sharing.

Dr. Clay
_____
Arkansas Sky Observatories
MPC H45 - Petit Jean Mountain South
MPC H41 - Petit Jean Mountain
MPC H43 - Conway West
http://www.arksky.org/
And:
Thanks for your much appreciated comments.

The wires I chose, were the best I could think of at the time. It seemed
like the small-gage electronic stranded wire (22ga?) would be an
appropriate size. I had trashed the original wires so bad, it was hard
to tell if they were significantly bigger. One difference that makes
them appear larger is the color. Originals were bare copper, these are
tinned with solder I think, making them silver.

In hind-sight, the wire of the windings of a very small electric motor
might be better. I didn't have one of those laying around or I would
have tried that instead. I still may have to if these turn out to be too
large in the field of view. It just made sense to try this first before
getting a new one (with dried out glue that also could fall apart...)

I've felt the original crosshairs could be finer, but I've always
adjusted these to put the point-source of light in one of the quadrants,
instead of right on the cross. This usually got me in the 9mm
illuminated recticle eyepiece FOV (the one I use for initial set-up and
align). In all fairness, the original crosshair wires covered up stars
and planets anyway.

RE Optical finderscope: Glad I'm not alone in my belief in the optical
finders. Looking at all the newer scopes, it seemed like the electronic
laser-pointer-red-dot-thingys were the thing to have. I felt a bit
outdated using just a right angle crosshair instrument. But for me, it's
perfect: the orientation is the same as with the eyepiece view for the
ETX, when you push the button to go right its FOV moves right (I have
the L-R controller buttons flipped) just like the eyepiece FOV, and it's
right next to the eyepiece so it's a simple thing to switch between the
two. In short, it's a low-power ETX to get the view in the ballpark,
exactly what's required.

Ok, so I've made a sales pitch... I'll let you know the final result
when I get the assembly glued back together. I have an un-molested #825
on the ETX-90 that I can do a side-by-side with. And Michigan gets three
clear nights this week!!!

Nohr Tillman
And:
A "long time ago" when I started in astronomy it was still common
practice, and somewhat revered in tradition, to use nothing but silk
spider webs for crosshairs....incredibly thin and very uniform.  Since a
spider's web is essentially a cylinder, rather than a flat surface, it
is much easier for the eye to fix on the crosshair as well as the
distant object focused beyond....hence the reason that all of the top
gun sights (Mike is the expert here....) in aircraft and artillery used
to require a spider thread only for the precise crosshair.

Once laser engraving came into its own and demonstrated far greater
accuracy, precision and particularly permanence, engraved sight optical
disks were inserted into the optical path of sighting scopes, replacing
the old standard.

In addition, some industries became quite proficient at stretching glue
or resin/sap into a fine linear string across a reticle ring and
attaching to the other side, simulating the thinness and precise
thickness of a spider strand.

Dr. Clay
Mike here: I remember a riflescope we had when I was a kid. It had a spider web thread. I believe the gunsight in my A-7D jet fighter (circa 1970s) was etched into the glass.
And an update:
Ok, the 22 gage single strand of wire didn't work out so well. Comparing
with the OEM finder, the size was a bit bigger, close but... The focus
on the crosshair wires was not good. Couldn't get the ring just right in
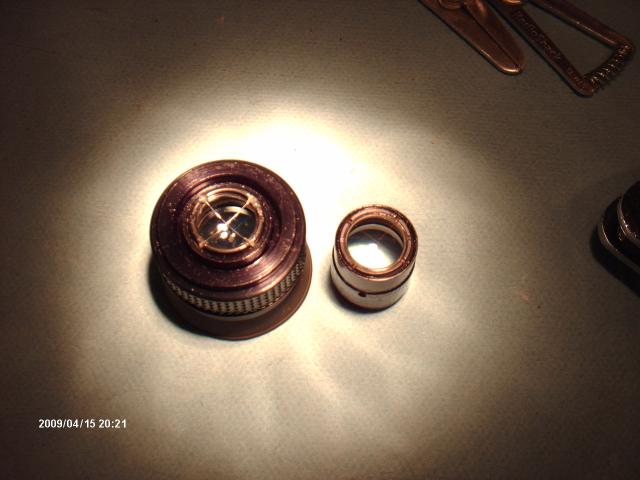
it's threads to get them sharp. So I pulled apart the OEM one to
compare... OEM is on the right in the pic.

It looks like very fine copper wire from small motor windings I've seen
before (like the old slot-car motor, which I still have a couple of).
There's got to be a light diffraction formula that I'm missing because
Meade assembly line techniques can't luck out enough to get wire to
focus this good.

I like the spider silk idea, and I have plenty here. I would love to
brag about having a "top gun" sight mounted on the ETX! I also looked
around at the stray dog hair I have floating around...hmmm. Might even
sacrifice one of my own hairs to experiment. Maybe the slot car motor
spare to sacrifice next. Sure have learned a lot about this $45 finder
and its construction in all of this. Boy do "they" like greasing the
heck out of everything!

More to come, thanks for playing!

Nohr Tillman
Troy, MI, USA, Earth

And the "final" word:
Final results in this saga. Think I've landed on the best solution I can
come up with. Be sure to wear safety goggles ;-)

The single strand of electronic wire (0.0062 inch dia) did end up being
too large. There are tiny grooves in the ring where the crosshair is
glued and the wire was not seating completely. Thus my crosshair focus
problem. Next I tried motor-winding wire, or magnet wire (0.0045 inch
dia), from an old slot car I had. I'm thinking small electronics
transformer wire would work as well. This was fine enough to seat in the
groove, but still seemed too large.

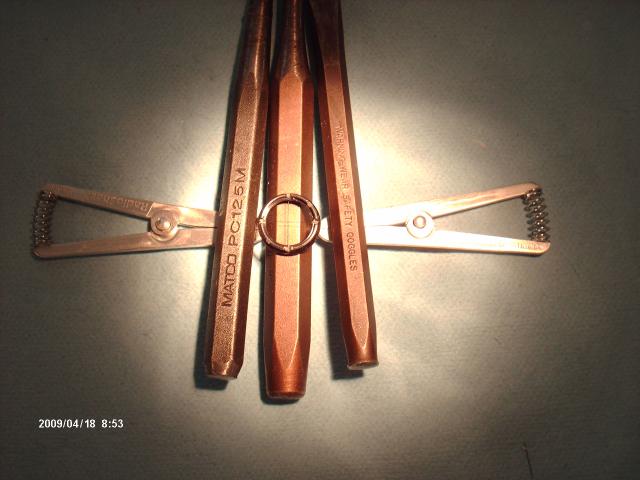
The last material I had on hand to make crosshairs was, well, hair. The
thinnest strands of hair from a camel-hair detailing brush were used in
the photo attached. Here, tension is applied with the heat-sink clamps,
then epoxy applied carefully with a toothpick, which I've gotten much
practice doing. I did one and tested in the eyepiece cell first to
comfirm it was good. Only slightly bigger than what Meade installs, and
close enough.

For anyone wanting to re-glue their #825 eyepiece, and to avoid damaging
the reticle crosshairs in the first place, I offer this advice: remove
the moving lens "cell" from the helicoid mechanism. Take off the rubber
eyecup, then work the rubber focus grip from the rotating ring. This
will expose the circular ramp, and the retaining screw that moves the
lens cell. Once removed, you are left with just the rotating ring
assembly which can now be degreased and cleaned for re-assembly.

Once cleaned up, reassemble the lens cell into the focusing ring before
gluing back on the finder scope. This allows proper alignment of the
crosshairs during assembly.

Nohr Tillman
Troy, MI, USA, Earth

And more:
I finally claim success on fixing the Meade #825 finderscope. I
re-summarized our correspondance to save you some editing, Mike (I
hope).

My Meade #825 findersope eyepiece had come apart from the right angle
mirror housing. First attempt to clean for regluing resulted in snagging
the crosshairs, making them not usable. Removing the moving eyepiece
"cell" from the focusing mechanism was the most helpful from here on out
and recommended before any cleaning operation: Removing the eyecup, then
the rubber grip ring will reveal a slider screw which runs on a ramp to
perform the focus motion. Removing the screw with a small screwdriver
will free the cell.

Once the cell is out, the crosshair ring can be removed from the cell
(using whichever spanner tools you are comfortable with) and cleaned
with a hobby knife. Experiments resulted in: A) single strand of 24 ga
wire -0.0062 inch dia- too thick to seat in the grooves B) single strand
of 37 ga motor/magnet winding wire -0.0045 inch dia- will seat in the
grooves, but still bigger than OEM, and C) thinnest strand of camel-hair
detail brush was very close to OEM and the final material. Sorry, didn't
have any Brown Recluse silk threads at hand.

Pictures show the final re-assembly of the cross hair. Two soldering-aid
heat-sink clamps were used to handle and stretch the hairs in place.
Common mechanics punches were used to weight the clamps (be sure to use
safety goggles). While tensioned, a two-part 6-minute set epoxy was
mixed and applied carefully with a toothpick. Overnight curing time was
allowed before handling.

The assembly was cleaned and screwed back together. The focusing
mechanism was glued back on the mirror assembly and the axis aligned
before the epoxy set firm. Resulting through-the-lens picture with a HP
Photosmart camera is attached. I think the effort was worth saving the
finderscope.

Nohr Tillman
Troy, MI, USA, Earth
Go back to the Tech Tips page.
Go back to the ETX Home Page.