Sent:	Monday, October 19, 2009 01:56:07
From:	infoforplt (infoforplt@comcast.net)
Thanks for the great website.  A little history of my experience here is
necessary. I purchased an ETX 125EC used in early 2008. I spent the
Spring and Summer of 2008 familiarizing myself with the scope. I had
common problems that others had experienced and I was able to work
through them with information gleaned mostly from your website and a few
other sites. I overall had very few problems and had wonderful viewing
experiences. I live in Southern Minnesota (USA) and my scope had been
packed away pretty much since November 2008. I first took it out again
in April of this year. Well, the first night out I went through a reset,
calibrate motors, and train drives and then performed an Easy Align. I
slewed to the Moon and it tracked for a minute and then I heard a loud
pop and tracking in Azimuth was gone. The RA drive had failed. I
initially contacted Dr. Clay and he was unable to help as Meade didn't
stock or provide repair service for this model any more and he had no
parts available either. I contacted Meade and their response was (of
course) upgrade to a newer model ETX. I was considering saving some
money to purchase an LXD75 mount to replace the ETX fork mount. Well,
times being as they are I was unable to come up with enough money. After
spending the summer without my scope and missing many beautiful nights
of viewing the stars, I came up with a plan to repair the gearbox
assembly.

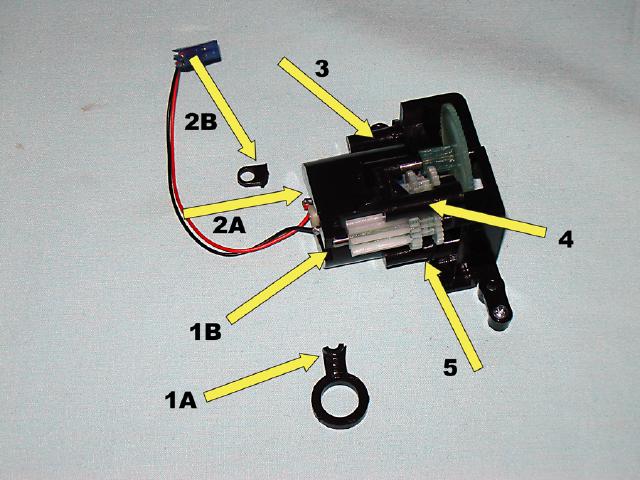
I have included a few photos that include the broken gearbox:


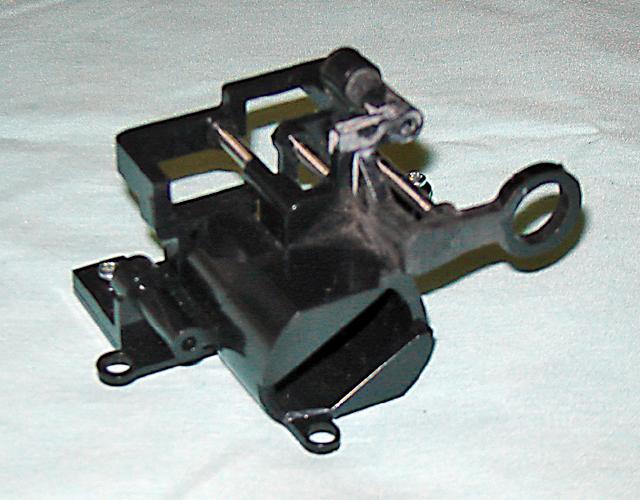
the partially repaired gearbox:


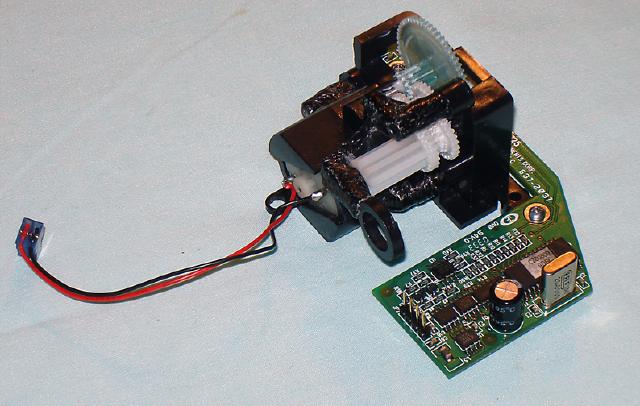
and the fully repaired gearbox ready for reinstallation into the base:


I've kept good notes with more photos of the supplies used and will at a
later date document the full procedure of the repair, though this is not
a repair for the faint of heart. I will try here to briefly describe
what I have done. I estimate cost of supplies at about $100.

I first used plastic pipe cement that I purchased from a local hardware
store to reattach the transfer gear support arm and mounting tab
(ETX125_01.jpg, arrows 1 & 2). I used a type that is good for ABS, PVC,
and CPVC plastic as I figured that the gearbox was made out of ABS. ABS
is commonly use for small plastic parts such as this. Turns out I must
have been right as ETX125_02.jpg shows the gearbox after the initial
repair. These repaired joints are very strong and I was tempted to test
it but I went a step further.

I then used carbon fiber woven cloth (and strand in a couple of areas)
and West System Epoxy to reinforce the support arm and also to reinforce
the gearbox cover screw supports as these had severe cracks in them.
These are numbered 3, 4, & 5 in photo ETX125_01.jpg. I couldn't come up
with a practical solution for reinforcing the mounting tab and if it
fails again I will fashion an L bracket to replace it with. The carbon
fiber I used was from a sample pack that I purchased online through a
company called Fibre Glast. The West System epoxy is commonly used in
marine craft fabrication/repair and is widely available.

ETX125_03.jpg shows the repaired gearbox ready for reinstallation. I
removed the circuit board prior to installation, as it is easier to
install the gearbox without it attached. I had to remove it again later
as I had applied too much Lithium grease, which had spattered about
after initial testing. I tested the scope indoors performing reset,
calibrate motors, and test tracking. After some necessary readjustment,
etc., which I will document in more detail later, I was ready for
outdoors testing.

I went out about 1:30am CST, Sunday morning here in Southern Minnesota.
I was greeted during setup with a couple of meteors from the approaching
Orionid meteor shower. I performed an extensive Train Drives starting
with my 26mm eyepiece, stepping down to 20mm, 15mm, 12.4mm, and 9.7mm. I
then performed an Easy Align.

I am very happy to report that the repairs appear to have been
successful. I spent about 2hr running through the Guided Tour  (twice
for several of my favorites) of the Autostar without a hitch or error of
any kind. Tracking was excellent once an object was centered in the
eyepiece. Several times I let the ETX track and walked away for 5  10min
and when I came back the object was still centered in the eyepiece. I
also noticed that the growling, that used to be quite evident before the
failure when the RA drive was tracking, is greatly reduced. I will
perform more extensive tests if the skies stay clear this week, allowing
the scope to track for 15min and longer on a single object.

To sum it up, I think the repairs should hold up well. Only time will
tell. The carbon fiber reinforced areas of the gearbox will be stronger
than how it was initially molded. How the stresses will be transferred
to other areas of the gearbox I don't know. If I had to hazard a guess,
I would think the mounting tab or the support arm loop for the transfer
gear would fail first. The flexing in the support arm that caused the
initial failure is virtually nonexistent with the carbon fiber
reinforcement. I am hoping the repairs will hold at least another year
until I can save up for a new scope, after which I will use the ETX
primarily for terrestrial photography. After pricing the LXD75 mount,
tube rings, Sky Assurance, and other accessories necessary to mount the
ETX tube, I have decided to keep saving until I can purchase a new LXD75
SC8 full setup.

I'm hoping you'll post this on your site. It may also give others who
have had this failure something to think about before giving up on their
ETX 125EC. I have also sent a copy of this to Dr. Clay. Thanks for a
wonderful website. I peruse here from time to time and it has been fun
reading about your journey to Cassiopeia Observatory. Your website has
been an invaluable source of information about how to get the most out
of my ETX. Thank you.

Yours truly,
Paul Torgusen
Subject: Re: ETX 125EC RA Drive Repair ![[NEW!]](../../images/new.gif) Sent: Wednesday, October 28, 2009 20:44:38
From: infoforplt (infoforplt@comcast.net)
We finally had clear skies in Southern Minnesota, USA on Monday,
10/26/09. The humidity was quite high so the best views were within an
arc from the Zenith to about 30 35 degrees towards the horizon all
around the Zenith. The Jupiter First Quarter Moon pairing was nice,
although Jupiter's clouds didn't resolve very well at high power due to
the humidity. My 20yr old daughter and me had a great time for about an
hour and a half. It was a little after 9pm when I got setup and we had
fun checking out the Moon and Jupiter for quite a while and then we
buzzed around the Tour for a bit. Towards the end her boyfriend showed
up and we went back (or should I say forward through the Tour) to the
Moon and we had a lot of fun with different filters. I really like the
Meade 40mm Super Plossl for the Moon. It's also great for the Double
Cluster. Not quite wide enough for the Pleiades though.
About the ETX. I'm really satisfied with the repair. When tracking an
object it was so quiet that I had to put my ear to the base to hear the
RA Drive running. Last year I had grown accustomed to the growling in
the base and thought it was normal. Now I think I know what normal
should sound like. Tracking is excellent. The little skip every so
often along the Azimuth that was also the norm is completely gone. No
motor faults. I can't stress enough the importance of Training Drives
though. I didn't train drives this night as it was just over a week ago
since I had done it. I didn't do an extended tracking test this night
either. On this night, with my daughter there, it was more about the
time together and the fascination for the Universe we both share. We
viewed the Moon for at least 10 minutes twice and it remained centered
in the 40mm just fine. This was only the 2nd night out with the
repaired scope and I'll update again after I get a several hours
straight use. So far this month of October has been the cloudiest here
since the early 1970s and we appear to be on the verge of setting an
all time record. At least for Minnesota known recorded weather data.
Some additional comments about the 2nd remounting of the gearbox
assembly that I think are important. Remember, I had to remove the
gearbox to degrease a little. It took a bit of adjusting until the
gearbox 'settled' into position. This involved getting the support arm
hole adjusted properly along the plastic transfer gear shaft. During
remounting I left out the screws that attach the gearbox housing to the
base purposely until I had the transfer gear secured firmly (but I
didn't totally tighten the cap screw yet) to the worm gear shaft. Then
it took a little careful nudging of the support arm hole, along the
shaft of the transfer gear, until all the mounting holes on the gearbox
settled over their respective holes. I put the base screws in loosely
and then tightened the cap screw on the transfer gear until very tight.
This came loose a few times on me in 2008 and the gear would just spin
on the worm gear shaft. I used some LocTite on the cap screw this time
(I actually had to spread it on the internal threads of the worm gear
shaft) so hopefully that won't happen again, although I'll check it
from time to time. I also lightly scuffed the worm gear shaft with some
80grit automotive sandpaper in a direction parallel to the shaft. This
should reduce the possibility of transfer gear slippage (anybody
remember the advantage of a keyed gear shaft?). Then I double-checked
the support arm to make sure it wasn't binding on the transfer gear
shaft. I don't have a torque wrench so when I tightened the base screws
I brought them down until they made contact with the tabs and then
tightened them just enough so that they didn't flex the plastic tabs.
The rubber supports were just snug. The assembly doesn't rock and, when
the drive slews the support arm doesn't flex that I can notice. I
attribute the lack of support arm flexure to the carbon fiber
reinforcement. Wonderful stuff that carbon fiber.
I hope to have the project documentation published sometime later this
fall.
Clear skies all
Paul Torgusen
Sent: Wednesday, October 28, 2009 20:44:38
From: infoforplt (infoforplt@comcast.net)
We finally had clear skies in Southern Minnesota, USA on Monday,
10/26/09. The humidity was quite high so the best views were within an
arc from the Zenith to about 30 35 degrees towards the horizon all
around the Zenith. The Jupiter First Quarter Moon pairing was nice,
although Jupiter's clouds didn't resolve very well at high power due to
the humidity. My 20yr old daughter and me had a great time for about an
hour and a half. It was a little after 9pm when I got setup and we had
fun checking out the Moon and Jupiter for quite a while and then we
buzzed around the Tour for a bit. Towards the end her boyfriend showed
up and we went back (or should I say forward through the Tour) to the
Moon and we had a lot of fun with different filters. I really like the
Meade 40mm Super Plossl for the Moon. It's also great for the Double
Cluster. Not quite wide enough for the Pleiades though.
About the ETX. I'm really satisfied with the repair. When tracking an
object it was so quiet that I had to put my ear to the base to hear the
RA Drive running. Last year I had grown accustomed to the growling in
the base and thought it was normal. Now I think I know what normal
should sound like. Tracking is excellent. The little skip every so
often along the Azimuth that was also the norm is completely gone. No
motor faults. I can't stress enough the importance of Training Drives
though. I didn't train drives this night as it was just over a week ago
since I had done it. I didn't do an extended tracking test this night
either. On this night, with my daughter there, it was more about the
time together and the fascination for the Universe we both share. We
viewed the Moon for at least 10 minutes twice and it remained centered
in the 40mm just fine. This was only the 2nd night out with the
repaired scope and I'll update again after I get a several hours
straight use. So far this month of October has been the cloudiest here
since the early 1970s and we appear to be on the verge of setting an
all time record. At least for Minnesota known recorded weather data.
Some additional comments about the 2nd remounting of the gearbox
assembly that I think are important. Remember, I had to remove the
gearbox to degrease a little. It took a bit of adjusting until the
gearbox 'settled' into position. This involved getting the support arm
hole adjusted properly along the plastic transfer gear shaft. During
remounting I left out the screws that attach the gearbox housing to the
base purposely until I had the transfer gear secured firmly (but I
didn't totally tighten the cap screw yet) to the worm gear shaft. Then
it took a little careful nudging of the support arm hole, along the
shaft of the transfer gear, until all the mounting holes on the gearbox
settled over their respective holes. I put the base screws in loosely
and then tightened the cap screw on the transfer gear until very tight.
This came loose a few times on me in 2008 and the gear would just spin
on the worm gear shaft. I used some LocTite on the cap screw this time
(I actually had to spread it on the internal threads of the worm gear
shaft) so hopefully that won't happen again, although I'll check it
from time to time. I also lightly scuffed the worm gear shaft with some
80grit automotive sandpaper in a direction parallel to the shaft. This
should reduce the possibility of transfer gear slippage (anybody
remember the advantage of a keyed gear shaft?). Then I double-checked
the support arm to make sure it wasn't binding on the transfer gear
shaft. I don't have a torque wrench so when I tightened the base screws
I brought them down until they made contact with the tabs and then
tightened them just enough so that they didn't flex the plastic tabs.
The rubber supports were just snug. The assembly doesn't rock and, when
the drive slews the support arm doesn't flex that I can notice. I
attribute the lack of support arm flexure to the carbon fiber
reinforcement. Wonderful stuff that carbon fiber.
I hope to have the project documentation published sometime later this
fall.
Clear skies all
Paul Torgusen
|
|
