Last updated: 4 February 2002
|
Last updated: 4 February 2002 |
Notes on ETX90 with DS tripod mount.
Thanks Mike for a marvellous website. The coverage of the ETX in the UK press and dealers is very limited compared to the USA. The site has been invaluable for picking up tips, and for finding out what the scope is really capable of.
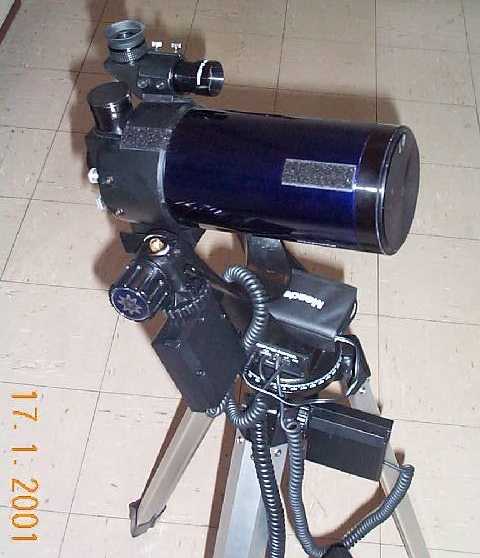
Thanks also to Paul (strburst@mindspring.com ) for his original article on "Using DS mount with ETX-90RA". I'd had my ETX-90RA for about 18 months at that point. Although I was very impressed by the optical quality of the ETX, the drive mechanism was a big disappointment. I used the scope on a Manfrotto tripod, which is quite heavy, but tilting the mounting plate ( I'm at latitude 53 degrees ! ) gave some weird viewing angles. The Manfrotto head, which is excellent for its original purpose of holding a camera, is just too small to hold the ETX base plate firmly. Like many ETX-90RA owners, I was slightly annoyed that Meade did not offer an upgrade path to the ETX-90EC. After all, the OTA is identical. To replace the fork arms and drive mechanisms wouldn't be a major job. Even if this was a dealer-only option, it would still be a lot cheaper than a new ETX !. So, when I saw Paul's article, my prayers were answered. I immediately ordered a DS60, with Autostar ( cheaper as a bundle ). Paul kindly sent me the specifications for the mounting bracket, and I set to work.
I agree with Paul that the DS60 mount is a fine piece of engineering at the price. The ETX now rides beautifully in its new mount, and tracks perfectly. The image stability is much improved. During the recent Lunar eclipse ( sorry guys, we had an excellent view this side of the pond ), the sky was quite hazy, so I couldn't find use the Autostar alignment properly. However, I set the home position accurately, using a spirit level on the tube and setting North by using a compass, allowing for the difference between Magnetic North and the true pole. I then allowed the scope to slew to where it thought the guide stars were, and just pressed [ENTER]. I tracked the moon for nearly 3 hours, taking occasional shots with a webcam, and only twice had to compensate for drift in declination. The tracking in RA was accurate throughout the session.
I have made some amendments to Paul's original design. These were partly brought on by lack of availability of materials, and partly from personal experience using the scope. These were ?
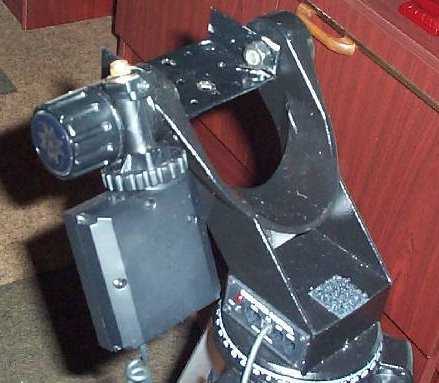
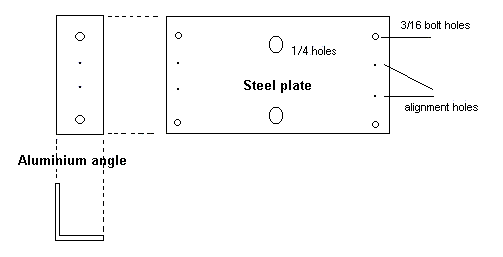
1) Instead of using a single piece of 3/16" aluminium, and bending it to shape, I decided to use a flat " steel plate, with a piece of 1" x 1" x 1/8" aluminium angle section on either side (see diagram). In the UK, B&Q stock suitable plates, predrilled with 3/16" holes, for joining roof trusses. These were held together by two bolts on each side, with elongated holes in the aluminium section. This arrangement allowed me to adjust the width of the cradle to fit the forks. When this was set correctly, I drilled two small alignment holes on each side, removed the bolts, painted the mating surfaces with enamel paint, and reassembled the bolts, using pins through the alignment holes to keep the pieces in line. The whole cradle was then painted in black enamel ( apart from a circle around each of the large holes where the bearing surfaces meet ). The whole assembly now looks as though it was designed that way.
2) After using the scope for a few nights, it became apparent that it sometimes took the long way round. For example, when slewing from Venus ( which was approx. South-West ) to Auriga ( which was approx. West-North-West ), it took the scenic route, and slewed through 290 degrees instead of the obvious 70 degrees. As there are 4 cables coming from the control box on the tripod, it's easy for these to get tangled. On the setup instructions, it says to attach the battery case to the tripod leg. However, the battery case actually sits very nicely in the rectangular slot between the forks. Wrap the cable around the battery pack ( inside the cover ) leaving about 4 inches of cable free. This the plugs nicely into the power socket, with no trailing wire.
3) The Altitude motor casing sticks out at the back of the forks. As I intended to pack the tripod head away in a case between uses ( after all, I bought the ETX because it was portable ), I didn't want the motor casing to get damaged. When the Altitude bearing was disassembled, I noticed that the bearing casing was fixed to the forks with 3 screws. By removing these screws, and turning the casing round by 120 degrees, the motor casing now lies almost in line with the fork arm, making the assembly a lot more compact. At the same time, wrap the coiled cable through the forks before attaching it to the control box. That leaves only the Azimuth motor and the Autostar cables hanging free, so there's a lot less to get tangled up.


Subject:	ETX90-RA to DS70EC conversion finished!
Sent:	Monday, February 4, 2002 19:06:46
From:	trans-am@austin.rr.com (Ralph Encarnacion)
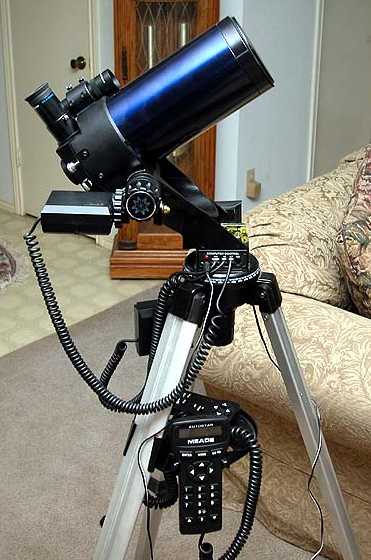
Thanks to your excellent page and the great article written by Paul, I
was able to install my ETX-90RA on my DS-70EC mount. Now I have a
computerized go-to ETX-90. The hardest part of the conversion was
getting the big nuts off the bearings on the DS-70EC. Once I got them
off the rest of the conversion was a piece of cake. The DS-70EC mount
fixes a couple of problems that the ETX-90EC has. I can now use the view
finder when pointing at the north star because the big base is not there
and I can use the focus knob in any position because the big base is not
there. I sent you a picture of my conversion.
Thanks again.
Ralph

Return to the top of this page.
Go back to the Tech Tips page.
Go back to the ETX Home Page.