Last updated: 11 September 2002
|
Last updated: 11 September 2002 |
ELIMINATING THE COMMON "ROCKING" IN THE ETX ALTITUDE (declination) AXIS
Plus! Increasing Altitude Rotation Efficiency and Maintaining Your Declination Setting Circle Precision!
For the longest time I have been studying variations of ways to tighten up the inherent "loose" Altitude (declination) motions and clamping of the ETX EC telescopes. In Part 1 of this Enhancement Guide..., there are many modifications that can be made to improve the tightness of your Altitude axis, both in clamping and in backlash and general "slop" that seems to accompany every ETX scope out there. A minor amount has also been reported in some of the earlier LX 90 telescopes.
By far, the best remedy is that found through Jordan Blessing's "ETX Tune-Up" and particularly the "de-greasing" of the clutch and pressure surfaces referenced in Part 1, but still something more needed to be done; I had found that placing a rubber bushing against the optical tube support arm fronts (between the tube and the arm) helped to eliminate "rocking by flexure."
But rocking still persisted and I have gotten more and more mail regarding a fix.
After much experimentation using different methods that could be done easily by all ETX users without any mechanical background, I finally hit on a wonderful and very, very efficient fix for what we will call "Altitude Rocking."
-----------------------------------
ALTITUDE ROCKING
"Altitude Rocking" is that annoying motion that you witness after you have CLAMPED firmly the Altitude axis, yet if you hold the back end of the optical tube and move it up and down, you witness as much as 1 to 2 degrees of "play" of the entire OTA assembly within BOTH fork arms. The Tune-Up has helped many people, but the rocking still persisted.
One tip of the Mighty ETX Site suggested putting a 3/4" washer between the setting circle (the real one on the side without the clamp) and the small extruded "ring" molded into the circle atop the left fork arm (as you see it from the rear of the telescope). Although there was a hint of slop reduction, something was still missing. Only after looking at the MOVING vs. NON-MOVING components, and what SHOULD BE LUBRICATED and what should NOT BE - combined with some investigation into the troublesome dragging of my Declination setting circle - did the answer become obvious and simple to implement.
The rocking can cause much concern at high magnifications since the slightest touch of the telescope (i.e., focusing or changing eyepieces) can result in a two degree shift in the sky! That can be equal to the span of four full moons!
----------------------------------
ROCKING AND SETTING CIRCLE ACCURACY
Most ETX and LX 90 users do not use their setting circles to acquire celestial objects; but like me, most use them religiously to assist in setting their latitudes for initial polar alignment and leveling for "Home Position."
I began to notice that - after firmly setting the declination circle to read my exact latitude of 35 degrees when the scope was aimed STRAIGHT UP (I use polar alignment so I level the lens cap attached with the scope perpendicular to the ground to determine a true 90 degree north reading - See Part 3 of the "Enhancement Guide....") - by the time I moved it to celestial north, 90 degrees, the circle had obviously slipped from friction as the scope was nowhere NEAR aligned with the fork arms toward north!
The Altitude rocking and the "sticking setting circle syndrome" were part of a common problem, and this fixes BOTH.
----------------------------------
THE QUICK FIX FOR ELIMINATING ROCKING AND MAINTAINING TRUE DECLINATION
The following steps assume that you have "de-greased" according to Jordan's guide the declination (altitude) gearwork and clamp assembly. This should be done first in all ETX scopes; as I understand it the problem with excessive grease in the gear works is getting even worse with the newer scopes coming out.
REFER TO FIGURES 1 AND 2 for a complete description of where to place the additional components and exactly WHERE to lubricate! The lubrication (and lack of) is just as important as adding the two new spacers! This figure is facing your telescope from the REAR, or eyepiece end, with the Altitude clamp on the right and the actual working setting circle on the left.


1) CLAMP SIDE (right side) - if you have de-greased the declination clamping/clutch assembly per Part 1, then no further adjustments on this side are necessary; NOTE however, that this quick-fix will also eliminate your need to "clamp hard" to tighten that loose Altitude that we have all been hearing about so often!
2) SETTING CIRCLE AND KNOB REMOVAL (left side) - using a rubber jar lid gripper (thanks to Mike Weasner for that tip!), unscrew the smooth knob that holds the setting circle against the left fork arm; remove the knob, the setting circle and any WASHER that Meade may have placed against the plastic fork arm assembly.
3) Using mineral spirits, clean ALL surfaces of grease, including where the setting circle slips against the fork arm when it is rotated (See Figure 1).
4) On the smooth knob SIDE FACING THE SETTING CIRCLE, stick two narrow (1/4" strips) of common duct tape to the plastic knob so that the shiny silver side is pressing against the setting circle (Figure 1 in "blue");
5) Insert the threaded rod of the knob through the setting circle and at this point you will ADD TWO NEW ITEMS:
a) farthest IN toward the optical tube will be added a 1/2" NYLON unlubricated washer; this will fit against the exposed tip end (that with the little brass threaded insert to accept the threaded rod from the knob) of the Optical Tube Assembly support arm TRUNION (that tapered short shaft that goes through the "hole" in the top of the fork arm); THIS NYLON WASHER IS SHOWN AS "GREEN" in Figures 1 & 2.
b) immediately against that Nylon washer will be a SECOND washer of stainless steel, one inch (1") in diameter that will be WELL LUBRICATED WITH LITHIUM GREASE on both sides (do not slop it on, merely rub on a thin even coat with your finger!); it helps to brush thoroughly this washer with very fine steel wool prior to placement and lubrication to smooth it to the best possible finish. THIS STAINLESS WASHER IS SHOWN AS "GRAY" in Figures 1 & 2.
6) Now using only LITHIUM WHITE GREASE, lubricate sparingly ALL surfaces shown in RED in Figures 1 and 2; these surfaces MUST ROTATE FREELY as the altitude axis moves, otherwise two things will happen: A) the declination (altitude) motion will bind and cause precision problems; and, B) the setting circle will "stick" as it attempts to turn with the Optical Tube Assembly, thereby losing your precise adjustment....THIS is where most of you are losing your DEC circle settings; you are NOT accidentally moving it I found out, the circle is sticking as the telescope rotates!
Note in Figure 2 that there are two (2) styles of pressure plates for the declination circle to rest on inside the fork arm; the older style is a complete circle that rubs against the inner side of the setting circle; if you have this configuration you must lubricate the entire perimeter of the circle for efficiency; for best results look at the inside surface of the circle itself and you will see where the rubbing and wear have "engraved" the thin aluminum....this is the BEST place to sparingly smear on your lubricant.
Also on the inside of the setting circle you will see another wear pattern, this one very close to the hole through which the threaded rod attaches the assembly to the fork arm; this small circle is the wear from yet another extruded circle on which the entire torque of you tightening down the setting circle rested. You have changed that now that you have ADDED the stainless steel washer. So make sure that you adequately lubricate the WASHER where it rubs against BOTH the inner side of the setting circle and where it presses against the second Nylon washer.
----------------------------------
That's all there is to it! Tighten the assembly back down (you will notice that your setting circle extended just a TINY bit farther out than it did before) and rotate the entire Optical Tube Assembly up and down several times to distribute the lubricant and seat the new washers.
Once done, then point your tube assembly with its screw-in cap on straight up until perfectly level (using a good bubble level). Place the level first east-west across the black screw-in cap to get a good level that way, and THEN turn the level to a true north-south orientation. If you use ALT-Altitude mode for tracking, then you want the setting circle adjusted to 90 degrees when the tube is level north-to-south. If you use your scope in POLAR mode, the reading when the tube is leveled straight up (north-south) should read YOUR LATITUDE of your observing location.
Tighten down the smooth knob firmly, but not too tight as to strip it, while holding the setting circle to your desired reading and it should remain exactly where you placed it! If it moves while all is still new and not quite seated, it may be necessary to take off the knob and circle, work the washers around a bit and then re-assemble.
You should be amazed at what happens:
1) Your altitude "rocking" is virtually eliminated (assuming you have de-greased also!);
2) It takes FAR less force to lock down securely the Altitude clamp, a god-send in itself!;
3) Your setting circle will NOW stay put and rotate precisely with the Altitude or Declination motions of your telescope and should not have to be frequently reset.
4) After clamping the axis, grasp the back end of the OTA and attempt to rock the scope up and down in altitude while watching your setting circle and its small indicator arrow....your "play" in that axis will be all but eliminated. My ETX 125 and ETX 90 BOTH resulted in absolute lock-down after this minor modification.
Total cost: $0.77 for the two washers and about 12 minutes of my Sunday afternoon.
An incredible investment off which I am already realizing a huge return just from the smile on my face....it'll bring one to yours as well!
P. Clay Sherrod
Arkansas Sky Observatory
Conway / Petit Jean Mountain
Arkansas
Subject:	Re: Question concerning ETX mod. Part 4
Sent:	Wednesday, August 1, 2001 17:49:44
From:	drclay@tcworks.net (Clay Sherrod)
Thanks for writing.  Good thing you wrote.  Meade has made a few quickie
modifications and those particular two washers may NOT be necessary.
Try it without them first.  Also, please be very careful if you open up
the base as there are two very delicate and short wires that you are
surely to break if you do not exercise EXTREME caution.  As a matter of
fact, go ahead and do the DEC (alititude) axis adjustments - they need
it the worst - and try it out from there without doing anything inside
the base.  It might work fine without taking a chance.  Those
modifications are very difficult and I really caution everyone about
getting into and changing the RA (azimuth ) drives.

Good luck and welcome to the great world of the ETX....once tuned it is
a GREAT scope!

Clay Sherrod

-----Original Message-----
>I have recently purchased an ETX 125 and am anxiously waiting to receive
>it.
>
>I fortunately found Michael L. Weasner's web site several days before
>making my purchase. I read with great interest the 5 part tech tips
>series to help get the most out of the ETX. I would like to apply the
>"fixes" as soon as my scope comes in.
>
>A question I had concerns the two washers (1" stainless and 1/2" nylon)
>that you recommend installing. What would the inside diameter and
>thicknesses of the washers be? I am trying to understand what rubs
>where, but given that I don't have mine yet, I'm having trouble seeing
>how it all fits together, and, I want to make sure I don't go out and
>buy the wrong washers.
>
>I am thankful for any time that you could spend answering my questions.
>
>Best regards, and happy sky gazing.
Subject: ETX125EC Tech TIPS Help Sent: Tuesday, September 10, 2002 0:47:59 From: jaidev@ihug.co.nz (Jaidev) I'm about to preform the procedures listed on your ETX site under, ETX technical tips, Part 4 - Eliminating Common "Rocking" in ETX Altitude Axis, http://www.weasner.com/etx/techtips/etx_tuneup4.html I just want to clarify a few things first and have included pictures to hopefully make it easier... Shown below are my left fork arm with the setting circle removed and on right side the washers and circles.And:The fiber washer shown above fits into the extruding inner plastic ring where the setting circle rests on the left fork arm. 1. Is this correct?? Should the fiber washer fit inside this extruding plastic ring?? The stainless steel washer fits against (rubbing against it) the extruding inner plastic ring where the setting circle rests? 2. Is this correct?, OR should the stainless steel washer fit over the entire extruding inner plastic ring, so that it is flush against the fork arm??? The reason I ask is currently the inner hole of the steel washer is too big for the washer to stay in place when it rubs against the extruding inner circle, I need a washer with a smaller inner hole?, OR the inner hole of the steel washer is not big enough since it doesn't fit right over the extruding inner circle instead it rubs against it. So hopefully someone can clear this up for me, and tell me which is right??

Here you get a better idea of how they fit, You can see I have the fiber washer installed, and have to hold the steel washer, is this correct? 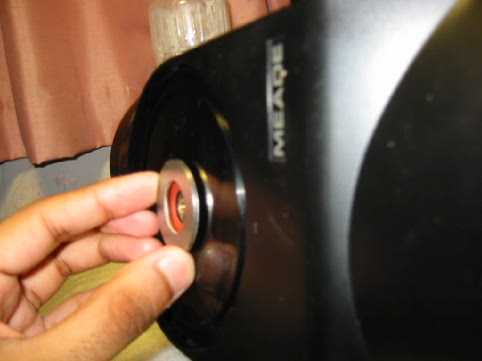
this is what the altitude clamp side looks like with the false circle removed, should I clean up all the grease and re-grease this side?, does the inner circle need to be greased? as you can see in the setting circle picture, the false circle which fits here has two rings engraved in by the movement of this side. The four green greased blobs in this picture are extruding "star shaped" plastic posts. Appreciate any help offered in clearing up my confusion, thanks... Thanks, cheers, Jai 
Sent:	Tuesday, September 10, 2002 17:37:00
From:	drclay@tcworks.net (Clay Sherrod)
Nothing at all should ever rub against the protruding ring of the fork
arm....that which is molded into the arm itself.  This will result in
drag and torque against the motor as it attempts to move the scope.  The
trick is to find a washer (fiber in this case) that will both:  1) fit
INSIDE the protruding ring against the small trunion that is poking
through; and, 2) thick enough to allow the user to place a larger
surface washer outside so that it does NOT drag against that ring.  As I
have mentioned, use whatever size fits; because of model changes and
size changes, not all solutions are universal on the ETX scope.  A
month's time can make a difference in whether one modification fits or
works or whether it does not....

Clay
----------------------------------------
Dr. P. Clay Sherrod
drclay@tcworks.net
Arkansas Sky Observatory
www.arksky.org
Return to the top of this page.
Go to Part 5.
Go back to the Tech Tips page.
Go back to the ETX Home Page.
