
The following web page by Jordan Blessing of Scopetronix, was originally hosted at "http://home.att.net/~scopetronix/etxtu.htm". Since the original posting is no longer available and since this information has proved of value to many ETX users over the years, I have retrieved it using the Wayback Machine, http://www.archive.org/web/web.php and posted it here. Products mentioned on this page may no longer be available.
Please Note: These images and procedures are for an ETX-90/EC, other EC series scopes are probably very similar. This article assumes you have basic mechanical skills and tools. If you have a warranty use it, I will not be responsible for any damage you may cause as a result of this information. Performing this work will undoubtedly void your warranty, proceed at your own risk! Enough of the legalities, get out your tools...
My ETX-90/EC was pretty tight when new, but after some use both the Dec and RA started to develop a fair amount of slop. Being a rather technical person I decided to dive in head first and see what the problem was. The pictures and captions below will show you some common problems to look for and simple adjustments to make that can restore your EC back to a nice tight little scope. So if you're ready here we go.....
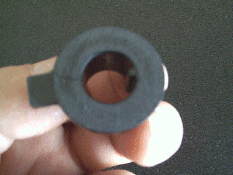
If you have ever tried using your ETX with a solar filter and happened to look into the eyepiece port you were probably shocked to see so much light scattering around the flip mirror. It comes in through the open area indicated here and through the two open threaded OTA mounting holes. Obviously dust can find its way in too. I inserted an extra piece of diced foam into the front opening and two spare thumbscrews into the holes. You could use the thumbscrews off the base that plug the leg holes or even a couple short 1/4-20 bolts.


If your RA lock is starting to "bottom out" before it securely locks the RA axis a simple adjustment will fix it. Using the proper allen key loosen the set screw on the side of the RA lock lever as shown. Now lift the lever up off the central bolt. You can now reposition the lever one step back from its previous position so it has more room for tightening the bolt. I always thought this lever was metal and was quite surprised when I took it off and realized it was plastic! I was even more surprised I hadn't broken it yet!

If you use the ETX Deluxe Field Tripod you are probably experiencing a fair amount of instability in the left/right directions. This is because the top of the tripods were poorly cast and the looseness of the battery cover doesn't give a stable footing. Attaching two strips of velcro (just the furry side) to the battery compartment lid as shown will make a huge difference in stability! You can also see in this picture the rubber feet have been peeled off to expose the (3) screws holding the cover on.
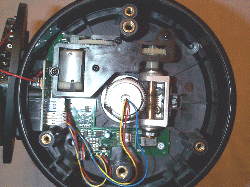
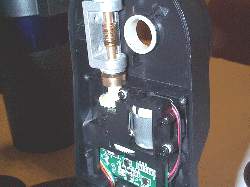
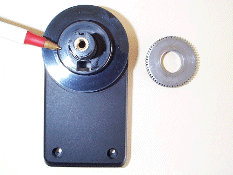
Remove the (3) screws and carefully lift the cover/battery compartment off and gently set it off to the side.You should remove the batteries first, aside from preventing any shorts it will make the baseplate lighter and ease the strain on the thin wires connecting the battery compartment to the circuit board, be very careful not to pull these wires as they will surely break off easily. Take a look around. The motor and plastic gear train are in the top of this picture, looks like they are fresh from a toy car. However the worm and worm wheel are quite impressive compared to the plastic spur gear of the original ETX.

If your ETX was suffering from a loose RA axis (not slop in the east-west direction, but slop up and down) check this nut and make sure it isn't falling off, make it just snug and no more.

On the end of the motor shaft is a plastic gear with an optical encoder. If grease or dust blocks a slot between two teeth the scope will have pointing and tracking errors and if the light is blocked altogether you may get motor failure errors, or more likely a runaway drive. If necessary cleanup with a light brush. The Dec axis has a similar encoder, though it is not quite as accessible.

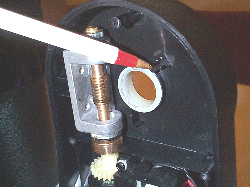
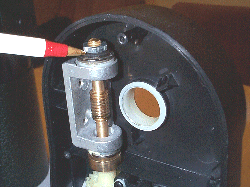
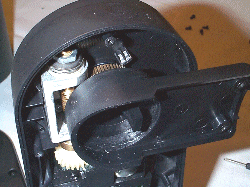
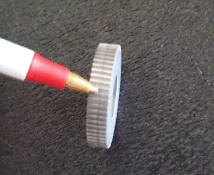
Most of the slop my scope was experiencing was due to end play in the worm gear assembly. If the RA axis was locked and I forced it back and forth a little I could see the worm gear move in and out (actually in this image it would be up and down). Use care to adjust this, you want it just barely tight enough to remove the end play but DO NOT over tighten. To adjust you will need to hold the worm gear with a pair of needlenose pliers and tighten the nut on the outside of the bracket (just below the pen in this image). If you try to tighten the nut without holding back the worm gear you may loosen or strip gears. It is very important to hold the worm with needlenose pliers where I am indicating in the image (be careful not to get on the worm teeth) while tightening the nut with a proper wrench

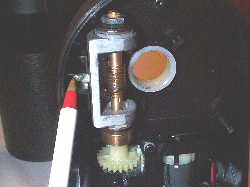
The second area of looseness I was experiencing was because the worm gear was not meshed firmly with the worm wheel. If you look closely at this image you will see (3) screws holding the worm gear assembly to the base. I am pointing at one, the other two are visible between the bracket and worm gear. Loosen these screws slightly, then gently pry between the bracket and the plastic support behind it (these are visible just above and below the pen tip). While gently putting a little "preload" on the worm gear tighten the 3 screws. On my ETX one of the screws was stripped from the factory and was falling out, the other two seem to have it under control though. At this point your RA axis should be nice and tight, reassemble the base and try it out, then we'll proceed to the Dec axis.....
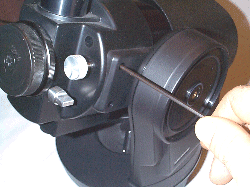
To remove the OTA use the proper allen key to remove the 4 socket head cap screws securing the OTA to the left and right tube supports. Then slightly spread the fork arms (boy now you see how flimsy they really are) and pull the OTA rearward. Please note: unlike the old ETX the new one has a small clip/tang on each side of the OTA (visible in the right image forward of the mounting holes), you must pull the OTA rearward to disengage them without damage. Set the OTA aside.

Unscrew the Dec lock knob all the way and remove it along with the setting circle, the left one can stay on. You can now also pull the right OTA support out from the fork arm (pictured below).
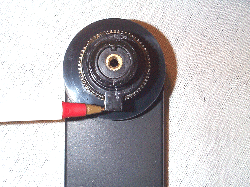
This is the right OTA support with worm wheel assembly still on it. In this picture I am indicating the moving portion of the Dec stops everyone worries about so much (who cares?). If this part is broken, bent or missing you have no dec stops. The keyway visible just above the threaded center hole will also cause a lack of "stops" if it is damaged.
After removing the (5) screws from the inside of the right fork you can pull off the plastic cover for access to the Dec drive. As you can see it is almost identical to the RA drive. We will perform the same adjustments to it. In the righthand image I am pointing to one of the stationary dec stops, the other is visible just below the round white bushing.
The worm endplay is adjusted here, just like the RA worm assembly. Again be very careful to hold back the worm as described in the RA adjustment.
Again, like the RA worm preload the bracket is adjustable with (3) screws, use the same procedure as for the RA, with one exception....
To get the endplay and preload adjustments right you will have to temporarily reinstall the OTA support without the cover so the worm wheel is in place.You will be able to feel the worm endplay by applying a small amount of up/down pressure on the OTA support. Also be sure to inspect and clean the Dec optical encoder as well while you're in there, this is located at the circuit board end of the motor and may be a little hard to access. Try a compressed air can to blow away any possible debris.
This section has been added to address problems with Dec locks which seem to no longer lock very well, or slip very easily. First off many people have been experiencing broken "Right Tube Adapters". If your dec lock doesn't tighten or hold at all the below procedures won't help, you need to call Meade for a repair kit or purchase the ScopeTronix all metal replacement part (see below for more info). Lately I've read about a supposed fix for Dec lock problems that involved installing a washer under the setting circle. Your welcome to give it a try, but knowing how this mechanism works I couldn't see how this could help much if at all. If you look at the pictures below the action by which the Dec axis locks becomes clear. The right OTA support has a plastic post sticking out with a brass threaded insert in the end. On this post is the Declination worm wheel, then a plastic piece which serves both as part of the lock (or more properly "clutch") mechanism and as part of the dec "stops". By tightening the knob to lock the axis you are simply squeezing together these three pieces to form a friction clutch. The problem is that over time and through capillary action grease from the toothed portion of the gear migrates onto the friction surfaces which act as the dec lock (clutch). This reduces the friction and the clutch slips easier. As a result you have to apply more and more force to the knob to get the axis to lock. So if you broke your right tube support by overtightening the knob don't feel bad, it's not your fault anyway. Following the directions below you can have your dec lock gripping like new in 10-15 minutes. To proceed remove the OTA and right OTA support as outlined above then follow the directions below...


That's about it. You should have a nice tight RA and Dec axis at this point and your Dec Lock should lock solidly.You should now perform a new calibration and re-train the drives with Autostar so the computer recognizes the changes in RA and Dec play. If you have any simple questions feel free to email me. Please note however that I don't have time to subsidize Meades customer support. If it is a problem with their product and it is under warranty, they are the ones you should contact first.