ETX TECHNICAL TIPS
Last updated: 9 April 2001
ETX TECHNICAL TIPS |
STUMBLE NO MORE...
Simple and Inexpensive Telescope Safety Lighting
I use my portable telescopes (the ETX 125 and the LX 90) both on piers and off the same heavy tripod (the Meade LX 10 tripod); in both cases, I have had considerable problems stumbling across the foot-end of each, as the pier has three long legs similar to the tripod.
Others have described methods of adding LED's to the tips of such legs, which I considered very good descriptions....I was about ready to do it, based on a post here on the Weasner ETX site. BUT: scrounging around in my observatory's shop two weeks ago, I found a forgotten box of little AC-to-DC adapters (the kind that you hook up your cordless phone, and answering machine, and electronic dart board, etc.). Among about a dozen of them, I found a brand new 7.5V unit (had a plug on one end that had to go) that plugs into AC right at the converter box.
So I did a little cutting, wire stripping, and found a GREAT use for all those old Kodak black-and-gray film canisters that we end up throwing out after saving forever ("....surely I can use that for "SOMETHING!").

You can see the result in the 45-second time exposure of my observing deck in which the pier is installed. Because of the long exposure, the intensity of the red lights is greatly exaggerated (you can get an idea of how dim they really are by NOTING the lighted display intensity on the AutoStar attached to the top of the pier); they are actual VERY dim and pleasant and do not detract for a good steady view of dark skies.
Since I already had the power source (Figure 2) and a bunch of appropriate wire on hand, the entire project cost me only $9.57 at the local Radio Shack.
----------------------------------
THE POWER SOURCE AND SELECTING YOUR LIGHTING VOLTAGE
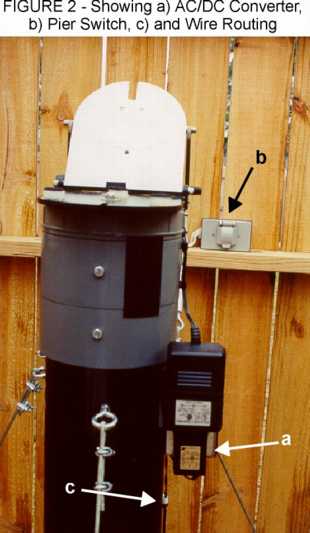
As can be seen clearly in Figure 2, the little 7.5V DC output unit is plugged directly into my power plugs attached to the pier. Above it, the larger converter is the Meade #541 AC/DC adapter that drives the ETX 125. This receptacle, as seen in this figure (arrow) has a power shut-on/shut-off safety switch to assure that all power to the pier is disconnected in bad weather. This was particularly helpful in more than one way: 1) when I turn on the power, both the telescope power source and my lighting is activated; and 2) if I accidentally attempt to pack up for the night without turning off the power, the three red foot lights let me know!
Route the one single wire down either a tripod leg or a pier via small wire clips that can be permanently attached via strong adhesive or small sheet metal screws; this assures no dangling wires.

At the base of the tripod leg or bottom of the pier the wire from the AC/DC adapter is stripped and spliced via heat-shrink to three other wires, each leading to another leg of the tripod/pier. I used wire tie-wraps along each of the legs to put the wires out of view and out of dangling amidst my feet as can be seen in Figure 3.
----------------------------------
THE LIGHTS
It was all so simple, the lights were the difficult (NOT) part. I selected three bayonet-style bulbs of 6.5V each; by the time the DC voltage was split among them, a considerable dimming to my desired intensity occurred in the red lights.
At Radio Shack, there are all sorts of lamp holders and adapters, but I chose one ($1.97 each) that came complete with the lamp holder assembly, the red globe, and pre-wired for soldering the two leads from each wire. I removed the red plastic globe and inserted a FLAT BLACK disk of cardboard against the very top of each one (they are flat at the top - I chose the flat ones for that reason) to block DIRECT light from shining into my eyes.
This way, all the light is directed at the floor or ground....where it is needed, not in my eyes.
I looked at various methods to mount each light to its respective leg end, but finally came onto a no-cost solution that has worked out wonderfully! Using a very thin strip of aluminum and Velcro, I merely attached each light using an empty KODAK PLASTIC FILM CAN (Figure 3) turned upside down! I drilled a 5/16" hole with a auger bit in the bottom of each can to accept the bulb holder and ran the holder, bulb and wire right up into the film canister; a small slot at the bottom of each one allows for the wire to escape the canister and still be able to clamp the top (which holds it via the Velcro to the leg) tightly to protect the soldered wires in the holder.

Pictures speak 1,000 words.....look at the photograph above and just tell yourself out loud: "...I KNEW those danged things would come in handing for SOMETHING!"
P. Clay Sherrod
Arkansas Sky Observatory
Conway / Petit Jean Mountain
Arkansas
Return to the top of this page.
Go back to the Tech Tips page.
Go back to the ETX Home Page.