Last updated: 14 April 2002
|
Last updated: 14 April 2002 |
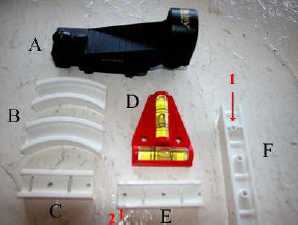
Sent: Saturday, April 13, 2002 12:08:17 From: ccopley@dodah.com (Chip Copley) Ok, I'm cheap! But I want good tools for my newfound hobby & I want the results to look good. There are lots of finder scopes & red dots in the market, but I decided that I wanted to spend $20 (or less). I had looked at the little Daisy BB gun site, but it looked kind of small and, to get it where it would perform well at night, it was going to need some mods (to vary the intensity of the laser light). Then I happened to be in my local K-Mart & spotted the Daisy Max. For $1.00 more than its' little brother, it was bigger (maybe 2x) AND it already had a variable potentiometer for controlling the laser intensity. Heck, the Radio Shack parts would have cost more than a buck, the implementation wouldn't have looked as nice and, on top of that, I'd have had to open the little guy up for major surgery (drilling the necessary holes & soldering the micro pot into place). Needless to say it was a dollar well spent! And guess what - the Daisy Max is exactly the same as the Stellarvue "Red Dot" (reviewed under "Finderscopes", which costs $24.95 + $6.00 s&h). It just so happens (honest) that K-Mart is right next door to a Lowes store. After roaming a few aisles I discovered my new mount - for $.84! It started out as a 3" PVC pipe hanger, but, after a little hacking with the dremel tool, this is what my pile of parts looked like.A) The Daisy Max laser site, cost $13.99 B) I cut the curve of the pipe support into two equal length pieces about 2 inches across the bottom C) I cut a portion of the straight part of the hanger (see F) to the same length as the site mounting plate (underside of A) D) A level I already had laying in the bottom of one of my tool trays; if you don't have one it'll cost you about $2.00 more E) I cut another section of the Straight part of the hanger to act as the crossbeam to connect the two curved pieces (B) F) What was left of the hanger that I didn't throw away. I included it here so you could see the ridges that need to be smoothed down (flat) on the top of E, to which the mount (Part C) will be glued. Notice that the ridges (see #1, Part F) have been removed on both sides of Part C and the top of E. Also note that 4 small notches have been cut into Part E (see #2), to allow it to fit the channels of the pieces in B and allow for a tight join. Then I broke out my miter box and split the level, as indicated below. When it's all put together, the level is glued to the outside of the crossbeam. 
The only thing left to do was to bevel-cut the top of C, to allow it to mount to the site, and put it all together (don't you just love super glue?). 
Notice the beveling done along the mounting edge (#1) of C (and once again the cleaning of the ridges [#2]). A little flat black paint, glue the level in place and it doesn't look too bad. A dab of double-sided tape under each of the curved sections (B) and mount it where you will. It looks good, is rock solid and the price is right! 
P.S. One of these days I'll tell you about the pier I made - dead level, solid as a mountain and the scope just drops into place. And, if I remember to Park before I quit for the night, I've gone through multiple sessions (over weeks) with NO NEED TO ALIGN. And yes, I did make my own flexi-focus for less than $3 (I did say I was cheap). Regards, Chip 
Return to the top of this page.
Go back to the Tech Tips page.
Go back to the ETX Home Page.