ETX TECHNICAL TIPS
Last updated: 12 March 2000
ETX TECHNICAL TIPS |
From: Spyros Michas (michas@tee.gr)
Dear Mike
Knowing that the tabletop legs are
not practical for field use, I decided to find a tripod solution for my ETX-90.
US made stuff are expensive here, like the Meade field tripod which costs more
than 300$, and there are not many choices around anyway. I thought I could come
up with something cheaper. I also have the do-it-yourself bug of course…
a) Tripod
First, I looked for a reasonably priced suitable tripod. I saw several camera tripods made of aluminum on the market, with prices starting from $80. Luckily, I also found a beautiful old wooden tripod in a friend’s junkyard. This friend is a surveyor, and this tripod was used with his old Wild T-series theodolite. This is a precision optical instrument, and quite heavier than the ETX-90. Therefore, I thought that it should be sturdy enough for the telescope use. The tripod is more than 20 years old, and it was in a pitiful state. However, the metal parts like the connecting top mechanism, and the stop-bolts of the sliding legs, looked OK. I dismantled the tripod; I sanded the metal parts and painted them five thin layers of paint and two hands of varnish. I sanded the wooden legs and painted them three hands of dark varnish. I assembled the tripod, and attached a small metal chain on each leg, connecting them in the middle. This is to prevent the legs from spreading apart when they are used on slippery surfaces. Then, I gave it a thorough test. Everything looked right. The tripod is very sturdy, and capable of safely carrying great weights without the legs sliding. I also realized that the original manufacturer (Wild of Switzerland) used first-grade materials (especially the wood) and great craftsmanship in their work.
|
Cost of tripod: |
$0 |
|
Cost of paint and other necessary
stuff: |
Appr. $35 |
|
Working time: |
10 hrs. |
|
Weight: |
5.2 kgr |
b) Mounting
Next step was to find a mounting
system, able to hold the telescope both in Alt-Az and Polar-aligned positions.
I was lucky to have a Mechanical Engineer friend that helped me to design
something efficient, simple and at a reasonable cost. We gave it a lot of
thought and finally decided to build a simple mechanism with two holding parts
and a pitch axis screw and bolt, plus a base to put on the tripod and a top
unit to bolt the telescope onto. We also applied a simple leveling mechanism
with three screws, similar to those used on surveying equipment, but much
simpler. We chose aluminum for our material. I gave my friend George my final
designs, and he went on to build the thing. It took around 4 working hours on
the lathe and 6 more on other finishing equipment. Since he is a friend, he
didn’t charge anything, but this should mean a small fortune if you have to pay
the machine shop! We assembled the
mechanism, attached and adjusted a leveling bubble, and screwed the whole set
on the tripod. I also attached a small plastic protractor and made some
markings to be used on the polar alignment procedure. With a little practice, I
managed to be able to easily level and polar-align the scope. The first flaw we
found was that the bolt of the pitch axis screw required a lot of strength to
be safely fastened. This was because of the low friction between the two
aluminum surfaces. I made it a little better by putting a small piece of strong
tape with a rough surface between them. At last, it was ready! It has proved to
work fine till now. The leveling works great, and is very precise, probably
more than necessary. The telescope performed fine at a polar-aligned setup. The
weight of the mounting system is over 2kg, quite heavy, but works in favor of
the stability of the system. The system won’t budge easily, and is hard to tip
over, even with the telescope at 38° (Athens, Greece). It is even better
at an Altazimuth positioning. I’m quite happy with my work, and have no major
complain after a total of about 20 hours of use. I have not tried any special
equipment on it yet.
|
Cost of aluminum: |
$20 |
|
Cost of screws, protractor and
other necessary stuff: |
Appr. $30 |
|
Working time: |
10 hrs to
build, but a lot more time to think of the design and produce the plans |
|
Working cost: |
$0 |
|
Weight: |
2.3 kgr |
c) Conclusions
I had great fun trying to design and
build my custom field tripod. There is nothing that can replace the pleasure of
making stuff and having good laughs with friends over the process. I also
believe that the final result is simple, practical and aesthetically pleasing.
Therefore I can say that I am very happy with my field tripod. The only
drawback is its weight, and the not so efficient pitch screw and bolt. The cost
seems very low, but you must bear in mind that I had for free what should be
the most expensive part of the project, which is the working hours of the
mechanic. A wooden tripod could be expensive, but a plain aluminum tripod costs
a lot less. I would recommend my design as a cheap solution only to one that
can find access to cheap heavy machinery tools. Otherwise, it could cost as
much as something available on the market.
d) Photographs
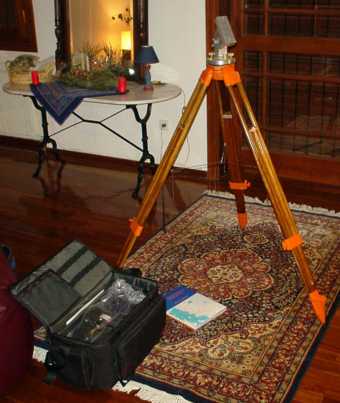
Pict. 1: The tripod, the mounting and my ETX carrying bag.
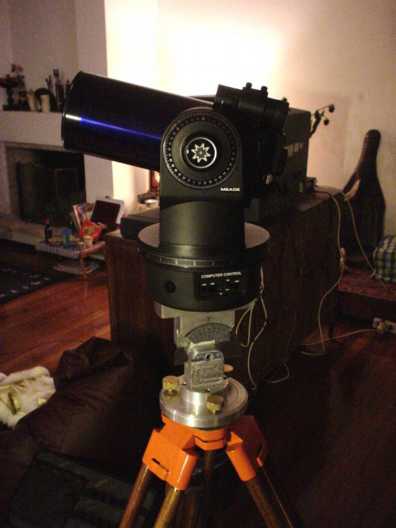
Pict. 2: The ETX on the tripod at
Altazimuth position. You can see the three leveling screws, the protractor, the
pitch screw, and the top of the tripod.
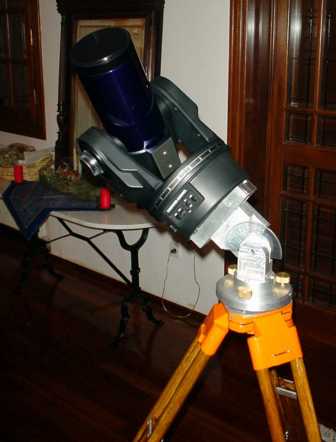
Pict. 3: The ETX on the tripod at a
polar-aligned position.
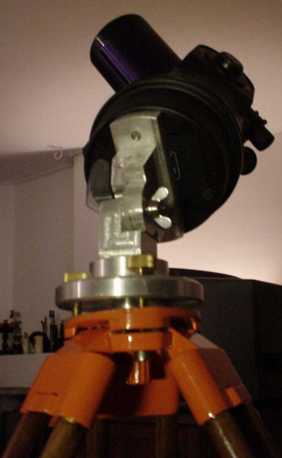
Pict. 4: The ETX on the tripod at a
polar-aligned position. Note the screw of tripod connecting the mounting
mechanism. You can also see the bolt of the pitch screw and one of the two
¼” screws attaching the telescope to the mechanism.
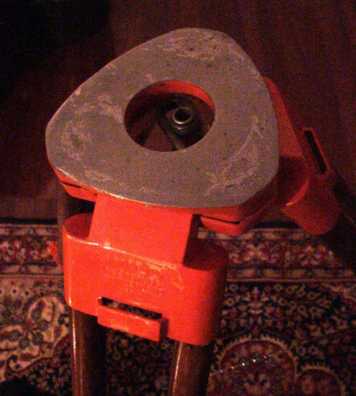
Pict. 5: The top of the tripod. Note
the screw. Its threading is of a weird size, and carving the aluminum base of
the mounting was a challenging task
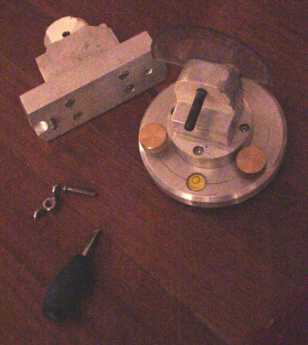
Pict. 6: Here are the parts of the mounting system. You can see the base, with the three leveling screws and the bubble. You can also see the screws connecting the base part with the lower part of the pitching mechanism and the protractor. On the top part, note the 4 screws connecting the mounting base to the upper part of the pitch axis. Note the little carving on one end, to host the ETX’s rubber pad under its base. More details to be found in the drawing.
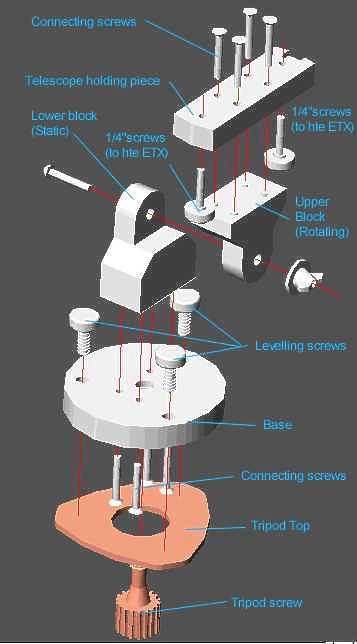
Pict. 7: This is a bitmap of the 3D model of the system in exploded view.
Pict. 8: This is
a bitmap of the plans
e) Digital
drawings
Attached (Right-click or option-click to download 148K file) you will find the drawings of my work. The format is Autocad2000, and it is the vector version of picture 8. I have also included an animation of the exploded model. Click to begin movie. It will appear in a new window.
Note: One could notice minor differences
between the final drafting and the final output (Lucky as I was to have great
mechanics work for me, they took the initiative to make some last minute
“enhancements”). The differences are:
q
The
lower block has a different base and the upper block final shape is a little
altered.
q
The
way the lower block is attached to the base is different.
q
I
haven’t cut yet the telescope holding ¼” screws. Instead I used two
plain ¼” screws of 30mm height. The screws of the drawing are on their
way.
These changes are not important and do not
affect the efficiency of the system at all. After all, these drawings are
mainly useful as an idea of the concept.
f) Credits
Many thanks to my friend George
Vettas and his father Stelios, for their invaluable help. They provided their
machinery workshop in their factory in Athens. They are worthy engineers and
great artists! Thanks to my friend Costas Thanos for lending his digital
camera.
You can put any of this on-line if
you want to. Since English is not my mother language, you may find spelling or
grammatical errors. Please correct them. I also hope that I am clear enough
with my engineering terms!
Thank you for your time, I wish to
you and your web-page visitors clear skies.
Spyros Michas
michas@tee.gr
Athens, Greece
Return to the top of this page.
Go back to the Tech Tips page.
Go back to the ETX Home Page.