ETX TECHNICAL TIPS
Last updated: 9 September 2000
ETX TECHNICAL TIPS |
Here's another tripod add-on for the Meade #883 Deluxe Tripod....I don't know if you want to put this one up on the website because it's a direct rip-off of one of Jordan Blessing's Scopetronix products, the Tripod Leg Clamp. Jordan seems to be a good guy and I don't want to take business away from him or his fine company...however, if you are like me, you just can't drop $50.00 (44.95 + 5.00 for shipping) at the drop of the hat....
The materials you need are easily obtained at Lowe's or Home Depot. The total bill for all materials listed was under $9.00 (and that includes tax!).

Here's what you need:
THREE - 2 -3/8 fence post tension bands
THREE - 5/16" No.18 Wing Nuts
THREE - 5/16" Lock Washers
SIX - 5/16" Regular Washers
THREE - 5/16" Carriage Bolts (2-1/2" Long)
VELCRO self-adhesive strap (the furry side about 30" long)
THREE - Small screws (3/4" long)
SIX - Small lock washers (these come from the tripod itself)
The tools I ended up using were:
Power Drill
Phillips Head screwdriver
Table Vise
Hammer
Hacksaw
Dremel Tool with grinding stone bit (actually a hasp file will do the trick too!)
Center Punch
Alcohol Cleaning Pads (they came with the Velcro)
Tape Measure
11/32 Drill Bit
13/64 Drill Bit
First thing you do is straighten out the tension band as pictured. This is easily accomplished with the table vise. The tension bands bend easily which is good and bad. Good because little effort is needed to do the job. Bad because if make too many bends in the same location, the band fractures.

Next, you have to make a series of five bends. Each bend is a right angle. Placing the band in the table vise and beating it with a hammer does the trick. I didn't take exact measurements here. I just placed the band up against the tripod's leg and marked where I wanted each bend to be. (Mark it, bend it, mark the next bend, bend it there, etc, etc.). It's important that the bend on the backside of the band (or clamp whichever you want to call it now) is long enough so that when the tripod is folded up for transport that the clamp will not interfere with the 'extension strut system' and the eyepiece holder.

Once the final bend is made, you are left with about an inch or two extra. This is where your hacksaw comes into play. Saw off the extra squarely and take the Dremel tool (or hasp file!) and smooth out the rough edges.
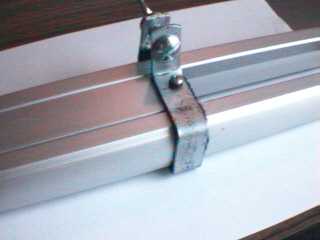
Two holes have to be drilled into the band. One is for the carriage bolt and the other is for the small screw as pictured. The small screw attaches the clamp to the center sliding portion of the tripod's leg. Nice thing here is that Meade has already placed the hole in the tripod leg to hold the plastic cap on the leg.

Last thing that has to be done is cleaning the inside part of the clamp with the alcohol pads and attaching the furry side of the self-adhesive Velcro to the inside. The Velcro is used to protect the tripod leg from scratches when the leg height is adjusted.
Now attach the clamp to the leg (which means you have to take apart the whole leg and put it back together!). Use the washers and lock washer with each carriage bolt and wing nut. The clamp should be loose on the leg when the wingnut is not tightened. This helps make the height adjustment of the leg easier. Once the wing nut is tightened the leg will not slip.

This is what the final product looks like.

Mike here: This was posted with the concurrence of Scopetronix Astronomy Products. The clamps are a rough copy of their commercial product, which is available through Scopetronix ready made for those not so inclined to make their own.
Go back to the Tech Tips page.
Go back to the ETX Home Page.