ETX TECHNICAL TIPS
Last updated: 3 March 2001
ETX TECHNICAL TIPS |
Here is my $10.00's worth of fix for the Meade #883 Tripod legs. I got the idea while browsing through Lowe's. I came across Velcro brand "Velstrap" tie down straps. One pack contains two 36" long by 2" wide velcro straps and costs $4.96. They have a nylon buckle permanently secured to one end of a 36" long strap of the fuzzy side of velcro. The other end is a tongue of velcro hooks.
The strap works by first wrapping it around an object. Next, the tongue end is passed through the plastic buckle. Last, the strap is folded back upon itself and the tongue end is pressed into the fuzzy side, securing the strap (think of a little kids athletic shoe buckles-same thing, only bigger).
For this project, you will need the following items:
1. 2 packs of Velstraps (4 total).
2. 24" of standard "sticky back" Velcro (hook side).
3. Scissors.
4. Tape measure or ruler.
Here are 8 easy steps to make leg straps.
1. Cut the 24" long piece of velcro sticky back hook material into
6, 4" long pieces.
2. Peel off the backing on one 4" piece and fold it onto itself,
sticky side to sticky side. The finished piece should have hooks on
both sides and be 2" long. Repeat for the remaining pieces and set
aside.
3. Take one Velstrap and cut off the plastic buckle and set it
aside. You want to cut any remaining velcro material from the
buckle so that all that remains is the buckle itself.
4. Measure from the tip of the hook side "tongue" back along the
strap 14" and cut the strap square. Keep the 14" piece and discard
the remainder.
5. Take the buckle and slip it onto the square end of the 14" long
piece. Move it onto the piece several inches so it is out of the
way of the next step.
6. Take two of the pieces you made in step #2. Start at the square
end of the 14" piece. Line up one strip so that the short side is
even with the squared end you cut and the long side is parallel to
the long side of the main strap. Press it in place. Repeat on the
other side. The finished product should have two "racing stripes"
of velcro side by side along the long axis of the main strip and
even with the cut end. There will be a small space between them.
7. Push the buckle up against the two strips.
8. Fold the end with the two hook strips over the buckle. This
traps the buckle on the end of the long strip, resulting in a much
shorter version of the original strap. Press firmly to secure the
double sided hook inside the loop material.
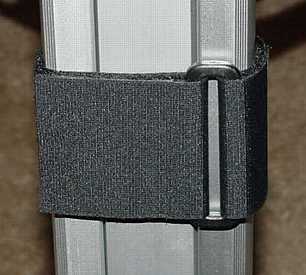
To use the finished product, just place the strap against the upper portion of the leg, smooth side in, fuzzy side out. Wrap the strap around the upper portion of the outer legs over a spot near where the top of the inner leg rests. Pass the tongue through the buckle and reverse it back over itself while cinching it up tightly. Fasten the strap by placing the hook tongue against the loop fabric.
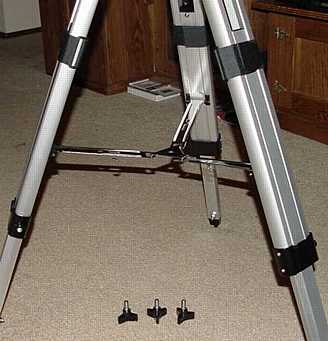
I tested mine by pulling it up tightly, securing it, and releasing tension on the factory clamp. It held the weight of the scope by itself (not that I recommend doing that!). Not only is it strong, but it will not mar the leg surface.
The only improvement I would make to the design is to sew the strap end shut. A heavy duty sewing machine should do the trick.
The remaining original Velstrap can be used to secure the folded tripod shut!

Here is a shot of the finished stitching. The lady at the leather store stated there may be commercially available, similar tie down straps out there. She recommended trying outdoor stores in the fishing, hunting, camping sections, or luggage stores for baggage tie down straps. Maybe someone out there can recommend a cheaper or easier way to do this. By the way, it cost me 5 bucks to have the stitching done. I left the Velcro pieces in place and had her sew through the whole thing.
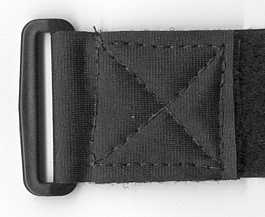
Here are more photos. They show a before and after shot of a strap, the parts that make up one, a couple of installed views (use the best one), a shot of just the straps holding up the tripod, and a close up of the finished stitching. As I said yesterday, I do not trust the Velcro adhesive. I recommend stitching for no hassles.
Here is the before and after shot.

This shot shows a strap with the buckle and two pieces of Velcro hooks that hold the end together.
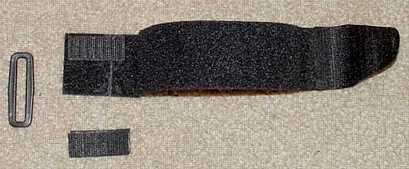
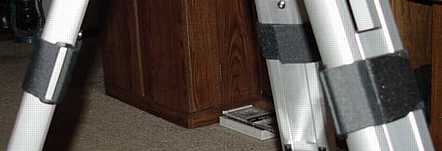
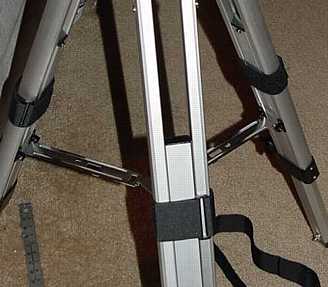
These shots show different views of the straps attached. One shows them holding the tripod (and scope, although it is not visible) up without the Meade bolts in the tripod.
Take care.
Nick
Return to the top of this page.
Go back to the Tech Tips page.
Go back to the ETX Home Page.