Last updated: 24 February 2006
|
|
Last updated: 24 February 2006 |
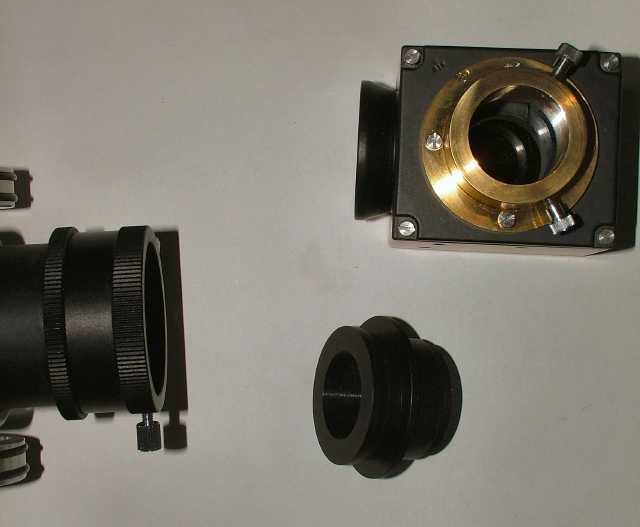
Subject:	Of Home Made Star Diagonal's...
Sent:	Sunday, February 19, 2006 07:11:17
From:	martin dawson (flugluftholgate@hotmail.co.uk)
Please find attachments for making a home made star diagonal.
Please feel free to chop and change to your taste. It was made with a
view to be used on a Meade LXD-55 AR-5 5-inch refractor but I guess it
could be used on any refractor that could take two-inch eyepieces.

Hope it contributes something to the some total of human knoweldge!!!

Regards and Best Wishes,

Martin Dawson


The York Astronomical Society, England, UK.

A Home Made Star-Diagonal                          by Martin Dawson YAS

It started as not so much an 'argument' but more like a 'heated
discussion'. After a York Astronomical Society meeting we all convened
into a local pub, then it started, one of the lads (John Roberts) said
"I'm going to buy a Star-diagonal" and I blurted out "Well, I'm going to
make one!" and that was my mistake, so of we went!

Another friend said that we could make a short video film, so the seed's
of an idea were planted. I used to work for Vickers Instruments, an
optical company that used to be based in York and one of there products
were tank sights (see box). There were always substandard parts lying
around and if you asked the appropriate shop foreman nicely he would let
you have some. One item I had had for a few years was a nice 45deg prism
some 45mm wide and 70mm on the long side. Not big enough for a 2" SD but
certainly up to the job for handling 1.25" EP.

I joined a local school's engineering course (again...) to use there
facility's. First of all I made a wooden pattern, as I was not sure of
the shape I wanted I just made a simple wooden block and from that
casted a billet. I could have bought a block of aluminium but that is
not as much fun! I found some waste casting's from a factory that made a
high quality product, what I don't know, they looked like filter
housings, what ever they were a well made product, it didn't matter as
they where soon in the crucible melting away. The wooden block was
surrounded by casting sand and soon created a void. When the aluminium
was molten, in it went! After half-an-hour or so it was broken out and
was soon in a lathe (four jaw chuck) having a hole drilled through it.
Next I bored open the hole to 33mm diameter and copied the profile of
the adapter for my AR-5, next it was to the milling machine to machine
out first the inside then when I was happy it would take my prism I
machined the out side surface's and mating surfaces. Next I made two
lids, one would have a 33mm diameter hole in the center and apart from
the hole both lids would be identical. The corners where swept out to
half the thickness of the plates and drilled. The lids were then offered
to the box to mark out the position of the holes that were next drilled
in to the box. When this was done they were tapped to M4 and the lids
fastened. Next job was the longest and most tedious, fettling, using
various files and progressively finer emery paper I cleaned up the
outside surfaces. I also paid particular attention to the corners.

To hold the prism, I first drilled six holes - three per side - and
tapped to M5. Position was determined by the shape and size of the
prism. Two brass plates were next with a thin sheet of rubber stuck to
one side. Using grub screws, the screws worked against the brass plates
with the rubber - and two sheets of black card - bearing against the
prism sides. Final machining task was the turning of a brass Eye Piece
holder, with a flange at one end and four mounting holes, and two thumb
screws. One small job was the stamping of a mark, in Ref a, I came
across a excellent article on the punch marking of early scientific
instruments. Engraving was a lengthy and highly skilled process whereas
punch marking could be undertaken relatively quicker. Also individual
marks on instruments where akin to silver marks on jewelry and this
appealed to me. Vickers Instruments had  a large inspection department
and large components that had passed quality control where stamped in a
inconspicuous place, I had 'acquired' a metal stamp with "VIY3" -
Vickers Instruments York inspector no. 3 - using this seemed to show a
link with the old firm and with the instrument makers of old.  When I
was happy that everything fitted the two lids and the box were powder
coated. Finally, I had a badge from Vickers Instruments which I fixed to
one of the sides. The stylized "V" for 'Vickers' and the "I", in the
shape of a eyepiece for 'Instruments'.

The screws were M4 slotted cheese head's from? Yes, you guessed, Vickers
Instruments as well as the thumb screws!

Although it has one or two 'Quality' issues, I'm happy with it, after
all it is a working item. Once while browsing through a Meade catalogue
I found some Flip-Mirror systems that had square bodies and further more
the Star-Diagonal on Meade's DS-60EC is 'square' and looked a little bit
like my Star-Diagonal, this suggested to me a little bit of
commonality...

Footnote.
Vickers Instruments Ltd, York was an optical company that was based in
York, England from 1964 to 1988. They were part of a much larger concern
that built aircraft (VC10's), submarines, Tanks (Chieftain, Challenger
2) and a whole range of other products. Vickers in 1916 took over two
old established firms, Troughton and Simms of Rochester and T.Cooke and
Sons of York. T.Cook and Sons were formed in the late 1840's and built a
lot of very fine astronomical instruments.

Barr and Stroud, an old optical company based in Glasgow made sights for
Chieftain tanks was absorbed into the Pilkington Brothers concern in
1977 (a & b). Some of there products were made by Vickers Instruments in
the late 1970's early 1980's (b & c)

References
(a)    Bulletin of the Scientific Instrument Society, No.73, June 2002.
(b)    War Monthly, Issue 40, July 1977.
(c)    British Army Equipment Exhibition Programme, 23-27 June, 1980.

I worked in the glass shop and fitting shop between 1975-80 and 1990-92.

Thanks go to the following for the assistance in this project,
Mr. Martin Whipp for producing a video diary and supplying aluminium.
Mr. John Roberts for starting the ball rolling.
Mr. John Ashwell of Fulford School, York for the use of the school's equipment and supplies.
Mr. Andy Lawson for helping with sourcing a powder coating service.
Mr. Gordon Peacock for supplying some excellent magazines that provided inspiration.
and finally,
the unknown Lens and Prism maker's who made the prism some years ago...


Return to the top of this page.
Go back to my LXD Home Page.