
Last updated: 19 August 2003
|
|
Last updated: 19 August 2003 |
Making and Using a "Hartmann Mask" for Focusing
I decided to make a "Hartmann Mask" to aid in focusing Mars when doing astrophotography with my Nikon Coolpix 995. A Hartmann Mask is a device to produce two distinct images of an object, which merge when in focus. It is similar to the technique used in "rangefinder cameras". There are many such devices available and are called by various names. Here are the steps I did to make mine.
First I placed the LXD55-8"SC lens cover on a piece of thin cardboard, as seen in this photo:

I traced the circumference of the cover on the cardboard and then cut out the disk. I also cut three strips of cardboard to make a ring around the disk.

I then cut two holes in the disk, each 2.2" diameter, placed 0.7" from the edge of the disk. I then taped (using Scotch tape) the strips to the edge of the disk. Here you can see the holes and the first strip being taped.

It is not important at this stage to completely secure the strips; you just want them held in place in preparation for final taping.
I then did a "fit test" on my 8"SC:

Since the fit was acceptable I then began the final taping. I used photographic tape, which is black masking tape. It is not necessary to use black but I like it. Here you can see the taping in progress:

Each length of tape is placed across the disk with a small portion going onto the strips around the circumference. I taped around the holes; I realized later that I should have done the hole taping first; the results would have looked better. Lastly, two long strips of tape were run around the circumference to secure the small strips of tape that ran across the disk.
I then added three small pieces of the soft portion of Velcro to the inside of the cardboard strips around the circumference. This helps secure the Mask to telescope tube.
Here is the final result:
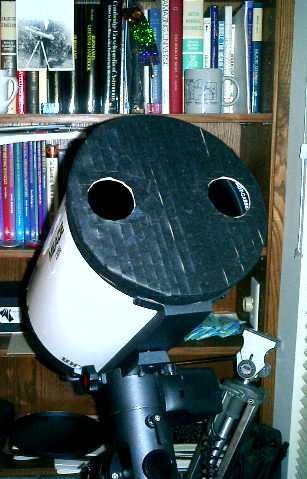
So, how well does it work?
I first looked at Mars with the 26mm eyepiece. Focusing was very easy; just merge the two images into a single image. The mask also acted to increase the focal ratio, reducing the brightness of Mars and making details easier to see. In the 26mm and 12.4mm eyepieces, the South Polar Ice Cap and a dark area were easily visible. The cap appeared somewhat smaller than my previous viewing of Mars 10 days ago. Seeing wasn't that great (I was out for only about an hour before the fog rolled in) but the best view was with the 15mm plus the Meade Polarizing Filter plus the Hartmann Mask. Moments of disturbed air were easy to detect since the single image would split into two distinct images.
I then switched to trying some photographs using my Nikon Coolpix 995 with the Nikon Remote Release Cable. I used a Scopetronix 25mm eyepiece plus the Scopetronix Digi-T System. The camera lens was fixed to focus at INFinity and generally at least full optical zoom was used.
My first test was to focus the 25mm eyepiece to my eye and then attach the camera. For afocal photography this is a common technique since the eye should focus to infinity and the camera lens set to infinity. As you can see from this image (ISO 800, 1/30sec), the focus was off (two images of Mars visible):

The next photo shows an even more out of focus image. I took this photo (ISO 800, 1/30sec) to show the distinct two images of Mars.

The next image (ISO 800, 1/30sec) shows Mars merged into a single image. (Actually it is not quite a single image but it is as close as I could get using just full optical zoom.) But you can see the South Polar Ice Cap at the bottom of the disk.

I then used some digital zoom to assist with viewing the merging of the two images. This photo (ISO 800, 1/30sec) shows the result. You can just make out a dark area above the Ice Cap.

Now it was time to start getting serious. The following photo (ISO 800, 1/60sec) shows more detail. (The above images were reduced in size to just show the merging effects; this image was reduced less from the original to better show Mars.)

I then added a 2X Barlow Lens and did this photo (ISO 800, 1/15sec, full optical zoom):

For a single frame image and with seeing not that good (Mars was still somewhat low in the Southeast and over a rooftop), it is not too bad.
Now that I know that using the Hartmann Mask is worthwhile I will continue to use it.
And alternative Hartmann Mask style is shown at:
Arcturus Observatory Mask Page
Return to the top of this page.
Go back to my LXD Home Page.