Last updated: 12 July 2006
|
|
Last updated: 12 July 2006 |
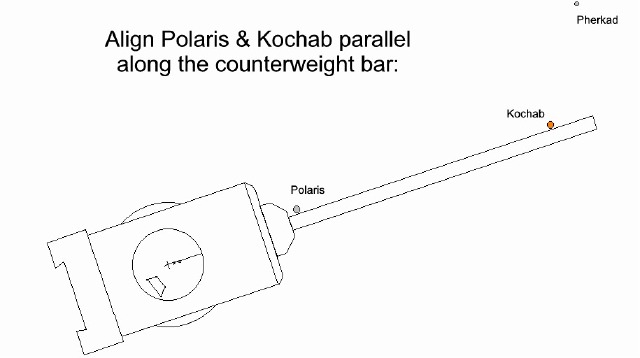
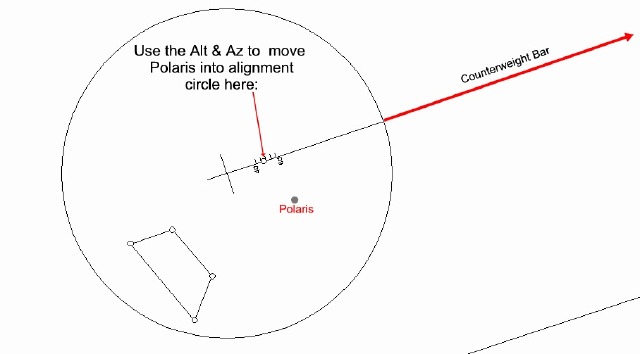
Subject:	LXD75 Polar Alignment Accurate & Easy!
Sent:	Monday, July 10, 2006 17:59:17
From:	M. J. The Madjordainain (madjordainian@insightbb.com)
It's been a couple of months or so since the last communication I sent
you. I was visiting your site today and since I have a SN10 LXD75 I
strolled over to your LXD site, after browsing through some of the
information you have there I decided to share a really easy and accurate
polar alignment method I use for my LXD75 mount.  It is basically Dr.
Clay Sherrod's Kochab Clock method adapted to the LXD75 GEM mount.  I
have attached a MS Word document along with some drawings to give a
visual of the ideal.  Let me know if the MS Word document needs to be in
some other format, I hope your readers find this 'adaptation' of some
help.

Clear Skies Mike W. !!

Mark Jordan
AKA: The Mad One
Greenfield, IN


Simplified
Clay's Kochab's Clock
Polar Alignment Method
For The German Equatorial Mount

This is a very simple method of achieving a very precise polar alignment
with the LXD75 mount using the polar scope.  This method will work well
for any German Equatorial Mount having a polar scope installed in the
mount.  There a few key points to cover to insure you achieve the best
possible alignment using this method to align your mount.

1.)	Be sure you have collimated/aligned your polar scope to the R.A.
Axis of your mount.  This step will insure your final Polaris position
in your polar scope is very accurate.

2.)	It is best to do the alignments without the OTA on the mount as
this allows for the R.A. axis to be rotated the full 360o that may be
required to align Polaris and Kochab in a straight line.  This can be
done with the OTA in place provided the required angle of rotation does
not cause collision issues between the mount and the OTA when attempting
to achieve the initial alignment of Polaris to Kochab.

3.)	Set the tripod up as you normally would, pointing the mount to
magnetic north leveling as you are comfortable with.  A note on leveling
the GEM while technically this is not an absolute necessity with the GEM
style of telescopic mount.  Getting the mount setup as level as possible
can save you time when doing your more precision polar alignments.
Technically a GEM can be out of level and still be polar aligned, once
the R.A. axis is aligned and the declination axis set to the correct
latitude the mount is correctly polar aligned level or not.  It is just
getting to the correct alignments when your GEM is out of level takes
more time & work than starting out level.

OK, now that you have covered the basics; your polar scope is
collimated; your tripod and mount are setup and ready to go (latitude
set to your location) lets get started on the actual alignment
procedure.  Leaving the counterweights and OTA off of your mount, sit
yourself in a position where you can sight along the counterweight bar
to align Polaris and Kochab up in a straight line along (parallel to)
the counterweight bar.  Loosen the R.A. Axis clutch and turn the R.A.
axis until you can achieve a straight line between Polaris and Kochab
along the edge of the counterweight bar, set the clutch.  Once Polaris
and Kochab are lined up sight through your polar scope and use the Alt &
Az adjustment bolts to bring Polaris into the small alignment circle on
the polar scope crosshair.  OK that's it you're done, your mount is now
polar aligned!  You can do a drift alignment procedure to bring your
mount to the utmost alignment for long exposure photography, but I have
found in my past experiences with doing the Kochab's Clock alignment on
my LDX75 I need very little if any adjustment when drift aligning.

I have shot 30  60 stack images of up to 2 minute long exposures frames
using this method alone without having star trailing.  If your mount is
well tuned and the polar scope well aligned/collimated you too will find
this method to be very easy and time saving when setting up for a star
gazing/imaging session.  This may sound too easy or good to be true, but
believe me I didn't come up with the Clay's Kochab's Clock alignment
method, it's been around for a long time.  This is just how I adapted it
to the polar scope set up in the LXD75 and similar GEM mounts.  Dr. Clay
Sherrod explains what the concept is very well in his article on his
method.  Here's a web address where you can find his article.

http://www.weasner.com/etx/ref_guides/polar_align.html

I have also included some drawings of the LXD75 polar scope as it is set
up in the LXD75 mount, as well as how to line everything up.  To check
the alignment/collimation of your polar scope simply set the tripod and
mount up with out the OTA; counterweights; and counterweight bar
removed.  Lower the Alt adjustment and tripod in a position where your
can sight a stationary ground/terrestrial target through the polar
scope.  Put the X of the crosshair on a marker terrestrial target;
release the R.A. clutch and rotate the R.A. axis while sighting your
target through the polar scope.  The target should stay centered in the
polar scope crosshair, if it does not your polar scope is out of
alignment and you will need to align it.  This is done using the 3 Allen
head set screws located in the retaining collar holding the polar scope,
this is also a good time to turn your polar scope crosshair so the long
line with the alignment circle on it to line up straight with the
counterweight bar position.  Be careful when tightening the set screws
the will strip relatively easily, I recommend replacing them with an
aftermarket 'thumb screw' style of collimation/alignment screw.  I check
my polar scope alignment about once every 3 or 4 outings and have rarely
had to tune it back in.

Good Luck and Clear Skies!

Mark Jordan
AKA: The Mad One
Return to the top of this page.
Go back to my LXD Home Page.