GUEST CONTRIBUTIONS ARCHIVE 1998
Last updated: 31 October 1998
GUEST CONTRIBUTIONS ARCHIVE 1998 |
Here are some miscellaneous contributions from other ETX users. If you have something that you think would benefit other ETX users please send it to me. Send any images as GIF or JPEG files; due to internet email gateway issues, please send only one image file per message. Send to etx@me.com. Alternatively, if there is a web page with the information please let me know and I'll include a link to it.
From: SeaOttrz@aol.com
I bought a Daisy Electronic Point Sight for $12 and change, after reading an article by Dennis Allen [www.featurefarm.com/mas/mas_articles_dob3.html]. He recommended putting a finger in front of the red light for a dimmer control. Inconvenient. I took the thing apart and found that Daisy had designed it for maximum brightness (day shooting, I guess) and it was drawing 35 ma, a pretty husky load for a small battery. I toyed around with inserting a series resistor in the battery/LED lead, and ended up with 33K ohm to cut the brightness down to about the same as an "average" star. The current is now 40 microamperes, about 1/1000 of the manufacturer's design... battery ought to last longer than the sight. I removed the clamps that are meant for mounting to a pistol receiver. Next, I'll try simple double-sided masking tape to hold it to the barrel of my ETX. Since this "sight" is meant for use with both eyes open I have ahunch it will be a big help as a finder for the ETX.
From: Mark Peterson (mhpdfp@flash.net)
I have a heavy duty Bogen tripod that works fine for the ETX when removed from the fork mount and used as a spotting  scope, but it has too much vibration when I get serious and take the ETX out at night. I guess I've been spoiled by my Oddessy. So
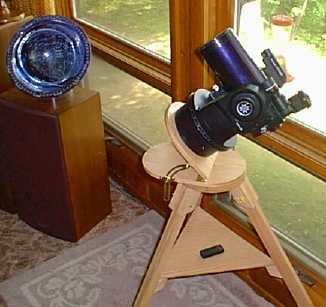
  I built my own wood tripod out of 1x2's. When 'thumped' it will dampen vibrations in less than a second like my Oddessy and I no longer wish for a motorized focuser accessory. When considering a tripod I think ETX owner should consider a wooden one, if you don't, every time you touch the focus knob you'll wish you had. My homebuilt cost about $70 in materials to make using common pine lumber.
I have had alot of requests to post the plans on your site. Truth is I didn't use any plans to build the tripod, just made it up as I went along. I made a crude sketch that I'm sending along that has the basic dimensions and with the 2 photos it might be enough someone to duplicate it.
As far as construction goes everything is made of "1 by" (3/4" thick) pine. The legs and their attachment brackets are 1x2's (3/4"x1-1/2") and the topplate from a 1x8 (3/4"x7-1/2"). The legs are angled out 30 degrees as are angled cuts. All bolts are 1/4"-20 by the appropiate length. The metal pieces that tie the 3 center braces together are small 90 degree "L" brackets that I flatted to 60 degrees and drilled the holes to fit the 1/4" bolts.
 Here are some tips that might save some time & money: The length of the center braces has to be cut to fit after assembling the tripod, so use the 8-5/8" length shown as just a estimate. I cut my center braces down to 3/4"x 1" mostly for looks. Use a jig of some sort to drill all the holes on the center of the 1x2's and exactly the same distance apart or they won't line up when you change the tripod's height. Don't tighten the six bolts that attach the wooden leg brakets to the topplate completely until you assemble the complete tripod. The knob in the center was made from three 1"diameter & one 1-1/2" diameter 'donuts' cut with a hole saw and glued together. It has a "T nut" in the bottom. A long carriage bolt goes thru the wedge cradle's bottom plate, thru the tripod top plate into the wooden knob.
I did't include any dimensions on the wedge because after seeing the one Gary Hanson built at your site, I think his is better. It has got to be at least 1/10 the trouble to build and I like the way it looks too. I'll probally be building one like it for my tripod in the near future.
 Also, I have been asked about the lack of an eyepiece tray in the center of the tripod. The enclosed photo of the small 3 legged table I built should answer that. It is extemely simple to build and cost about $30-$40. It is made from a 24" round pine top that can be purchased already cut, edged beveled and sanded . The legs and their mounting brackets as well are prefabricated and all this is availible at Home Depot or Builders Square. All that's required is laying out the 3 brackets 120 degrees apart aroud the top and about an inch from the edge and screw them in. The legs have bolts on the top to screw into the brackets and can be removed for storage or transport.It take up almost no space at all in the bottom of your trunk and weighs about the same as the ETX. The photo shows my ETX on the table to give you a sense of scale but it really isn't rigid enough to be a good observing table.
From: Al Peck (PEKTRONICS@aol.com)
I'm very good at building this stuff but not very good at "putting it all down on paper" so the next guy can duplicate or understand what it is I'm doing. A friend who is good at this sort of thing, he writes for several of the electronics mags, is interested in doing an article on the camera, so this might be a better way to go in terms of details for ETX users than for me to try and stumble thru diagrams, pictures, and things I quite frankly don't know how to do or for that matter want to do. The basic concept is easy. There are lots of these "one board" spy cams available, very sensitive (.1 lux), hi res, and @ a reasonable price(as low as $85). NTSC video out of the cam. into a frame capture device, I have found the "snappy($99)" wonderful for this aplication. A "T" adaptor, and PVC fittings, mount all this to the ETX camera port. The secrete here is that the mounting to the ETX port must be very rigid. A good regulated voltage source to the cam. seems to help alot in noise reduction, mine seems to work best @ 10.7 volts. These camers are just a circuit board with a lens attached, which must be removed, and mounted in a box with good RF shielding, outside RF being another sorce of noise. A video level adjust is a must out of the CCD for this aplication. There are normaly several adj. pots on the board for various adjustments, the trick here is to find the right one. Trial & Error. Good Luck!! OK.... maybe this is more than easy but you can get the idea that it can be done at an experimenters level, and I think that those that have invested in the ETX are not hardcore astrophysists, but want to experiment with their telescopes
From: Stefan Thiele (office@ait-trading.com)
 As an avid user of Meade's ETX, I have come up with a home-built solution for all observers, wishing to use a stable, yet lightweight polar wedge for their ETX. The entire assembly is made of aluminum and features two base-plates, held by two side-pillars that are easily demountable and which are each held by three set-screws. The plate that holds the ETX drive-base has a center-hole to accomodate a 1/4" bolt to attach the ETX to the polar wedge and an off-center opening to reach the On-Off switch, even when the ETX is mounted. The bottom plate is designed to firmly support the ETX on any flat surface or can be used to attach the polar assembly to any MEADE or CELESTRON Field tripod via the appropriate threading. A second 1/4" thread accomodates all regular photo-tripods of sufficient strength. For further evaluation, I have added a picture that may help to show some of the qualities of my ETX-wedge. Anyone interested in this unique accessory may contact me in Germany at the e-mail address given above.
From: Rich Ray (rayra@earthlink.net)
 Purchased my ETX, found included legs to be lacking, looked into tripods and wedges, looked into commentaries on Weasner's website, did some shopping around, and found a few companies offerred some utilitarian aluminum plate mounts, with very few options and with one even of questionable stiffness. Being fairly handy, and having access to a large selection of tools, and wanting a super-portable wedge mount, I decided I wanted to make one myself. I selected oak and brass as my materials, both for their workability and their aesthetic appeal.
I also created a simple / cheap ($5) safety 'leash' as I did not like the looks of my quick-disconnect on my tripod, and it has already paid for itself 150-fold when my QD did indeed fail, leaving my telescope / camera / wedge swinging in space instead of bouncing off the concrete below !! +100 pts for being worried enough to devise something, -100 pts for going ahead and using the QD anyway.
I've also applied several of your site's other modifications; the drive indicator LED is great!; the PVC coupler / light shield works great, and also the trick of mounting eyepieces inside the photo coupler using tissue-paper. Just want to say thank you again for your great work in collecting all this useful stuff in one place.
More info and detailed photos on Rich's home.earthlink.net/~rayra/rscope.html web page.
From: Don Anselmo (Don_Anselmo-P26249@email.mot.com)
I don't recommend that any one except a retired crazy attempt to build a case which is worth more than the telescope, but I thought you'd like to see it anyway. Stay tuned I'm also building the mother of all tripods. 
From: Gary Hansen (ngc6960@mlecmn.net)
I thought I would share a tripod I built for my ETX that's as portable as the scope. I used 3/4 inch oak for the top and leg's, The legs come off the top for easy transport and convenience.
I completed the wedge for it Friday, and it works great....
From: Don Anselmo (dranselmo@uswest.net)
I made the simple wedge in the photo in a couple of hours. The CG offset really helps the stability. It is built for 33 deg 17 min. The level lets me set up and find polaris in about 20 sec without needing the finder scope.
I have taken a more detailed pic and attached it. The material is 1/2" birch plywood. The mounting plate is 3/16" brass 2"X3" drilled add tapped to take the1/4-20 tripod screw. The angle with the babe is 90 minus my latitude in Az. Each corner of the brass plate was drilled to allow the use of 4 10-32 screws to hold it to the underside of the horizontal base. The off set to compensate for the CG is 4" from the projection of the telescope mounting point to the tripod tapped hole. The small hole near the telescope mounting screw is 1-1/4" in dia to give access to the motor drive switch.
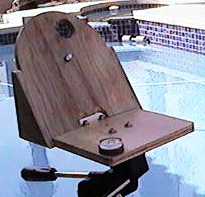

If your latitude is 31.33 deg, the angle the wedge would make with the horizontal base would be 90-31.33=58.67 deg. Construct the angle by laying out a template on cardboard . Form a triangle with a height of 5 inches, then the base of the triangle would be 5X cos 58.67 or 5X.854187,which is 2.6 inches. Doing it exactly you will only be off .0002 deg or .7 sec of arc. This will give you a wedge that is exact to the pole. Polaris will be .5 deg off center.
From: Scott Friedemann (RandomSF@wctc.net)
With inspiration from the "Q" company and some PVC, I built a light-weight, sturdy, customizable, cheap tripod. Using legs of 1.5" pipe, a main upright of 4" pipe, and various fittings, I have spent well under $40 and would be hard pressed to do better.
A few details.
The legs are 24" long with a 45 degree ell at the bottom for a 'foot,' and a 45 degree street ell at the top. These slip fit into 1.5" pipe caps which are PVC cemented and bolted (overkill?) to a 4" pipe cap. A pin through each 1.5" cap and street ell holds the legs in place. Inserted into this 4" pipe cap is a 4" pipe (naturally) which is cut to the height desired, in my case to reach eye level of my wife while standing. On top of this is one of two additional 4" pipe caps. One is simply a cap reinforced underneath with a small piece of plywood with a hole drilled through the center. This setup is for terrestrial viewing. The ETX attaches with a 1/4"-20 bolt. A wing nut on the underside pulls the ETX tight to the cap. For celestial viewing, I cut a wedge for my latitude, screwed it to a short piece of lumber to offset the scope and move the center of gravity over the tripod, added a bubble level and bolted this whole affair to another 4" pipe cap. The same bolt and wing nut holds the scope to the wedge. It would be a simple task to make an adjustable wedge for multiple viewing locations. The legs store inside the main tube. All parts fit in a 30" long duffel bag.
BTW, we picked up a Rubbermaid, structural foam (very rigid), tool case for $25 to store the ETX. It's sized right, the tray holds lots of accessories, and is a better price than the $100+ I have seen for other hard cases.
From: Martyn Johnston (Martyn_S_Johnston@compuserve.com)
Love your ETX pages. I've recently bought one, (your info/advice helped!), and I've made a wedge for it to fit onto a very sturdy, flat-topped tripod I've got.
It's made from two pieces of aluminium, one is simply a round plinth for the ETX to sit on, which also acts as a lock for the threaded bar; which I made from a 1/4x20 bolt with the head chopped off. The other peice is shaped to suit the users latitude, and has a flat & level extension at the back. This extension does two jobs; 1. it holds a small round spirit level in the drilled out hole, (available from any camera store), which is glued in with some silicone sealant, and 2. it acts as a support for a compass (from a camping store) to align it to North. The 1/4x20 female insert, in the base, was also bought from a camera store.

[Image file is full size but displayed reduced. Copy it to your hard disk if you want to read the detailed text.]
It works well, was much cheaper than the flash adjustable ones in the shops, and it's small enough to fit in my accessory box.
From: Frank Dement (FGBIKE@aol.com)
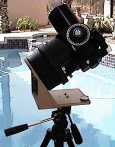
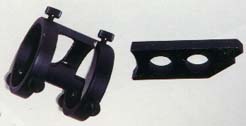
The original mount is well done however it was inconvenient for me because it was too close to the eyepiece even with or because of the right angle modification that I purchased from Jim's Mobile lnc. Since I prefer to keep my glasses on while observing that interferes more when using the standard mount than without glasses.
 This is a dangerous modification in the sense that a small bump could tear the attachment screw (#440) from the body of the scope. If you should remove the finder bracket you will see a small threaded brass insert which is cast into the scope body, at least it is on mine, this is ok for the original mount but with my modification the extension bracket provides a leverage that could possibly tear out the brass insert if bumped. I am willing to take the risk for the more convenient finder position.
It would be nice if Meade could make a factory upgrade for future ETXs that would allow for a different finder mounting scheme.
From: Paul J. Boudreaux (boudreau@eng.umd.edu)
 After reading requests for help in converting the Latitude Scale on the center leg to alternate positions, I prepared this simple chart to help those do the conversion. I worked out the values using Excel. Tim Kline (in the March 98 Feedback) was right about the Trig, but he was wrong in his estimate of the accuracy. The scale on the center leg is quite accurate. You have to take into account, for the length of the leg, the extra inch contributed by the base itself to make the calculations accurate. The 9.3 inch is correct for the normal (perpendicular) height, but the leg length must also include the one inch contributed by the base itself. The other two legs are located one inch from the base plate where the center leg is attached. When this is done, we get the graps shown in my chart. I hope they prove useful to others.
From: Frank Dement (FGBIKE@aol.com)
Here are photos of my ETX with the attachments to drive the Advanced Astro Master encoders. When I purchased the Astro Master from Orion Telescopes a number of years ago it came ready to attach to a Celestron telescope with all the necessary parts. The nice domed cover for the declination axis encoder was part of the package.
 I used a short section of aluminum pipe to which I attached a cross piece to hold the encoder and a thin flange to which I attached the domed cover. Three Holes were drilled in the fork leg in order to attach the pipe section inside of the fork leg. The dec. circle was discarded, so was the warrantee. Picture #2 shows the dec. axis with the cover removed. Picture #2A shows the detail
  of the encoder mounting. Inside attached to the dec. axis was a bolt in which I had drilled a hole the proper size to fit the encoder shaft also at right angles to the bolt head I drilled and tapped for a 6-32 screw to hold the encoder shaft in the bolt head (see picture #3).
 Picture #4 shows the right ascension (R.A.) encoder mounted on its bracket with the friction wheel attached. The assembly is upside down in order to show more detail. The silver cylinder is actually a spring to keep the friction wheel pressed snug to the R.A. circle. The "tire" on the friction wheel is a rubber 0 ring. The encoder and its mounting bracket are seen in its proper
  orientation in picture #1, mounted to the base of the ETX with a 1/4-20 bolt to one of the tripod attachment sockets(I use a fixed pier behind my house to mount the ETX for observing so the tripod sockets are unused).
The "gear ratio" for the R.A. encoder when used on a Celestron fork mount is 1:1 with the friction wheel in place the ratio is changed to: the circumference of the friction wheel to the circumference of the R.A. circle. i.e. circumference of friction wheel divided by the circumference of the R.A. circle. The encoder ratio is entered when the Astro Master is in the setup mode as described on page 21 of the Celestron Advanced Astro Master Instruction Manual.
CONSTRUCTION NOTE
I have one of the early Smithy lathe-mills which I used to make the parts fit. Did a lot of hole drilling and tapping for threads. When using small taps in aluminum it is very easy to break the tap as they will bind and break. One should use a taping fluid and remove the tap every few turns and clean the aluminum particles from the tap. Yes it is time consuming but it is easier than trying to remove a broken tap from a tiny hole without destroying the part, I know.
From: Kit-ying Hui (khui@csd.abdn.ac.uk)
I've just put up some text describing the way that I mount the QuickCam onto the ETX for eye-piece projection. It is a light-weight solution without any extra purchase or hardware work. Good for poor/lazy people:
www.csd.abdn.ac.uk/~khui/etx_qc.html
You can link through my astronomy page, anyway:
www.csd.abdn.ac.uk/~khui/astronomy.html
Enjoy and clear sky!
From: Han Kleijn (Han_Kleijn@compuserve.com)
The program "Hallo northern SKY" is a simple windows application which plots an electronic version of the night sky. It displays all stars till magnitude 8.0 (or 9.5) and 8415 deepskyobjects. It also shows the planets, Moon, Sun, the Jovian moons, phases of the Moon and innerplanets, rings and moons of Saturn and some minor planets and comets.` The intention of the program is to familiarise you with the night sky and prepare yourself with a map for a night with your telescope. To help you with this, all deepsky objects are displayed in the right size (diameter)` This program is free. Please distribute and enjoy. Inform me if you liked it. Comments are always very welcome. This program stays (C) Han Kleijn and you may not make money of it. Please distribute with original files only.`
ourworld.compuserve.com/homepages/han_kleijn/software.htm

HNSKY version 1.31 has been released. Main new feature is the "Night vision mode". After selecting this menu option, all windows and menus will become red. This will save your night vision during observing.
See the Guest Contributions Archive 1997 for contributions submitted in 1997.
Return to the top of this page.
Go back to my ETX Home Page.