 |
Last updated: 22 June 2011 |
![[Home!]](../../images/mighty_etx_logo_orig-sm.jpg) |
|
Nikon D7000 DSLR Kit with 18-105mm VR Lens
$1500

Jump to the start of today's update.
31 October 2010
I've had a Nikon D70 DSLR since April 2005. It has provided me with a lot of excellent general photography and astrophotography. But it was getting a little dated in its capabilities, so earlier this year I began considering upgrading to a newer model. Two Nikon models came to mind: the D90 (a direct upgrade path from the D70) and the D300s. However, before I was ready to purchase a new camera, Nikon announced the D7000 in September 2010. After reading the specs and reviews, I was hooked. The D7000 was the camera to replace my D70.
I had complained to Nikon for some time about their DSLR camera model naming scheme; there is no logic to it. Their model number sequence like D3, D90, D300, D5000, does not indicate an "order-of-magnitude" increase in capabilities or performance from one model to the next. However, with the D7000 DSLR they got it right. It is definitely two orders-of-magnitude better than my D70 DSLR, at least on paper, which is all I had to go by when deciding to get the D7000. And as my tests have confirmed, it is significantly better than my D70 DSLR.
For my purposes, several factors weighed heavily in my decision to go with the D7000. The main ones for astrophotography were:
1. Much higher ISO range. The D70 would only go to ISO 1600. The D7000 goes to ISO 6400, with an extended range to ISO 25600. (Yes, you read that right.)
2. Live View, allowing the mirror to be flipped up and the image on the sensor viewed directly on the camera LCD.
3. Much larger LCD. The D70 LCD was rather small. The D7000 LCD covers nearly the entire back of the camera, making it easy to confirm focus on images of faint objects.
4. The mirror can be manually flipped up before the exposure is started. That is important to avoid vibrations during long exposures. With the D70 (and other cameras) I would use the "Hat Trick" method.
I ordered the D7000, along with an extra battery and the EP-5B connector for my Nikon AC Adapter, from OPT on 11 October. The camera arrived on 25 October, a week after Nikon started shipping the new D7000. That was a surprise. Thanks OPT! Unfortunately, the extra battery and AC Adapter connector were on backorder from Nikon (and still have not shipped as of this writing).
Here are front and back images of the D7000 (left) and D70 (right) for comparison.


In my initial testing, I discovered that the Nikon D7000 DSLR Raw image format is not currently supported by Mac OS X 10.6.4 and Aperture 3.1. I had no problem with the Raw format used by my Nikon D70 but Nikon changed the Raw format for the new D7000. Grrrr. So, I'm stuck with JPEG for now (at 4928x3264 pixels). I hope Apple quickly updates the Raw converter for Nikon's new NEF file format, as that is the format I prefer for all my photography, including astrophotography.
For astrophotography, many times the "bulb" setting is needed to allow for long duration exposures. I use the Nikon ML-L3 wireless remote (which I used with my D70; it also works with the D7000). First, you set the mode dial to "M" for manual settings and then set the shutter speed to "bulb". With an auto-focusing lens attached, it is necessary to switch the A/M lever to M. This is not required when no lens is attached, as when using a T-Ring adapter.
As I hoped, "Live View" can be used in the Manual "bulb" exposure mode. This means, that for bright objects (moon, stars, planets, etc.) the image through the telescope can be focused on the large display, with or without the Bahtinov Mask or Stiletto Focuser. And the remote release does work in "Live View" mode. Since the mirror is flipped up in "Live View" and the remote works in "Live View", this may become my preferred method of doing astrophotography. When not using "Live View", the remote can be set to use one of three release modes: a 2 second delay when the button is pressed, no delay, and mirror-up, which raises the mirror on the first button press, opens the shutter on the 2nd press, and closes the shutter and releases the mirror on the 3rd press.
One other nice feature of the D7000 is that there are two sensors for the wireless remote release, one on the front of the camera and one on the back of the camera. When my D70 DSLR, which only has the front sensor, was mounted on the telescope at prime focus, the sensor was sometimes blocked and I would have to move the remote around to get a clear line-of-sight to the sensor. With the D7000 and the rear sensor, this will not be a problem.
I spent several hours the first day I had the camera learning to use the D7000. There are many similarities to the D70, but also some differences. I set up various settings for how I plan to use the camera, for general photography and astrophotography. I quickly became comfortable with using the D7000 for general photography, although I'm sure I'll be tweaking some settings for awhile yet. Then I just had to wait for a clear night to start some astrophotography tests. And so, how does the D7000 perform in astrophotography? Read on.
As of this writing, I've only done some mininal testing but here are some example images. The original images were done in JPEG Fine format, 4928x3264 (16 mega-pixels). They are reduced in size for posting here. I'll note when the image has been edited or cropped from the full-frame version. I hope to switch to Raw format soon; I'm waiting for the Raw converter for my software to be updated for the new format used by the D7000. Raw provides considerably more editing capabilities than JPEG.
This is a waning gibbous moon, hand-held with the 18-105mm VR D7000 Kit lens set to 105mm focal length. The exposure is 1/320sec, f/13, ISO 500.

This is the moon on the same night with a 70-300mm VR lens set to 300mm, 1/320sec, f/13, ISO 500.

The D7000 does pretty well on moon photography.
As I walked to the observatory to do some wide-angle astrophotography, I took this photograph of the western sky about 30 minutes after sunset with the D7000 Kit 18-105 VR lens set to 18mm. The exposure was 1/60sec, f/3.5, ISO 400. The photo accurately showed the colors I saw.

I placed the D7000 on a tripod, focused the lens on Jupiter (through the viewfinder), set the lens to 18mm and f/3.5, and then pointed the camera at the Milky Way. After the sky was dark, I took a series of 1 minute exposures at different ISO settings. Here are the unedited images:


I was pleasantly surprised to see the sky overexposed at the ISO 25600 setting. This is the first time I've ever seriously overexposed the night sky from my dark sky site. This likely means that for astrophotography, ISO 25600 will not be required. But more testing is required before I make that definite.
Here is an edited version of the 1 minute, ISO 6400, image:

The skyglow shows worse than it actually is.
I mounted the camera on the Meade 8" LX200-ACF telescope for some piggyback M31 astrophotography tests. M31 was actually visible through the D7000 viewfinder. The D7000 viewfinder is so much brighter and clearer than the D70 DSLR viewfinder. I could easily see some stars in the D7000 viewfinder, which will help when focusing. With "Live View" I could not see M31 on the display but could see some stars. That will also be useful for checking focus. I took several images of M31 at 105mm, f/3.5, guiding with the telescope during the 5 minutes exposures. Here are the unedited images:

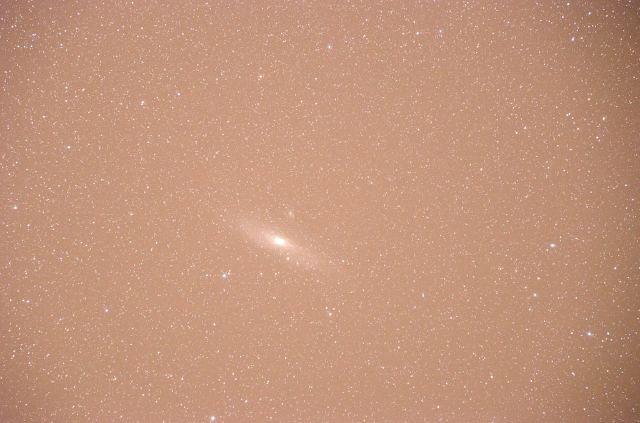

This is the ISO 6400 image with some editing:

Here is a cropped version of the above image easily showing M31 with its spiral structure, some dark lanes, and companion galaxies:

The large LCD on the D7000 gave me a pretty good idea of how the images looked after I took them. And viewing them later on the computer confirmed the quality. The above were the initial D7000 astrophotographs I did. Now that I knew how well the camera could perform and I now had some experience with imaging with the D7000, I did some additional testing at the telescope.
Before I had a chance to do some additional astrophotography, I had the opportunity to visit Kitt Peak and look through the WIYN 3.5-meter (yes, a 138" aperture telescope!). The full report of my visit is online. I took some night shots from inside the telescope dome at various ISO settings. These handheld images show just what can be done with the D7000 when you are not planning to do astrophotography.


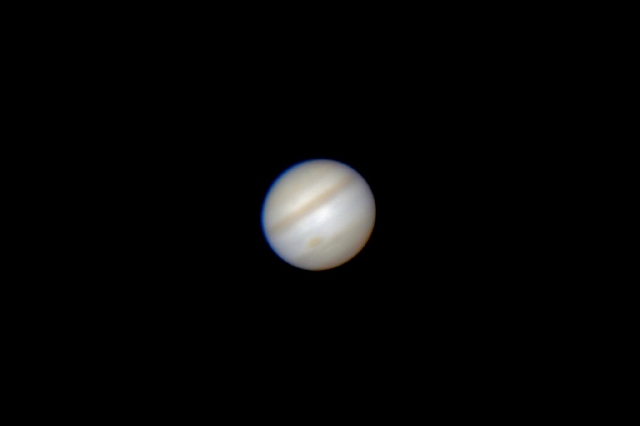
The next night I was able to resume my D7000 astrophotography testing. I took some images of Jupiter using eyepiece projection with a 12.5mm eyepiece. This first image, slightly edited, is 1/200sec at ISO 2000:

I tested using "Live View"; Jupiter and Ganymede could be easily seen on the LCD.
The D7000 DSLR can also record movies, with or without sound, at HD quality. For some astrophotography, like with planets, video can be the preferred mode. Then during post-processing, the best frame or frames can be selected, and optionally "stacked" with appropriate software. I tested video on Jupiter and here is one frame:

With some additional experience and post-processing, it appears that the D7000 can do some pretty good planetary imaging.
Next, I did some prime focus imaging using the Meade 8" LX200-ACF f/10 telescope. Here are some example images. M13, the Great Globular Cluster in Hercules, and a nearby star were visible in the viewfinder; I focused on the star. However, I didn't get a precise focus but the images still show what is possible at some of the ISO settings.


M57, the Ring Nebula, was also visible in the viewfinder (but very faint).

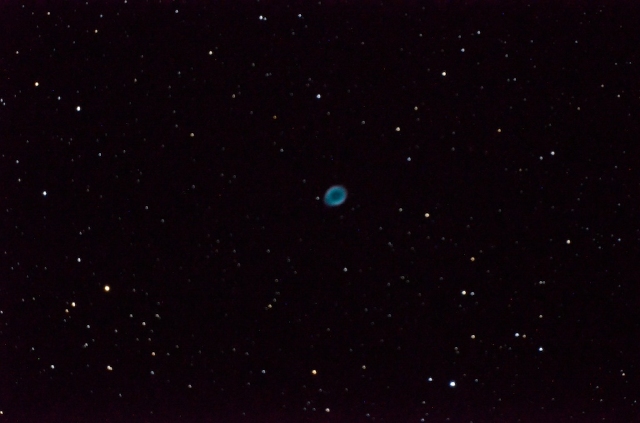


I tried using "Live View" with M13 and M57, but neither could be seen on the LCD.
I then did some wide-angle imaging. Here is the Milky Way, 2 seconds (handheld), f/3.5, 18mm, ISO 25600, slightly edited:
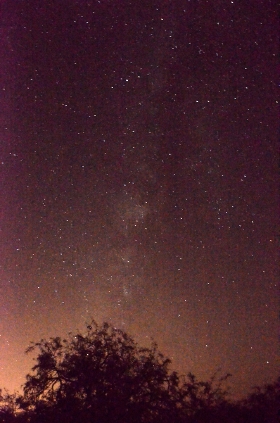
Not too bad for a handheld photo.
I mounted the D7000 DSLR on a tripod. Here is a 10 second, f/5.6, 300mm, ISO 25600, image of M45, the Pleiades, unguided and unedited:

In the original image (uncompressed JPEG), some blue-ish nebulosity is just visible.
Here is M31, the Andromeda Galaxy, with the D7000 on a tripod, 10 seconds, ISO 25600, unguided and unedited:


I piggybacked the D7000 DSLR with 300mm f/5.6 lens on the 8" telescope. Here is a 10 minute, guided, ISO 6400, slightly edited image:

I think it is fair to say that the Nikon D7000 DSLR definitely outperforms my old Nikon D70 DSLR when doing long duration astrophotography at higher ISO settings than were available on the D70. There is considerably less heat-generated sensor noise (in fact, it is almost non-existent). I had the D7000 "High ISO Noise Reduction" setting on Normal (Low, Normal, High, and Off are the available settings), but "Long Exposure Noise Reduction" was turned off for all my astrophotography tests.
One other note about the D7000 DSLR. There is a sensor dust removing option. You can set the camera to vibrate the sensor on power on, power off, or both, to shake off any dust which may have settled on the sensor (that would cause spots in the images). When doing astrophotography at the telescope, the lens is frequently removed and mounting adapters are attached. This means there is a lot of opportunity for dust to get to the sensor. I saw this on my D70, which did not have a sensor cleaning option, so I had to manually blow off any dust particles. Now, with the D7000, I just let the camera handle the problem. I have it set to do it at power off only, as I want the fastest power on for the nature photography that I do.
Most of the images I've shown on this report have been unedited so show the basic image captured by the D7000. Of course, proper editing can improve many images, as seen in a few posted here. I will post additional D7000 DSLR experiences and images on the Reports and Photos pages on my Cassiopeia Observatory web site. Check there for ongoing updates.
My previous articles on astrophotography with the Nikon D70 DSLR are still applicable to much of astrophotography with the D7000 DSLR. You can see those articles on my "D70 DSLR Astrophotography" page.
12 November 2010
To see a full size (4928x3264 pixels) unedited D7000 DSLR ISO 2000 JPEG image of Cassiopeia click here.
I have created some "dark frames". Here are the unedited images (only reduced in size):


Only the ISO 25600 is really noisy in the original dark frame. It shows a lot of red pixels.
I continue to post additional D7000 DSLR experiences and images on the Reports and Photos pages on my Cassiopeia Observatory web site. Check there for ongoing updates.
14 December 2010
When I ordered my Nikon D7000 DSLR back in October, I also ordered an extra D7000 EN-EL15 battery and an EP-5B Power Connector for the Nikon AC Adapter. They were on backorder from Nikon and finally arrived on 9 December 2010. Thanks OPT!
To use the D7000 on AC power, you need both the Nikon model EH-5A AC Adapter ($75) and the Nikon EP-5B Power Connector. I already had the AC Adapter for use with my Nikon D70 DSLR, so I just needed to add the connector ($50, which seems a little pricey for what is essentially a "pass-through" cable).
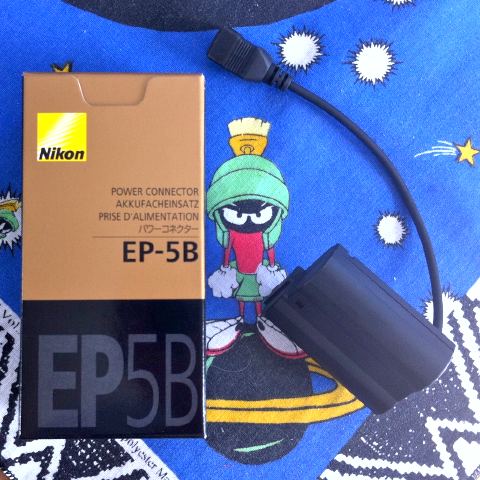
To use the D7000 on AC, you have to:
Once done imaging, you have to:
Whew! That's a lot to do in the dark while in the observatory.
With the D70 DSLR, the steps were:
Once done imaging with the D70, you:
With the D70 DSLR, I could easily do those steps in the dark in the observatory. I could actually do all the steps "by feel". In fact, there were only three steps to power on and off the D70 as I kept the AC Adapter plugged into the electrical outlet. I will do that as well with the D7000, so I'll only have 18 steps (vs the 6 steps with the D70). As it turned out with the D7000, I was able to go through all but one of the steps by feel in the darkened observatory. I did have to use a red flashlight to get the AC cord connector in the proper orientation for the Power Connector cable (step 8). Hopefully, I will eventually get used to the "feel" of the orientation and not need a light.
This photo shows the Power Connector inserted into the battery compartment and the connector cable routed out the little door:
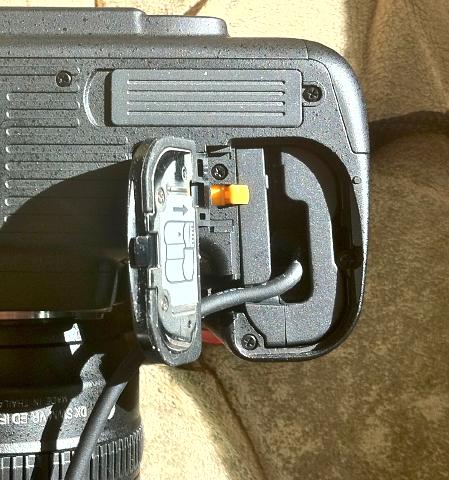
And here is the battery compartment door closed, showing how the connector cable comes out:

Why Nikon changed the AC power source design is unknown. Yes, it probably reduced the circuitry required for providing the DC-in (from the AC Adapter) by eliminating the DC-in on the D7000 and moving it to an external device. But it added a lot of complexity for the user. In fact, I noted one potentially serious problem with the Power Connector: the cable that is routed outside the battery compartment can easily catch on the battery compartment door when being removed. Whether that will cause extra wear on the cable or even break off the door remains to be seen. Hopefully there will be no issues with this design. We'll see.
But having the convenience of AC power for the D7000 when used at the telescope is nice. I found using AC very useful when taking several long duration exposures with the D70 DSLR and I'm sure it be just as useful with the D7000.
This is what the D7000 DSLR with the AC supply cord connected looks like on my 8" LX200-ACF telescope:

22 June 2011
I have been using the D7000 DSLR to video record the International Space Station (ISS) on my 8" LX200-ACF telescope. There are many challenges in imaging the ISS. I have discussed those, as well as some tips recently on my Cassiopeia Observatory reports. See the 16 June 2011 report for some basic information and the 21 June 2011 report for some additional information about using the D7000 DSLR manual video recording mode. To see my best ISS images to date, see the Cassiopeia Observatory "Satellite Astrophotography" page.
Keep watching the Reports page on my Cassiopeia Observatory site for Nikon D7000 DSLR astrophotography updates.
Go back to the Astrophotography Page.
Go back to my ETX Home Page.