Last updated: 25 March 2003
|
Last updated: 25 March 2003 |
Subject:	ETX90 wooden case step by step
Sent:	Tuesday, March 25, 2003 9:17:23
From:	pablo@peu.net (Pablo Untroib) [email may be bogus]
I saw a wonderfull wooden case in your site made by Don Anselmo, so I
decided to contact Don and ask for more pictures.
He is a nice man who replied promptly and then send me a couple of photos
with directions on how he made his case.

The I began building myself one, here is a step by step, so you can publish
it on your great site.
The measures are: 24" x 13" x 10"
The box is made of 1/2 plywood but you can use 1/4 as well
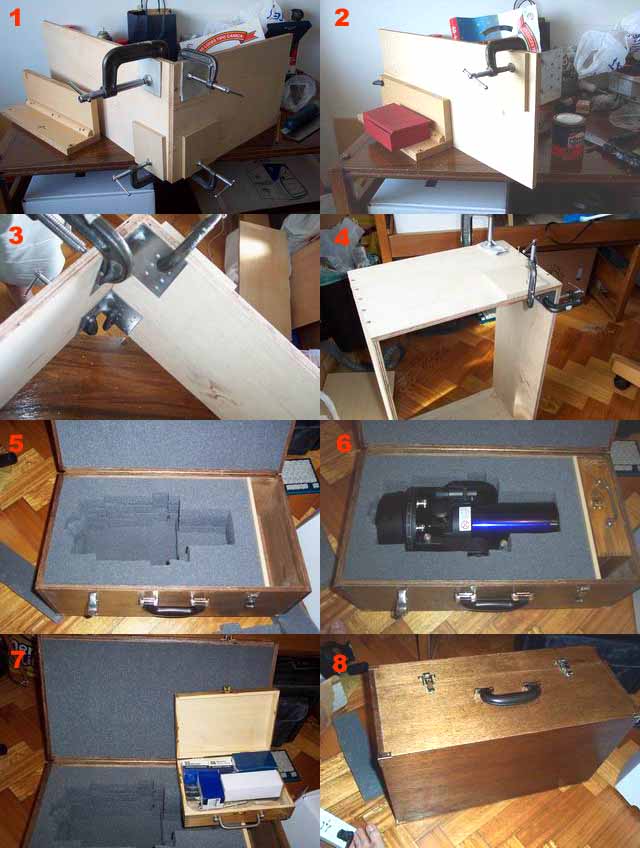
1 & 2) using metal angles as guides, glued and then screwed all the sides
3) here is a detail on how the metal angles help the process of aligning
and screwing
4) you can see the 4 sides screwed
*) there is a gap in the sequence, but these are the in betweens:
the case sides are 1/8 plywood and they were nailed.
IMPORTANT NOTE: the box was finished on all six sides and then sawed the
opening, this way to avoid missalignments.
The opening was sawed at 7" 1/4
The hinge is a piano hinge cutted to the case size minus one inch
Then I varnished / tinted the case to OAK
I purchased a large sheet of foam and the shop cutted it for me to the
exact internal dimension.
Its better to measure the exact internal dimension once you saw the opening.
the foam is 1"3/8 height but you can purchase other heighs, using this
height my case exactly fits 7 layers, 2 for the opening and 5 for the other
side.
I purchased a ready made wood box that will fit most of my eyepieces/barlow
and tripod legs.
Then measured the internal box width and sawed a division so it can be
screwed to the sides using  small metal angles (they are under the foam
looking to the telescope, not to the internal division)
5) here is the trickiest part: to custom cut the foam.
Using the scrapped parts of the large foam sheet I tried many options and
found that the cleanest cut is obtained by using a thin cutter with a blade
long enough to cut thru the height of the foam, the movement is a sawing
movement almost vertical, take your time
In the site you can find a template for the etx 90 ready made, so print and
cut it, and then use it as a guide to draw an outline for cutting.
the 1st layer is an uncutted layer, second layer its only cutted at the
bottom of the etx, so the OTA have a bed
3rd 4th & 5th are cutted using the whole outline
You may test the fitting layer by layer.
6) here is the scope in its case
7 & 8) the case is finished, by adding a handle and protecting corners.
(3-25-2003 Buenos Aires / Argentina)

cheers

PS: sorry about my English, feel free to spell check & publish this on your
site.

Pablo E. Untroib
-------
Capital Federal, Argentina
E-mail: pablo@peu.net
http://peu.net/comollegar.jpg

PGP Key ID: : 0xFC7177AF

/'"\
\  /  Use ASCII
  X   No envie e-mail HTML
/  \  ASCII Ribbon Campaign

Return to the top of this page.
Go back to the Tech Tips page.
Go back to the ETX Home Page.