ETX TECHNICAL TIPS
Last updated: 19 April 2001
ETX TECHNICAL TIPS |
From: Thomas Meier (thomas_meier@gmx.de)
A click on the pictures enlarges them in a new window.
Andy Papathanassiou (andypapa@yahoo.com) described on Monday, April 16 a modification idea with a thin needle roller thrust bearing of similar diameter to the base of telescope.
I have done that - Here is the description:
***************************
Caution - warranty will be lost !!
***************************
I have not tested well yet, but the mod seems to be very successful.
I purchased:
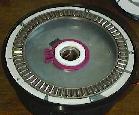
The total thickness is 7mm, 1mm more than before w/o the bearing. I think SKF has the same type numbers. Total cost here in Germany about $100. The picture shows the lower base with the needle bearing.
The rings are fastened with a strong double sided duct tape. 
Since the original bearing consists just in the white teflon ring the fork mount
always had a bit of slack and if adjusted "slackless" with the big
nut at the pivot axle there was too much friction. I saw this when I rotated,
the scope creeped a bit further after the motor stopped. Just like the famous
"creep after beep", but without any motor sound.
Now there is a much larger diameter to rest and a very low friction because
of the rolling "needles" (15mm long, 5 mm diameter). The base seems
to be much more stable and _without_ any "play" and nearly no friction.
The assembly is not very difficult - Let's look inside:
All you need is a bit mechanical experience and a stout heart ;-))
0) Clean the two thin rings of the bearing with alcohol to remove the strorage grease.
1) Remove the OTA as Jordan Blessing described in his great Tune-Up site etxtu.htm
2) Then remove the batteries, the three screws and open the cover/battery compartment.
At this stage, I also lengthened the two wires from the battery compartment
to the switch/connector pcb.
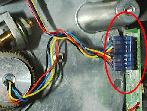
Now you can see the switch/connector printed circuit board with the two blue
plugs for the motors:
3) Pull the upper plug (for the AZ-Motor) and gently remove all the wires. The colors and order ist the same like the lower plug (ALT-Motor). They later can carefully be pressed back with a match or a thin tool.
4) Now loosen the AZ clamp screw completely and remove it (Description in Jordan Blessings etxtu.htm and Dr. Clays genious Performance Enhancement Tips at http://www.weasner.com/etx/techtips.html).
5) Remove the clutch plate and gear wheel. If there is a plug at the wires
you have forgotten step 3) ;-))
Now its time to clean the clutch and worm gear as Dr. Clay always recommends
8-)
6) The big nut at the center pivot axle (under the gear wheel) is fixed with
loctide but can be loosen.....
In the progress of loosening the nut you must lift the base from the fork mount
because the nut will touch and possibly damage the worm gear.
7) Now you can lift the fork arm assembly with the pivot. Control the metal
of the lower base part: If the surface ist not flat or even a bit bent (like
mine was) check it the ring of the bearing will rest very flat. If not: Try
to fix it.... Mine was bent a bit but the ring rested very flat.
Remove the six screws that fix the upper metal plate with the pivot axle to
the fork arms. Lay down the plate and look:

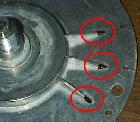
8) The blackened ends of the ribs at left and right have to be milled away.
Since it is aluminium its not difficult. I took a proxxon
micromot tool and 5 minutes later it looked like that:

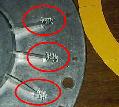
9) On the right side of the picture you can see the upper "counterpart
washer ring"
type AS150190, prepared with heavy duty double sided duct tape.
After cleaning the surfaces with alcohol the washer ring can be fixed __concentric__:

As you can see, you must grind some small recesses in the ring to make place
for the screw heads. The needle cylinders will not roll over this area. Apply
a sparse film of lithium white grease or molycote grease to the steel for lubrication
and protection to rust.
10) Back to the base: Prepare the remaining ring with duct tape as seen in
8). Clead the metal and fix the washer ring __concentric__.
Take some teflon or brass pieces laying around in your tinkering chest and glue
(epoxy or so) 3 of them in an angle of 120° to guide the cage with the needle
rollers (but not too tight - allow a play of 1mm):

Reassemble all that stuff laying around - Finished!
One tip for tightening the big central nut: Just snug until the play is gone and not more than 1/8 turn further.
If there is a screw remaining or a screwdriver missing: GOTO 1) 8-((
My opinion about that invasive mod:
No friction, therefore no creeping, no play, more fun....
At least I want to thank Mike Weasner, Clay Sharrod and all other contributers for their great work!
Thomas ( in Mannheim - Germany)
Return to the top of this page.
Go back to the Tech Tips page.
Go back to the ETX Home Page.