|
|
Last updated: 31 March 2010 |
|
|
| This page is for comments and user feedback about the "ETX Classic" telescopes. ETX Classic models include the ETX-60/70/80/90/105/125 (EC, AT, BB, Premier Edition). This page also includes comments and feedback of a general nature. Comments on accessories and feedback items appropriate to the ETX-90RA, DSX, and DS models are posted on other pages. If you have any comments, suggestions, questions or answers to questions posed here, e-mail them to me for posting. Please use an appropriate Subject Line on your message per the Site Email Etiquette. Thanks. Remember, tips described on this site may invalidate the warranty on your telescope or accessories. Neither the submitter nor myself are responsible for any damage caused by using any contributed tips. |
Subject:	lenses fell out of my 70mm!
Sent:	Tuesday, March 30, 2010 13:52:32
From:	robert layland (skallywampus@gmail.com)
There they were on the cloth...out of the ota faster than I saw the
order to reassemble them....which lens goes which way.....?  I see
images in daylight but moon a blur at nite...no starlight at all..
Mike here: See the two emails "ETX70 Objective Lens Arrangement???" further down this Feedback page.
Subject:	Re: Unattached Deflector / ETX-90EC /HELP?
Sent:	Tuesday, March 30, 2010 12:28:53
From:	richard seymour (rseymour@wolfenet.com)
Phil wrote:
----------
First I used some automotive wax/grease/tar remover (professional BASF
product from the auto paint store) to clean off all the residual
adhesive from the lens and the baffle. Then cleaned both parts with
denatured alcohol.
------------

The corrector lens is multi-coated... attacking it with unknown (in
terms of compatibility) solvents/cleansers can remove that coating,
which will lower the optical performance of the telescope.

Dr. Clay has posted a formulation for a "safe" cleaning fluid, or you
can buy good-quality multi-coated lens cleaning solutions from good
camera stores.

I realize that a scope with a dropped baffle is useless, so drastic
actions may be better than no action... but a gentler solution (-thin-
soapy water, followed by lots of rinsing) is safer for coatings.

have (careful) fun
--dick
Mike here: You can read more about Dr. Clay's cleaning solution on the "Cleaning Optics" page (http://www.weasner.com/etx/buyer-newuser-tips/cleaning.html) or you can read about buying a Kit at from OPT at http://www.weasner.com/etx/reviews/2004/opt-dcck.html.
And:
From:	PHIL G (cphilg@ix.netcom.com)
Perhaps I was not as descriptive as I should have been. I used many
Q-tips to clean ONLY the area that the baffle was attached to. No
solvent on the rest of the lens.

On the rest I use a mix very similar to Dr. Clay's. Mostly distilled
water with some anti fog agent. Has worked well so far...

Had the ETX 90RA apart a few times over the last 10+ years...

Modded with MicrostarII+ controller and focuser.

Haven't had to do much to the Celestron N5 though...

:)
Mike here: My ETX-90RA still has the Microstar II+. Works great! One of the early products from the good-ole-days of Scopetronix.
And:
Well, I AM a Mechanical Engineer by profession and take advantage of the
expert's advice before I dig into anything. Mike's site has been
bookmarked for a LONG time now...

Wonder what Jordan is up to these days. He helped me with some
resistance values to slow the focuser a bit. Kinda nervous about taking
the MSII+ apart but it worked well...

Regards to you both.

Phil
Mike here: Wherever Jordan is now, we wish him the best!
Subject:	EXT-80 dew shield
Sent:	Monday, March 29, 2010 18:50:22
From:	John2222@aol.com (John2222@aol.com)
Where do I buy a EXT-80 dew shield?  I was complaining to Meade that
there ETX-80 AT model I purchased didn't include a dew shield/light
shield.

For the edification of others with the same problem, I made one by
buying a 4" to 3" Soil Pipe Adapter (Nibco Model #CL5805) from Home
Depot or Lowe's.  I cut off the reduced section, leaving me with a dew
shield with a loose fit, so I purchased some green felt (liner for
drawers)  and one-inch electrical black tape.  I wrapped the objective
with two winds of one-inch electrical tape and then cut and added one
wind of one inch of the drawer liner on top of the electrical tape for a
snug fit of the two telescope components.

Works perfectly, no thanks to you Meade, for not selling this
much-needed dew shield accessory for this scope but doing so for your
backpack version of this scope.
Mike here: I did a Google search and found this one from Astrozap at Scope City:
And:
I wanted a plastic or metal one.

How can I mount a Nikon DSLR piggyback to the EXT-80?
Not prime focus.  Piggybacking.  I don't want to start drilling holes in
all the wrong places.
Meade doesn't sell an adapter for this purpose.
Mike here: I believe the Astrozap dewshield is plastic. As to your other question, please read the Email Etiquette item on the ETX Site Home Page regarding mixing email subjects. Thanks for understanding. As to a piggyback adapter, you could make one; see the Helpful Information: Astrophotography page for some ideas.
And:
I called Meade two or three weeks ago and spoke to a man with an accent
(either Spanish or of Indian descent).  I specifically asked if the
EXT-80's mount would support a camera piggyback, and he replied yes.  He
stated that if it will support a camera for prime focus use, it will
also support it for piggyback use.  That cinched my purchasing the unit.

Then yesterday, Tuesday, March 30, I called Meade and was conversing
with the Assistant Manager, who said the mount was not designed to
support cameras and counterweights, that the prime focus photographic
ability of it was primarily intended for daylight telephoto photographs,
as in a spotting scope that could take pictures, not tracking, etc.

I am impressed by my EXT-80 but am now wondering if it is an overrated,
glorified "toy."  Did you have any problems mounting or balancing a
camera on your scope(s), and did the added weight adversely affect your
scope(s) performance?
Mike here: I have done piggyback, afocal, and prime focus astrophotography on most of my ETX models. I did have some slippage with my D70 DSLR at prime focus of the ETX-70 (but it didn't have a counterweight). But other than that, all worked OK. Of course, you will be limited in the length of the exposures since the ETX was not designed for the precise tracking required for long duration astrophotography. When doing piggyback astrophotography, you can guide on a "guide star" using the main telescope. You can see many astrophotography examples by me and others, including some using the ETX-80, on the ETX Site.
Subject:	powermate question
Sent:	Monday, March 29, 2010 16:50:26
From:	Betty Rhodes (rhodes@uwm.edu)
I found this customer service number for the Coleman Company with one of
my older lanterns. Perhaps you can call them direct for help. Coleman
consumer service at (800)835-3278. No guarantee if it is still a valid
number. Also, check their website. I'm sure they have one. Good luck.
Betty

--

Betty Rhodes
Department of Geography
University of Wisconsin-Milwaukee
Subject:	necessary greasing?
Sent:	Monday, March 29, 2010 07:14:25
From:	Andy Lancour (andy@spe-wi.com)
I am getting the ETX 90 ready to sell and in comparing it to the new
125, the scope movement in both axes feels alot stiffer. Is there
necessary maintenance or greasing to be done - I didn't see anything in
the manual? Or do the newer scopes "move" easier than the older ones?
Thanks AGAIN.

Andy Lancour
Mike here: Well, you could apply some white lithium grease and make things better or worse. If you make it worse you would need to do a major cleanup job. Probably best to just see if redistributing the lubrication will help. Unlock the axes and slowly move the OTA back and forth, up and down, hard stop to hard stop, several times. As to newer models having smoother movements, improvements made by Meade over the years have resulted in better performance.
And:
Yeah, I could see that turning ugly.
Subject:	ETX-125 focus problem knob came loose.
Sent:	Sunday, March 28, 2010 20:28:44
From:	erpacollins (erpacollins@comcast.net)
I need advice on how to reattach the focus knob. I over turned it and it
came loose. I can't find any disassembly instructions on this site or
advice. My scope is the original model, purchased in 1999, and still in
good shape.

Need Help!!!!!!!!!!!!
Thanks!
Ernest
Mike here: There is a setscrew on the side of the knob. Slide the knob onto the focus shaft and tighten down the setscrew (you will need an appropriate size small allen wrench).
And:
Sorrow my request was unclear. The knob did not come loose, the shaft
it's attached to came loose inside the scope body.  I guess I over
turned it to far clock wise.
Mike here: Yeah, big difference in knob vs the shaft. See the article "Focus Shaft Fix" on the Helpful Information: Telescope Tech Tips page.
And:
Thanks Mike I unscrewed the barrel pulled out the mirror and reattached
the focus knob. All went well. Then I took it outside and observed Venus
and Mercury, before Mercury moves on around the sun. Then I found the
Orion nebula and was able to see it very well even here just north of
Houston.

Thanks again for your web site!!!
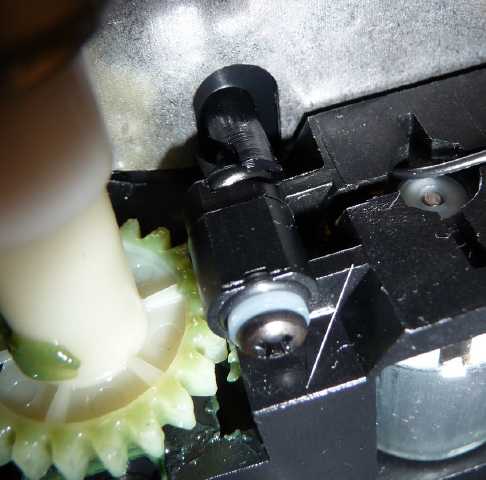
Subject: Re: ETX-125AT gear box stripped off Sent: Sunday, March 28, 2010 17:01:19 From: Yannick Dutertre (yannickd@gmail.com) I am still in discussion with the dealer (they might end up sending me a new mount), but in the mean time I have taken care of the remaining problem (mount would not run from batteries as attached in the picture), as per the attached picture.Mike here: I haven't heard of any problems using a reliable USB-serial adapter. However, note that not all adapters work reliably with the AutoStar. See the article "AutoStar and USB" on the Helpful Information: AutoStar Info page for more information. I recommend Keyspan adapters. As to updating to 4.3Eg, I forget whether you can jump straight to that version from 1.0c. If not, install 1.2g first and then you should be able to go straight to 4.3Eg; see the "AutoStar Software Archive" on the AutoStar Info page.I think the problem lies with the switch, but as I did not want to mess with the circuit board inside the mount (even with the schematics that one of your Russian readers posted, If I made a mistake and plugged in the AC adapter while batteries are installed, I ran the risk of having both the AC adapter and battery power applied at the same time, frying the poor board), I simply went around it and bought a set of wires, a plug, and soldered the whole together to basically make the battery compartment a standard power pack... I carved some small indentations on the battery cover where the wires should go through and I am good to go. I chose thin wires so that the mount is just as stable as before, and it works perfectly I have a question in addition: I noticed that my Autostar was in version 1.0c, which I believe is the original version of the software. I want to set the backlash values, and I will therefore buy a USB to serial adapter and build the DB9 to RJ10 cable as per the instructions posted on your website and Yoshi's ETX page.. However, I was wondering: how much output power does the Meade USB to Serial adapter output on the serial port? I would not want to risk to fry the electronics with two high a power input with a third party USB to Serial adapter... I couldn't find this info on the site... Thank you very much for your help, and for your awesome site :) Yannick
And:
Thanks a lot for your quick answer, I will try to find an appropriate
USB to serial adapter here - not sure whether they have keyspan adapters
available.

Thanks again,

Yannick
Subject:	Powermate question
Sent:	Saturday, March 27, 2010 15:55:18
From:	Michael Teitelbaum (teitelbaum@pol.net)
I saw your website about power supplies and was wondering if you could
help me with the Coleman Powermate Emergency Car Starter PMB8110.  I've
lost my instructions.  Could you tell me if having the button pressed in
charges the powermate or is for charging the dead battery?  Thank you
very much.

Michael Teitelbaum, DMD, FAGD, V.Pres ESACD
Subject:	Ghosting of mirror?
Sent:	Friday, March 26, 2010 17:05:47
From:	Andy & Leah Lancour (smanj440@sbcglobal.net)
Is it a characteristic of these scopes or this style of scope to have an
ever so slight "ghosting" of the center obstruction or mirror, resulting
in a very slight hazy circle, if you will, that becomes more defined as
one pulls their eye further away from the eyepiece? I see it in the 90
as well as the 125, even with different eyepieces.
Mike here: At some magnifications and some distances from the eyepiece exit pupil, you can "see" the central obstruction. That is true of all telescopes wit a central obstruction or any secondary mirror in the light path.
And:
So my scope isn't crappy! Thanks Mike! What would I do without your
help?
Subject:	etx 125red dot replacement
Sent:	Friday, March 26, 2010 10:49:11
From:	Andy Lancour (andy@spe-wi.com)
I've grown partial to the right angle finderscope on my ETX 90 and would
like something similar in my ETX125. It looks like I can remove the red
dot finder from the 125. It doesn't see like it would be too handy when
looking at really high objects. I am selling the 90 and can't steal the
bracket from it for the 125. So I need a bracket and to know whether or
not this will work? I do have a spare finder, though. I didn't see
anything online. Thanks

Andy Lancour
Mike here: See the Helpful Information: Telescope Tech Tips page for several articles on adding a finderscope. Also, see the Accessory Reviews: Finderscopes page for some more ideas.
Subject:	ETX 125 made in China?
Sent:	Thursday, March 25, 2010 15:04:03
From:	Andy & Leah Lancour (smanj440@sbcglobal.net)
I got the big Meade box in the mail today for my new ETX125 and was
disappointed to see "Counrty of Origin: China" on the side. I know there
is another box inside that actually has the scope in it, but am
wondering now if ETXs are made in China? I ordered the scope from Optics
Planet, for what it's worth. Maybe they just shipped it in this box?
Mike here: Many telescope components (and other products) are "Made in China" and assembled elsewhere.
And:
Thanks, Mike. Are these scopes then assembled in the USA? Not a big
deal, but I am curious.
Mike here: Not anymore. Now assembled in Mexico.
And:
On further review, FYI my new ETX 125 appears to be made and assembled
in China, per all the info from the boxes and directly on the scope.
There is no mention of Mexico or USA anywhere on anything - just "Made
in China". I don't know if that's good or bad. But I'm not surprised.

I bought a Triumph motorcyle a few years ago, partially because of the
appeal of the whole "Made in the UK" thing. Turns out it was made in
Thailand. I guess it's the way of things nowadays.

Andy Lancour
Mike here: All part of the "global economy".
Subject:	Gear problems
Sent:	Thursday, March 25, 2010 10:29:18
From:	Andy Lancour (andy@spe-wi.com)
I have read what seems like alot of reports on gears/drives being
stripped out on ETX scopes. Is this a preventable problem that stems
from human error? What can I do to keep my scope from having gear/drive
issues?

Andy Lancour
Mike here: Stripping gears can be caused by overtightening the axis locks, hitting a hard stop (on ETX models with hard stops), or by adding heavy accessories without proper counterweights. In normal use, the gears should not break. However, exceptions can occur.
Subject:	ETX 80 Parts Diagram
Sent:	Thursday, March 25, 2010 08:37:59
From:	Ron Harries (rharries@telus.net)
Do you  have any idea where I could get a Disassembly Break Apart
diagram  for a ETX 80. There are some very good ones for ETX 70 on your
great web site but, I have noticed some considerable differences between
the 70 and the 80.

Thanks for all your help

Ron Harries
Salmon Arm, BC
Mike here: No one has submitted any for the ETX-80. You can be the first.
Subject:	My Noisy ETX70
Sent:	Wednesday, March 24, 2010 17:42:08
From:	mr.nerb@hotmail.com (mr.nerb@hotmail.com)
I have recently aquired a second hand ETX70 and have just begun to use
it although the weather has been rather moody and all I've been able to
do is familiarise myself with it indoors.

I need to know if there is a problem with it?

When setting it up and aligning it, all goes well....until...it begins
tracking. I understand there is a certain amount of noise with the
motors of these scopes but when tracking, it has a non-motor noise.
Almost a fast and repetitive squeak! Sounds like an electrical "signal"
and seems to originate from the circuit board/electrics area deep inside
the shell.

In non-aligned mode it sounds fine when manually pointing it using the
autostar handset and the motors make their normal "motor" sounds and
there's no squeak...lol. The extra noise only happens AFTER alignment.
Silly question, but are there MEANT to be any noises other than the
motors for these scopes or will it need further repairs?

Until the weather cheers up I cannot verify that the tracking actually
works properly other than observing the slight, driven movements of the
optics.

Could be normal for all I know but any help with this sound would be
greatly appreciated from a newb who wants to start on the right foot.

Cheers..Brendan
Mike here: The only noise you should hear are the motors driving the telescope in Altitude and Azimuth. But another noise (beside some electronic noise (that is not normal) could come if you have overtightened the axis lock. Simple test for that would be to go through the alignment process (or just set the TARGETS to ASTRONOMICAL) and then unlock the axis where you believe the sound to be coming from. Remember to hold the tube to keep it from falling down if you unlock the Altitude axis.
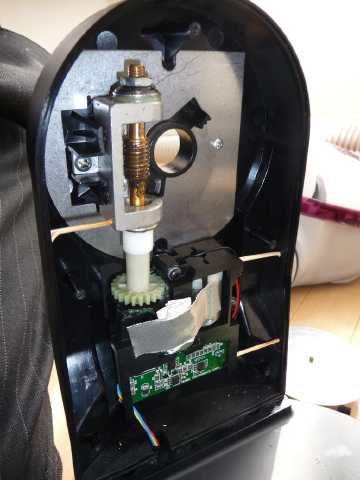
Subject:	Subject:	Re: Unattached Deflector / ETX-90EC /HELP?
Sent:	Wednesday, March 24, 2010 14:33:21
From:	PHIL G (cphilg@ix.netcom.com)
The baffle loosened on my ETX-RA years ago. I unthreaded the front lens
and the baffle was hanging by a shred of adhesive.

Now I am a firm believer of "crossover hobby" technology so here's what
I did:

First I used some automotive wax/grease/tar remover (professional BASF
product from the auto paint store) to clean off all the residual
adhesive from the lens and the baffle. Then cleaned both parts with
denatured alcohol.

Then I "carefully" stuck the baffle onto a piece of R/C "servo tape" and
cut the OD and ID with an X-acto knife. Then peeled the backing off the
"glass side" and attached the baffle to the front lens making sure it
was centered as well as possible around the mirrored area.

It hasn't loosened in five years. All done with things I had in the
garage...

Phil G
Subject:	ETX125 OTA art
Sent:	Tuesday, March 23, 2010 19:56:26
From:	Andy & Leah Lancour (smanj440@sbcglobal.net)
Does Meade still have new ETX 125 PEs available with the nebula art on
the OTA? I didn't see any on the Meade site except the blue tubes?
Mike here: I believe they dropped that a few years ago. You might still find some dealers with the models.
And:
So do all the new 125s have UHTC as standard now? What is the advantage
to getting the PE over the AT, other than the auto levelling(level north
technology, I think)?
I'm gonna bite the bullet and spring for a new one. I see there are a
lot of different prices online, hence my questions. Thanks a lot for
helping, Mike.
(PS - is there an advantage to ordering direct from Meade?)
Nike here: UHTC is standard now. The AT and PE models are the same optically. It is just the LNT module that is different. Dealers may provide some extra support and specials.
And:
also, the only 125 PE scopes at Meades site are refurbished? Is this correct?Mike here: It does appear that the PE models have been discontinued. The OPT web site shows the PE models has having been discontinued and they don't have any in stock.
And:
You are THE MAN! Thanks so much!

I am going with this from Optics Planet - an AT, as long as UHTC is base
model now. I can level my own scope.
http://www.opticsplanet.net/meade-etx-90at-maskutov-cassegrain-telescope-0515-03-60.html
Subject:	Re: Unattached Deflector / ETX-90EC /HELP?
Sent:	Tuesday, March 23, 2010 07:13:32
From:	Jeffrey Prosser (jeffreyprosser@verizon.net)
Mike, Thanks for your fast response. We were able to remove the front
lens without using a spanner wrench and the baffle was laying right
there. We could easily see the adhesive on the baffle and also on the
center disc. I actually used the scope without the baffle just to see. I
am going to contact Meade so they can provide me with the proper
adhesive. I appreciate your help and will keep you posted.

Be Well,


Jeffrey Prosser
Subject:	Re: etx alt az mount
Sent:	Monday, March 22, 2010 21:04:41
From:	Andy & Leah Lancour (smanj440@sbcglobal.net)
Mike - one other thing. Will a casual observer notice much difference
between an ETX 90 vs an ETX 125?  I enjoy the moon, planets, and star
clusters, but am pretty much a hack. Curious if I would see much
improvement in a little bit bigger scope. Will UHTC coatings give me
much bang for the buck either? Thanks again for any advice.
Mike here: First, please note what the Email Etiquette page on the ETX Site Home Page says about subject lines. Not certain what this subject line has to do with your question. Thanks for understanding. As to the difference, there will be a significant difference, not only the maximum usable magnification with the larger telescope, but also in the brightness of faint objects due to the larger aperture. Adding UHTC is like adding about another 1" to the aperture. For more the ETX-90 and ETX-125, you can read my reports on the Helpful Information: Buyer/New User Tips page, as well as many reports from other users on the Helpful Information: User Observations page.
Subject:	etx80 motor problem
Sent:	Monday, March 22, 2010 03:43:09
From:	saad zahid (saad_z_i@hotmail.com)
I recently purchased an etx 80 at. The first night out it worked fine,
however the second night I took it out, the telescope couldn't incline
up, meaning that the optical tube didn't climb up in the alt direction.
However it is able to climb down perfectly. The sidereel (az) also works
just fine. On later inspection I realized that this was due to the motor
not being able to lift/tilt the optical tube and when I support the tube
with my palm (pushing it upwards) while skewing it upwards on the
autostar, the tube is then able to skew up. I have changed the batteries
and I have also checked the alt lock and they are both fine. Is there a
quick fix to this, as returning this item is kind of a problem for me,
as I like in Pakistan and I bought it in America.

I appricate any help you can give me.

saad zahid
Mike here: Couple of questions: have you done a CALIBRATE MOTOR and TRAIN DRIVES? Could you be overtightening the Altitude axis lock? It should only be finger tight and just sufficient to hold the tube in place.
And:
when i tried TRAIN DRIVES, i couldnt complete it as when i couldnt
center the object without the support of my palm on the optical tube.
calibrate motor was the same, when the autostar says 'testing motors'
the motor would make the usual sound except it would not move in the alt
(up)direction but fine in the az direction. i have tried loosening the
altitude lock but it has made no difference.
Mike here: Since a warranty exchange seems unlikely, if you want to check into what might be causing the slippage, you will have to remove the locking knob (just unscrew it; I'm assuming that the ETX-80 mechanism is similar to the ETX-70). Then look for any grease or bent/broken components. If you see nothing obviously wrong, you'll have to dig deeper; the article "ETX-70AT Repair Guide" on the Helpful Information: Telescope Tech Tips page may help.
Subject:	etx alt az mount
Sent:	Saturday, March 20, 2010 10:37:25
From:	Andy & Leah Lancour (smanj440@sbcglobal.net)
Mike, is it possible to use an etx 90 in an alt az mount, for the
ultimate in grab n go. Do you have any info on this? Obviously it would
no longer be a go to scope, but that's ok.Thanks

Andy Lancour
Mike here: Most users probably mount their ETX telescopes (at least, ones with an AutoStar handcontroller) in Alt/Az. The AutoStar then (once properly aligned) handles tracking and GOTOs, even in Alt/Az. So, if that is what you want to know, yes you can mount an ETX AT or PE model in Alt/Az. Now, if you are talking about the ETX-90RA (which does not do GOTOs via an AutoStar since it is not AutoStar-capable), yes, you can mount it in Alt/Az but tracking in Right Ascension will not work very well.
And:
Sorry, I mean I want to remove the optical tube and use it in a strictly
alt/az mount with no "go to" at all. No Autostar use. I would probably
need a whole different tripod. I don't really use the "go-to" at all,
and really want a very basic grab n go set up, almost like a glorified
spotting scope. I was hoping someone had tried this or had info on it?
Thanks for the reply.
Mike here: If you have a sturdy photographic tripod, you can mount the ETX on it. If your ETX has the photographic tripod mounting holes on the OTA, you can just attach the OTA to the tripod.
And:
maybe I'll give it a try - thanks MikeMike here: Just be certain the tripod is sturdy. Otherwise, the image in the eyepiece will bounce all over the place with the slightest vibration of the tripod (from breezes, nearby footsteps, focusing).
And:
Actually, what is the easiest/fastest way to set up the system (I have
Autostar) without all the alignment business? Isn't there a way to
scroll around manually without all the other stuff? I need simple!!!
Otherwise I just never use it.
Mike here: Well, there is simple and there is simple AND useful. If you have a tripod (like the #883 or #884), then you can put it in equatorial mode, set the MOUNT mode in the AutoStar to Polar, set the AutoStar for TARGETS: ASTRONOMICAL, and then skip the alignment steps. The AutoStar won't know where anything is in your current sky but it will compensate (mostly) for the Earth's rotation at your Latitude. Then you can just manually point the telescope at objects or just the AutoStar to slew to them. Alternatively, you do a good alignment (Alt/Az or Polar), mark the location of your tripod legs on the ground, and then PARK the telescope at the end of the observing session. Then when you set up again, place the tripod legs on your marks and power on the telescope. It will retain its alignment, assuming you did not move the telescope on the tripod when your moved the telescope inside and back outside. In between these two options is this: power on and let the Alignment steps proceed. When prompted to center the alignment stars, just assume they are centered and press ENTER. The better your HOME position is, the better the alignment will be. There is a lot more on alignments on the Helpful Information: AutoStar Info page.
And:
thanks for being so helpful
Subject:	Unattached Deflector / ETX-90EC /HELP?
Sent:	Friday, March 19, 2010 10:31:08
From:	Jeffrey Prosser (jpmac57@me.com)
I recently acquired my first telescope. It is an ETX 90 EC that is in
near perfect condition. Used very little. Operator Manual has a printed
date of 1999. I bought it 2 weeks ago at a benefit auction for the Pa
Forestry Association. Came with tripod, and the 497 Autostar that does
not look to have ever been used.

Upon opening the soft travel case and taking the telescope out we
noticed a distinct sound of "something loose" inside the OTR. I took the
lens cover off and was very surprised to see a small deflector laying
inside the tube unattached. Meade customer service only wanted me to
send it to them for repairs, many $$$$$ and wait 6-8 weeks for return of
unit.

Others I have spoken with have said take the tube apart and "super glue"
the deflector back into its proper place.

Any suggestions, diagrams, photos, instruction would be of great help to
me as we would like to use it this weekend.

Next question will be how to make a donation for your efforts.

Looking forward to your reply, I remain.

Sincerely,

Jeffrey C Prosser
Mike here: See the articles "ETX-90RA Secondary Baffle Fix" and "Re-attaching the Baffle" on the Helpful Information: Telescope Tech Tips page. Once you have it attached, you will need to re-collimate the optics (not easy on the ETX models). There are several articles on this in the "Star Testing and Collimation" section on the Telescope Tech Tips page. Now for the kicker. If the secondard baffle was loose inside the tube, then the primary mirror will likely be damaged. That is something you can't fix. So, you may end up needing to return it to Meade anyway.
Subject:	Re: ETX-125AT gear box stripped off
Sent:	Thursday, March 18, 2010 05:40:19
From:	P. Clay Sherrod (drclay@tcworks.net)
This is unfortunate and you should contact the dealer immediately and
demand a refund and shipping charges. Let the dealer know that you are
asking for help from both Mike and myself.

Regarding a fix:  YOU CAN drill through the exact point of the broken
post and carefully use a #6 x 3/4" bolt and secure with a nut under the
false setting circle under the DEC clamping knob.  It takes some time
and a bit of ingenuity, but it can be done and far better than the
original plastic mounting.

By the way, this type of damage cannot be done during shipping, only
from mishandling outside of the box with the clamp engaged.

Best of luck on this problem.

Dr. Clay
_____
Arkansas Sky Observatories
MPC H45 - Petit Jean Mountain South
MPC H41 - Petit Jean Mountain
MPC H43 - Conway West
http://www.arksky.org/

----- Original Message -----
From: Yannick Dutertre (yannickd@gmail.com)
> Dear Dr Clay,
>
> My name is Yannick, currently living in Japan, a wonderful country
> which unfortunately doesn't have a single square inch free of sky
> pollution (even Mount Fuji).
>
> However, I bought a used ETX-125AT telescope from a reputable US
> dealer often mentioned on Mike Weasner's site but whose name I shall
> withhold at the moment. The scope was said to be in Excellent
> condition. Unless plastic can be sheared when shipped, it obviously
> wasn't the case - I had actually bought a used telescope to make sure
> I wouldn't get a lemon... When the scope arrived, and when the
> Autostar controller arrived a week later (they had forgotten it in the
> original package), I couldn't help but see that the dec motor was not
> working (RA is fine, the OTA itself is a Wonder of the Gods,
> absolutely terrific). Specifically, the scope had about 7 degrees of
> dec play when the friction clutch was engaged. If I let the scope free
> to lean into the play (i.e. pointing as far down as the play allows),
> the motor would not work: it would only do a whirring sound with a
> regular plastic to plastic drumming sound, but nothing else. If
> however, I pulled the telescope head upwards, then the motor would
> engage and drive the scope - not very useful nor precise as I need to
> keep holding the OTA as high as possible within the 7 degrees play
> while it is moving, and absolutely unworkable at low speeds.
>
> I resolved to open up the the dec driving arm to see what the matter
> was (the scope is under warranty, but I would have to pay about 500
> dollars for round way shipping...), and I followed your advice to the
> letter, as the drive is the old plastic drive. I noticed that the worm
> was very very loose - I tightened the three screws. I also saw that
> the worm gear assembly was nothing but a blob of sticky grease - I
> degreased it.
>
> The real problem comes with the fact that the middle-upper screw arm
> of the gear box is just broken (the plastic tube into which the screw
> is supposed to get in is sheared in half), so the gear box is not
> quite stripped from the fork arm, but pretty much dislodged. When
> there is no weight on the arms, the gear engage properly between the
> worm end wheel and the motor, and the arm actually moves. When any
> weight is applied to the arms, such as an OTA, the whole assembly
> shifts and hits the arm and the gears are not coming together - the
> drive therefore will not work.
>
> I noticed on Mike's website a user, Mark (toonsf2@peoplepc.com), who
> seems to have the same problem. You mentioned in your answer to him
> that "many times this is a pretty serious issue that cannot
> be fixed properly, but there are several solutions available depending
> on what has happened to your scope.", but there has been no progress
> since then. Do you have any solutions in mind? I would be more than
> happy to buy any replacement gear from you - unfortunately I cannot
> ship it for the supercharge, the shipping is simply too expensive
> (unless maybe I were to send only the mount without the OTA, but I
> just think that the arms would get ripped off during shipping).
>
> For the moment, I have actually managed to fix the scope by forcing
> the gear wheels together using toothpicks and sheets of paper (yes,
> out of all things!), and there is no slipping whatsoever, even at low
> speeds - I am sure however that the vibrations of the motor will break
> my fix in no time. The fix also puts a lot of stress on the two other
> plastic tubes that host the two remaining screws linking the motor
> assembly to the arm, so I risk weakening those as well over time. I am
> therefore buying any replacement gear you may have.
>
> As I am still in discussions with the dealer, so I haven't sent an
> email to Mike yet (I will eventually, with pictures as well, I will
> send you pictures I have a bit later as well).
>
> In advance, thank you very much for your help,
>
> Kind regards,
>
> Yannick
And:
Thank you very much for the quick answer and useful advice, I believe I
will try to repair the mount as you suggest if the discussions with the
dealer are inconclusive - I am contacting the dealer and will let you
know how it goes.

In the mean time please find attached pictures of the issue:

- image 1 is simply how the arm looks like when opened
- image 2 is a closeup on the broken plastic part
- image 3 shows how I placed toothpicks to actually hold the whole
assembly together. This ensures that the motor gears will always be in
touch with the worm bottom gear, and assure that the whole assembly has
no freedom of movement on the left to right axis on the picture. You can
also note that there is some taped paper in the central area
- image 4 shows some other taped paper on the plastic part that closes
the arm off. These taped paper blobs are there to ensure that the arm
cover will keep the motor locked in its arm and will not hobble in that
direction, hopefully making the fix last longer.

All in all, I have submitted the setup as it is with this flimsy repair
to lots of up and down movements at all speeds, it seems to hold for the
moment, but I am sure not for long. At least it doesn't require to
pierce any hole for the moment, so the mount is just as I got it if I
remove these.

Thank you very much,

Yannick
Subject:	Re: orion battery
Sent:	Tuesday, March 16, 2010 11:58:12
From:	richard seymour (rseymour@wolfenet.com)
I agree with Mike's "surprised"...

> ...the inadequacy of the charger to meet the demands of power needs in remote
> sites-actually none of the field, rechargeable batteries, are up to the task.

I must disagree with that assessment, as long as the rechargeable
battery unit is matched to the "demands".  And, as you'll see below, i
don't think it's the charger's fault.
(a voltmeter will tell you if the charger is performing at all.. just
measure at the plug, and don't worry if it reads as high as 16 volts)

The Orion pack should be adequate for running an ETX-125 telescope for
at least 6 hours, and then would need 8 to 10 hours of AC charging, or 5
to 8 hours of *engine-running* car-charging.

I've now downloaded and read the Orion's fairly clear instruction
manual... i see that they expect a full charge in 8 to 10 hours.
Although they don't -caution- you to not overcharge, that spec alone
should tell you "if it hasn't charged in 10 hours, something is wrong".
*Days* of "charging" won't help.

Your earlier message citing that you hadn't discharged/recharged the
pack told me that you did not understand how these lead-acid packs
should be treated.
As i said then: DO NOT DISCHARGE a lead acid cell.
The instruction manual did not even -suggest- doing discharge/charge
cycles.

I also see that the 2 amp fuse is only for the 3/6/9 volt outlets... and
you reported that it was (enthusiastically) blown.
THAT indicates some circuitry failure in the 3/6/9 volt converter
circuitry (or that you plugged something that demanded far more power
than the 1 amp-per-socket unit could provide).
If the 3/6/9 volt converter is short-circuited (or dying), *that* could
have flattened your battery... and dragged it -all- the way down to
becoming an irreparable lump.
Especially if the unit was placed in storage -without- turning OFF the
power switch.

I'm not trying to "blame the victim", i'm merely trying to show that
it's (probably) not the -charger- that's at fault... that "simple"
battery pack has enough additional gadgetry that could fail and bring
the battery itself to grief.

I'm a big fan of these portable battery packs... but they do have their
limits, and when extra built-in features (such as the 3/6/9 volt fuse)
start blowing, it's probably not the charger at fault.

My $45 JumpStart unit's instruction sheet has, among other cautions: "do
not charge for more than 16 hours"
And that's for a 500ma charger feeding a 17AH battery.
My charger would take 35 hours to -fully- charge a 17AH battery (from a
10v "fully discharged" condition).
But the JumpStart manufacturer's expected usage profile of the battery
pack is that you're not going to be -flattening- it, you'll just be
recharging after tire inflation, area illumination, and maybe one
car-jumping situation.
So they're trying to prevent me from OVERcharging the battery, which can
damage them as surely as flattening the battery lower than the 10v
"dicharged" state.

good luck
--dick
And:
From:	dan.kahraman@sympatico.ca (dan.kahraman@sympatico.ca)
It was Orion's guy who didn't think highly of the unit. There was
nothing I did to cause it. I always went by the fully charged light when
I ended the charging cycle- perhaps something went wrong with the
circuitry but Orion's tech people (or one guy) didn't seem too eager
about trouble shooting the cause(s).

You certainly have done much more than tech support at Orion seems to
do.

You mention that batteries are adequate for field use: my experience
with lots of slewing, dew and eyepiece heaters both working were too
much for the NiCad Kendrick unit that is why I started using both-the
Orion battery for the dew (corrector on the 10" SN+eyepiece)

I have also come across another article that stated the same thing. I
will try to find it.

Dan
(home early due to a power failure at work-yes it is ironic!)
And more:
The trick is to match (or exceed) your demands with a suitable power source.

Many LX200gps users buy a "marine deep-cycle" battery (think: $120 car
battery-sized).
The "deep cycle" means that it -can- handle being drained to 10% of its
full charge without damage.  ("marine" usually means that you can find
them at good boating supply stores, and that there's an extra pair of
threaded studs as attachment points, beyond the usual two big posts).
 Those have 70 to 120 AmpHour capacity... ten times your Orion unit.
But that's just the battery... a suitable charger (not a $20 car-battery
charger) is another $50 to $100.
And you still need a box (preferably vented and acid-proof) and a hand
truck to move it.

But it WILL provide many night's power for almost everything (get a
second one for the laptop).

To determine what you need you have to sum the power you'll be using,
with a heavy thumb on the scales to provide both leeway, allowance for
cold weather (batteries are electrochemical devices... they lose
efficiency when cold) and allowance for gradual loss of charge
capability over years of ownership.

What is/was your dew heater's wattage?  If i assume 30 watts, that's 2.5
amps at 12 volts.
That means it'll flatten your 12 AH battery in 12 (amp-hours) divided by
2.5 amps: 4.8 hours.
And that's total discharge (by the ratings).  Assuming a scope takes an
average of 1.5 amps, that plus the dew heater is 4 amps, 12/4=3 hours of
expected "life".
(i don't recommend running these packs down below 50% of their rated
capacity... battery life (in terms of years of service able to hold a
useful charge) will suffer)

I'm not surprised that the Orion tech support didn't care to dig deeply
into diagnosis.
These units are not designed with "repair" in mind (since it's usually
the battery that dies, or, in your case, something else died, and took
the battery with it).
It's far cheaper for them to simply replace the unit than even attempt
to fix it in the shop.
Except for the radio, the Orion looks -suspiciously- like the Celestron
in terms of what's there... my car-oriented JumpStart does not offer
3/6/9 volt output (but does have an air pump).
Celestron sells the same physical -package- with 7 AH ($60) and 17AH
($99) batteries.
I opted for the automotive flavor since (a) i could buy one -today- (b)
17AH was a common size (c) they're cheaper  <-- (yeah, the real reason)
due to a far larger market than "telescopes". (d) they're frequently "on
sale!" (see (c)).

have fun
--dick
And:
I am trying to unscrew it but the holes are smaller than the shaft of
the screwdrivers plus they are quite dep.

Yes the marine batteries would be the type to go after.

What pisses me off about my experience with the Orion is that inspite of
all the indicator lights (charging, fully charged, needs charging, hence
'idiot proof') it still went kaput on me and it is the sheer curiosity
that keeps me trying to get to the bottom of the cause.

One experience like this is enough for me to blacklist Telescope dot com
and I remember when Tim Gieseler used to own/run the company over 30
years ago.

Dan
And:
The LEDs are telling you the battery state... which they did: "dead"
They're not intended to report other things getting fried inside.
(or: why i don't buy a TV set with a built-in DVD player :-)

I wouldn't write off telescopes.com based upon this incident.

They're just "selling through" a battery pack, at a lower (per amp hours
and features) price than the semi-equivalent Celestron units.  Their
expertise is telescopes, not batteries.

have fun
--dick
And:
maybe that is why the guy I talked to last night didn't think very
highly of it.

dan
And:
Just for a heads-up: i would rate the expected "lifetime" of a battery
pack at roughly two to three years.
If they last longer than that, feel lucky.
In UPS service, the suggestion/rule is to replace the pack every two
years, even if you've never -used- them to actually keep your hardware
running.

I've gone through 1.5 JumpStart packs on my LX200gps since March 2002.
The first lasted about 2.5 years, its replacement is still working, but
showing lowered capacity in terms of "hours 'til yellow".  The ETX-LS
really seems to suck it down.

have fun
--dick
And:
sounds familiar. It would really lose power quickly it seemed and maybe
I had it that long---didn't use it much though. The climate here in the
great lakes isn't that good for astronomy.

Dan
Mike here: I purchased my Celestron Power Tank 7AH in October 2004. During 2005-2009, it got heavy usage during my monthly trips to Oracle. As far as I know, it is still OK. However, as Dick indicated, my UPS units get new batteries every 2-3 years.
And:
"didn't use it much" is actually a bit hard on the battery.
If you read the Orion manual, they recommend recharging a stored battery
every 3 months.
And that's correct behavior (do what i say, not what i do ;-) for
lead-acid cells.
Typical Lead-acid batteries self-discharge about 10 to 20% per month.

have fun
--dick
Mike here: Which may be why my Celestron unit has lasted so long. During those monthly trips, the battery was discharged and charged back up monthly.
And:
more finicky than the NiCad. That one I leave on its charger all the time.

Dan
And:
NiCads can handle a 10% (or lower) charge rate in a continuous mode.
If your charger was more enthusiastic, it would damage the NiCads.

have fun
--dick
And:
I have a 170 milliamp solar-powered "maintainer" that i have hooked to
my JumpStart during the summer.
(it's rather useless during Seattle's winter).

have fun
--dick
Subject:	NCP and polaris question
Sent:	Sunday, March 14, 2010 12:35:45
From:	H (hans@lambermont.dyndns.org)
I've been reading your excellent
http://www.weasner.com/etx/ref_guides/polar_align.html page and am
wondering where you got the 55' from.

In http://en.wikipedia.org/wiki/Polaris the offset is 42' as of 2006.

According to Stellarium (I've made a screenshot here
lambermont.dyndns.org/astro/Stellarium-NCP.png) it's now
41'35.49" and when I set the date back to 2004 (your webpage date) the
offset is 43'0.65" .

Via the ##astronomy irc channel on freenode (thanks peerce) I got a
measurement from Starry Night of 41'22" or so, maybe 21" for now and
43'01" for 2004.

Any ideas ?

regards,
  Hans Lambermont
And:
From:	P. Clay Sherrod (drclay@tcworks.net)
That is a number that is in error and I thought had been corrected;
about 45 arc minutes is correct.

Dr. Clay
_____
Arkansas Sky Observatories
MPC H45 - Petit Jean Mountain South
MPC H41 - Petit Jean Mountain
MPC H43 - Conway West
http://www.arksky.org/
Mike here: I'll correct the article.
Subject:	orion charger
Sent:	Saturday, March 13, 2010 06:08:26
From:	dan.kahraman@sympatico.ca (dan.kahraman@sympatico.ca)
I took the fuse out and it is blown. The glass ampule is broken and the
filament is burnt at one end.

The inscribed portion says A250V what does that mean?

If it is a matter of a blown fuse than the matter is straight-forward,
however the battery could be full discharged by now.

When I looked at the fuse the first time I didn't notice this.

Dan Kahraman
Mike here: I would have thought there would be a number in front of the "A250V", such as 1.5 or 2.5, signifying the amperage.
And:
I know that is what confuses me. I will go to circuit city today to try and get a replacement. What amperage should I get?Mike here: My Celestron 7H PowerTank manual says its fuse is a 2A one.
And:
sounds like a 2 -2.5 would be a safe/better choice
And:
Subject:	Re: orion charger
Sent:	Saturday, March 13, 2010 08:25:08
From:	richard seymour (rseymour@wolfenet.com)
The blown fuse could simply be another sign that the battery is
internally shorted.
(the blown glass is an indicator of sudden HIGH current)

I suspect that replacing the fuse will merely blow it again.
(is the fuse on the -output- (12v) or -input- (120vac) side of the
charger?)

> The inscribed portion says A250V what does that mean?

It means you didn't see the first half... the fuse should have said
something like:
3 A 250 V
meaning "will blow above three amps, and capable of blocking 250 volts
once opened"

If it's on the input (120vac) side of the charge, the amperage could be
fractional:
1/4 A 250 V  (one quarter amp) or expressed as:   0.5 A 250 V  (half an
amp).

good luck
--dick
And:
Look at the -ratings- of the charger.
It will have a label somewhere saying something like:
"Input 120 VAC 60Hz  12W"
and
"Output: 12V DC 500mA"

To calculate the 120 vac current (if the power is expressed in watts, as above)
divide the watts by the voltage.  So  12 W /120 VAC = 0.1 amps
a tenth (1/10 or 0.1) of an amp would the be correct -input- fuse.

On the 12 V side, it says 500ma, which is 1/2 amp.
(the above example is from a jumpstart charger i have)

good luck
--dick
And:
there was nothing to the left of the 'A'.
If the battery is shorted how can that be fixed and what caused it to
short. I can't see how it could have been shorted from normal use. I had
my dew remover (Kendrick) attached to the output socket.

I have placed the 2A250V fuse but nothing seems to be happening.

I have written to Orion (e-mail sent this morning).

I hope I can restore or the battery is recoverable.

Dan

P.S. input AC 120V, 60HZ 20W
output DC 15V 850mA
Mike here: Dew heaters can require a lot of power. Do you know how much yours draws?
And:
I will have to check it out but I never have my dew remover on full
blast.

I haven't had any problems with my NiCad rechargeable battery that I
bought from Kendrick
And:
So an appropriate (i.e. safe) input fuse would be  20/120= 0.16 amp, or
perhaps a 1/4 amp fuse, and an appropriate output fuse would be 1 amp

You still have not reported a **voltmeter** reading of the power
unit/battery output.

That's a critical test for diagnosing what's really wrong.

> If the battery is shorted how can that be fixed and what caused it to short.

If it is shorted, it is trash.  Recycle it for the lead.

Batteries can short (or open, which would also cause zero output) for
many reasons.
The most typical is overheating (due to high current output) causing the
internal plates to warp, with two plates eventually coming into contact
with each other. ZAP!

The battery's case can crack (mechanical shock, overheating, bad molding
of the plastic).
That lets the fluid seep/run out (if it's seeping, it may evaporate and
never appear on the outside of the Power Pack).  No fluid means no
battery... just a dry box of plates.
(the "fluid" is sulfuric acid.. be careful)

If it -is- leaking, then use of the battery as the fluid level drops
concentrates more current density in a smaller wetted area... eventually
causing the heat/warp issue above.

Lots of reasons.

good luck
--dick
Mike here: "Overheating" as in dew heater drawing too much current?
And:
For a 7 amp hour battery, a dew heater (unless -it- went weird, too)
should not be that much of a load (if it was a 30 watt heater, it would only draw abot 3 amps)

--dick
And:
I have lots of tools but today I thought it was a simple replacement of
a blown fuse that was the problem so I didn't even think of needing a
voltmeter.

I'll await to see what Orion will have to say (probably the same as what
you suggest).

Then I will have to take the casing apart and look for physical
evidence.

I am tempted to take the battery apart but I'll wait until I hear from
orion next week first.

I think the entire unit is dead so I don't see the point of a voltmeter
although the blown fuse happened after the 5 or more days of charging.
It was not broken the first time I took it out of its socket- so
something happened during the  several days of charging.

The lights (halogen and red light) radio or the charge indicator lights
don't come on-they didn't work prior to the charging episode nor do they
work now even with the new fuse in the socket so the trouble is pointing
somewhere else on the unit.....

Dan
Mike here: Definitely sounds like more than a bad fuse then.
And:
thank you guys you are very dedicated people. I will keep you both
informed.

dan
And an update:
Sent:	Tuesday, March 16, 2010 01:31:16
From:	dan.kahraman@sympatico.ca (dan.kahraman@sympatico.ca)
I talked to technical support at Orion after I got home yesterday. The
person I contacted strongly suggested that I e-mail
support@telescope.com, this would get to the people at marketing for
Orion.

The e-mail should be detailed with listing the problems and the
inadequacy of the charger to meet the demands of power needs in remote
sites-actually none of the field, rechargeable batteries, are up to the
task.

He personally did not recommend the charger. He is also afraid that the
battery is dead and unless I have an expert dealing with it it should be
left alone. He also added that the Orion charger was designed as a power
source similar to a car battery.

So don't buy it!

I will e-mail you guys a more detailed letter I will send
support@telescope.com

Dan Kahraman
Mike here: I'm surprised at that response from Orion. I've used my Celestron PowerTank for years in the field, powering at times one telescope, two telescopes, or one telescope plus an AC inverter powering a DSLR. The only problem I ever had was a burned out bulb for the "red light" and Celestron sent me a couple of replacements free.
Subject:	ETX 125 Supercharge still available ?
Sent:	Saturday, March 13, 2010 01:47:30
From:	Mark (toonsf2@peoplepc.com)
I have an ETX 125 approx 3yrs old. The gears wont elevate the OTA.

It makes a skipping type noise as gears are turning. Probably plastic
internals I just found your ETX site this week looking to find a fix for
the ETX and found "Supercharge". Is this service available?

If not where could I get better, possibly metal gear, parts to repair
the scope.

I noticed the site was updated 10/09 or just the page I was veiwing was
updated. Please let me know if the prices and conditions page is up to
date.

Thank you
Mark
Mike here: I'll let Dr Clay Sherrod respond, since he provides the Supercharge service.
From:	P. Clay Sherrod (drclay@tcworks.net)
The Supercharge is alive and well and all details are current on both
Mike's ETX site as well as the Arkansas Sky Observatories' site
http://www.arksky.org/
Currently in the ninth year of providing telescope optimization, I would
be happy to talk to you about your telescope.

Your problem sounds as though the gearbox has come dislodge or stripped
from the fork arm; many times this is a pretty serious issue that cannot
be fixed properly, but there are several solutions available depending
on what has happened to your scope.

Hopefully Mike will update the dates on the Service link to show 2010,
which I need to do on ASO as well!  Thanks for the head's up.

Dr. Clay
_____
Arkansas Sky Observatories
MPC H45 - Petit Jean Mountain South
MPC H41 - Petit Jean Mountain
MPC H43 - Conway West
http://www.arksky.org/
Mike here: I'll definitely update the page. Let me know when it is ready.
And:
I found a page on Mike's site which describes the disassembly sequence
to view the fork internals as well as adjustments that could be
improvements to the drive system.
I will disassemble the fork for a reasonably accurate assessment of
damages and if possible perform adjustments, then make plans for
resurrection.
Thank you for the resources.

Mark
And:
Mark:  WAIT.
Do you have an older EC version of ETX or the newer PE or advanced (UHTC
printed on underside of tube) version?  The directions for disassembly
are ONLY for the older plastic fork arm internals and not for the newer
models which have metal DEC components.  Unscrew the locking knob and
look at the inner workings and if you see aluminum parts, that is the
newer version and you should NOT attempt to disassemble.  It is not at
all user friendly and the chances of getting it back together properly
are slim to none.

Dr. Clay
And:
My apologies for the confusion
It is the EC model
Thank you
Updates to follow
Mark
And:
You should be able to follow the instructions carefully....Please let me
know what you find.

Dr. Clay
Subject:	re: ETX70 Objective Lens Arrangement???
Sent:	Wednesday, March 10, 2010 21:42:17
From:	richard seymour (rseymour@wolfenet.com)
The typical arrangement for a doublet like the ETX-70 is for the flatter
surfaces to be facing each other in the middle, touching the spacer
ring.
So the greater curved surfaces are -both- facing outward ... one forward
and one towards the eyepiece.

good luck
--dick
Subject:	re: reviving a dead Orion Dynamo Pro 12 Rechargeable Power Station
Sent:	Wednesday, March 10, 2010 21:36:48
From:	richard seymour (rseymour@wolfenet.com)
You wrote:
> I made an error in not discharging it fully before recharging or
>  something like that.

You do NOT want to fully discharge a lead-acid cell such as these power
tanks and JumpStarts use.
Doing so -will- damage the battery (possibly including internally
short-circuiting the cells).

The only commonly available battery technology that "fully discharging"
(and even then under carefully controlled conditions) helps are some
NiCad (nickel cadmium) cells.
Discharging can remove the "phantom plateau" effect (which limits
current output as the battery discharges beyond a certain level).

I might suggest calling/writing Orion and asking their suggestions.

I see that the Orion unit is only a 12 Amp hour battery... a typical
automotive JumpStart unit (see Mike's chart at
http://www.weasner.com/etx/buyer-newuser-tips/powersupplytable.html )
has 17 AmpHour capacity, nearly 50% more life. (but usually lacks the
AM/FM radio)

good luck
--dick
And:
From:	dan.kahraman@sympatico.ca (dan.kahraman@sympatico.ca)
it is now Thursday am and there are no lights on the recharger. By
lights I mean no charging or charged lights yet the charger is still
plugged in and working.

What is the next step?

Dan
Mike here: As Dick suggested, sounds like contacting Orion would be a good next step.
And:
If the charge lights are not coming on, you indeed could have a dead
charger, as Mike suggested.
"Dead" might have been caused by a fuse popping.
But the charge lights not coming on could -also- be caused by an
internally short-circuited battery.
I'd recommend buying a cheap voltmeter and -measuring- the Orion's
output. (both with charger off and charger on).

Is the Orion still under warranty?

good luck
--dick
Mike here: Good thought about a fuse. I forgot that my Celestron PowerTank has a fuse.
And:
Subject:	Fixing a Power Tank
From:	Travis (travisedwin@comcast.net)
I just read the question concerning "fixing" a Celestron Power Tank.  I
have the 7 ah version of this power supply (which is almost exactly like
the 12ah version except for how long the battery lasts) that suffered
from a dead (wouldn't take a charge) battery.

I opened up the unit, removed the battery (which simply plugs in the
unit with two connectors) and went online. It turns out this is a
generic battery and there are dozens of companies out there
manufacturing replacements. I bought mine from Radio Shack for about
$30, which is less than half the price of a whole new Power Tank. With
Radio Shack, you order the battery online and they deliver it to the
closest store to you.

I just took the battery, reconnected it and put the case back together.
While doing this, I also removed that million lumen beamer light they
come equipped with (I could never figure out why they included this on a
piece of astronomy equipment), which makes it a little smaller and
easier to carry. The power supply now works just like new.

So if the owner of the dead Power Tank removes the battery, gets the
number off it and goes online, I'm sure he'll be able to find a direct
replacement.

Travis
Mike here: Actually, it was an Orion one, but is similar to the Celestron model.
And:
However, $30 is about the "Sale" price of 17ah JumpStart units.

I have usually found that it's cheaper to buy a JumpStart than to buy
replacement batteries.

(i've shopped batteries for industrial UPS (uninterruptible power
supplies), and they use the same cells)

have fun
--dick
And:
I found these at prices that ranged from below $10 to well into the
hundreds, almost all from sellers I never heard of. Buying from Radio
Shack just gave me someone I could holler at if anything went funky.

My 7ah sits in a corner on my Orion 10" Intelliscope. It's small enough
so that it moves along with the base, so all my dew heaters, my
controller (I've rigged the controller to run off 12V), and even my
pocket pc get all the power they need without wires getting tangled or
otherwise causing problems.

So I guess I've just gotten spoiled.

Travis
Subject:	Meade ETX Help Needed Please
Sent:	Wednesday, March 10, 2010 15:22:58
From:	Arno Moolman (arnomoolman@msn.com)
I bought my first telescope the Meade ETX 60 the backpack edition.

I have a slight problem with it.

I bought the camera adapter ring and the t-mount ring for my canon
camera.

All worked 100% until I wanted to remove it.

The problem is both ring screw on clock wise.

The problem that I have is I was able to unscrew the t-mount for the
cannon camera but the camera adapter ring that you screw on first seems
to be stuck.

Due to the threading on the outside and the small size of the adapter
there is no place to grip it to unscrew it.

I do not want to use a tool as I do not want to damage the thread on the
outside of the ring.

I noticed there is two square notches on the ring I think one can use
some kind of tool to fit in there to unscrew it.

Do you perhaps know what this tool is called or where I could get it, or
perhaps anything I could try to unscrew the camera adapter at the back
of the telescope photo port.

Your help will be much appreciated.

Lastly will it be a problem if I can not get it off and leave it on
there and leave the photo port open, does it have to be closed for the
telescope to work correctly?

Many Thanks

Best Wishes

Arno

Cape Town South Africa
Mike here: The tool you are referring to is called a "spanner wrench". However, you shouldn't need one. I've never heard of any problems removing accessories from the rear port. If it is too tight to remove easily, try using a rubber "jar lid remover" or rubber gloves. That can provide a better grip. You could leave the adapter attached but I don't recommend it. You would need to cover the adapter opening to keep dust out of the inside of the telescope tube.
And:
Thank you for the speedy reply, I tried the jar lid remover and rubber
gloves no luck I feel like crying.

I will try and find a spanner wrench here in Cape Town.

Wish me luck.

Have a great day.

Best Wishes.

Arno
Subject:	Another ETX intelligence test
Sent:	Tuesday, March 9, 2010 17:55:49
From:	George Finlay (george@principiainc.com)
OK. I failed once, by trying to download data to the AutoStar without
powering it up.

Now the puzzle I am facing is discovering the action needed to change
the battery in the Red-Dot finder. I have it off on the dining room
table. On one side it says "battery" and on the other side it says
"push". I am stumped. It is not clear to my little pea brain what needs
to be pushed in order to gain access to the battery.

George Finlay
Mike here: I assume you are talking about the SmartFinder on the LNT module on the ETX Premier Edition models. There are some articles about that on the Helpful Information: Telescope Tech Tips page.
Subject:	Finder for 125
Sent:	Monday, March 8, 2010 17:59:17
From:	George Reiswig (human.factors@verizon.net)
Got a (hopefully) quick question for you.  I have an opportunity to pick
up a Stellarvue 8x50 right angle illuminated finder cheap.  I started
trying to do some imaging recently, and the stock finder just isn't
cutting it as far as precision goes.  But that Stellarvue is a little
heavy: around 2 pounds with the mount.

I already put a counterweight on the back to help balance it, and might
need to take some of that off (or relocate it) to counter the new
finder.  But is this just too heavy for the scope?  Have other people
put on something like this with success?

Thank you,

George Reiswig
Mike here: With proper balance, you should be OK. However, the typical problem that can occur with heavy add-on's is lock slippage. Since the axis locks are friction type, excess weight can cause the OTA to slide downward due to gravity. An appropriate counterweight (on a long enough rod) can counter this affect.
Subject:	reviving a dead Orion Dynamo Pro 12 Rechargeable Power Station
Sent:	Sunday, March 7, 2010 08:16:28
From:	dan.kahraman@sympatico.ca
Do you know of any way to revive a dead Orion Dynamo Pro 12 Rechargeable
Power Station?

Thanks,

Dan Kahraman
Mike here: Whether or not it is revivable will depend on what's wrong. It could be a dead battery, broken wiring, or something wrong with the circuitry inside the unit. I suspect you can replace the 12 volt battery with the same model. It might be a standand sealed lead-acid motorcycle battery.
And:
I made an error in not discharging it fully before recharging or
something like that. So now it won't charge. Yes it is sealed and I
believe it is lead acid based.
Mike here: I have a Celestron Power Tank (very similar to yours), purchased in 2004, and I rarely fully discharge it between recharges. You might be able to get it to recharge by leaving it plugged in for several days. I have a laptop with a battery that was not recharged in years. Initially, the battery was not even recognized by the computer for recharging. But I left it plugged in. At some point there was a power outage and I noticed that the laptop was still running. The battery had revived!
And:
the charger is working but there is nothing on the battery unit lit
up-none of the lights indicating that charging is going on. I will leave
it this way for several days and then consider other possibilities.
Mike here: I would think the charging light would illuminate. So perhaps the charging circuitry had failed.
And:
i'll keep charging for the next few days-maybe 'till friday the think of
other options.

i will let you know
Subject:	RE: Meade ETX-90/EC Right Tube Adapter
Sent:	Friday, March 5, 2010 14:08:42
From:	Tim Magrino (tmagrino@earthlink.net)
I did not get a response from Scope Logic.  I saw on their web site that
they are no longer in business as of 12/31/2009, though they still have
an email address.  I got a response from Meade that said they would
repair may telescope for a flat $150 plus $15 shipping and handling.
That seems a little outrageous considering they were replacing the right
tube adapter for free at one time.  Do you know of any other options to
get my right tube adapter replaced?

Thanks,

Tim
Mike here: Yes, it seems that Scope Logic has closed. If you want to attempt the repair yourself, see the article "ETX-90EC DEC fix (Right Tube Adapter repair) on the Helpful Information: Telescope Tech Tips page. I'm not aware of any sources that provide replacements.
And:
Thanks for your help. I guess I will try to do the repair myself.
Subject:	ETXpert discontinued
Sent:	Thursday, March 4, 2010 19:31:27
From:	john marion (jmarion1@comcast.net)
I just wanted to let you know that the ETXpert has been discontinued. I
would love to have continued but the cost of manufacturing was so high.
You may post that if anyone wants to take it over or find a cheaper way
to manufacture, I would not mind. I'm not interested in the money.

On another note, have you had anyone review the Android app Google Sky
Map? It is so amazing. It is on the Android Cell phones. You point it
anywhere in the sky and it will show the current constellations, moon,
planets, etc. As you hold the phone at arms length and move around the
sky, the screen moves with you indicating what is currently in any part
of the sky, including below the horizon line. It is a free app for
anyone who has an Android (Google) phone.

John Marion
Mike here: Sorry to hear about the ETXpert. As to the Android Sky Map, hadn't heard about. Sounds like the SkyVoyager and Star Walk apps for the iPhone. You can point them at the sky and they show what's visible. I have reviews of those apps on the Accessory Reviews: Software page.
Subject:	ETX70 Objective Lens Arrangement???
Sent:	Thursday, March 4, 2010 17:43:55
From:	Daniel Matjasz (daniel.matjasz@blueyonder.co.uk)
I've purchased a 2nd hand ETX70AT and I'm unfortunately having trouble
with getting my images large in the eyepiece. I've purchased new
eyepieces just to check them out and still the same. In the meantime i
took apart the objective lens (i think that's what its called) the main
one in the front of the scope. Now I'm concerned they have not been
installed properly. What is the correct order and way round the lenses
should go please??? I'm presuming thick with less raised side forward
then the air gasket followed by thinner lens with flat side forward???

Tonight i looked at Saturn with 9mm and 5mm lens with x2 and x3 barlows
and cannot seem to see it much bigger than 2mm with a thin line for the
rings... its barely visible with good viewing. Mars is literally a pin
dot and no more??? can you suggest anything that may be wrong or is this
all i can expect from a 70??? only i here people mentioning banding on
Jupiter and polar on mars yet i just cant seem to get views of anything
bigger than a few mm so deffo no details like that.

Many Thanks for your time and effort.

Daniel
Mike here: First, keep in mind that the ETX-70 is a short focal length telescope. So you will be limited on the degree of magnification you get with some eyepieces. And the small aperture means that you will reach the maximum theoretical (usable) magnification sooner than with larger aperture telescopes. For more on what the ETX-70 can do, see my ETX-70AT on the Helpful Information: Buyer/New User Tips pade as well as comments from others on the Helpful Information: User Observations page. What you were seeing was probably normal and there was no need to disassemble the objective lens housing. And of course, doing so without documenting what you see as you disassembled it is not a good idea (as you now know). I've not disassembled my ETX-70 lens housing but will say that the surface on the front is convex.
Subject:	MySKY, ETX-60 focuser
Sent:	Monday, March 1, 2010 07:30:11
From:	RICHARD BIRCH (richardbirch@bellsouth.net)
I was checking out your site again and saw some things you answered for
people.  I have all the cables for my 494 and 495 and the cables for the
MySky.  What did you think about Meade discontinuing the MySky?  I
waited and got mine last year and have had no problems with it.  I
waited for the price to drop on it before I bought it.  Great idea but
it could be made a little better.  I'm going to make a telescope mount
for it.  Already have external speakers and I wish they had a video out
on it if I use it at a star party.

One other quick thing......the ETX-60 I have is one of the newer ones
with the focus knob at 90 degrees on the top of the tube.  I saw someone
posted info on an electronic focuser. Do you know of anyone that has put
one on one of the newer ones?

  Rick
Mike here: I liked the MySKY but maybe Meade heard about GPS and accelerometer enabled phones that would run sky mapping software, like SkyVoyager and Star Walk on the iPhone. They do a lot of what MySKY did. I hadn't heard about an ETX-60 model with the focuser on top. Don't know about any focuser mods for that.
And:
Photo of an ETX-70 just like my 60 see the focuser on top?  And the
newer ones have the computer control on the bottom of the fork.  No
problem focusing with the scope pointing up but the turning would be a
lot better if a motor did it.
Check the Feedback Archive for previous editions of the Feedback page.
Go to the ETX Home Page.