SHOWCASE PRODUCTS
Last updated: 7 March 1999
 MicroStar IIE - $169.95
MicroStar II+ CDF - $219.95
MicroStar II+ CMF - $239.95
As with the original model, the Microstar II allows you to move the ETX in Right Ascension and Declination from a hand controller. It also provides easy tracking adjustments to keep objects centered in a high-power eyepiece, especially important when doing piggyback sky astrophotography. In addition, the "C" models provide compatibility for electronic focus motors (the JMI MotoFocus, for example). See the Scopetronix web site (www.scopetronix.com) for more details on each of the models.
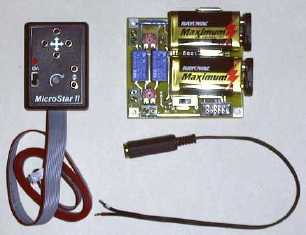
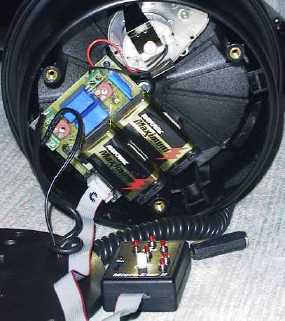
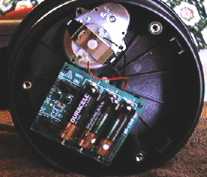
Installation of the Microstar circuit board (shown in the photo on the right, along with the redesigned handcontroller) is a straight-forward process and well documented in the Microstar manual. Scopetronix even supplies the tools and batteries. Having done this once when I installed the Microstar 1, installing the MSII+ was a familiar process but as you can read on the Microstar 1 review, it is still a simple process that anyone can accomplish. You remove the original circuit board (requires cutting two wires) and then install the MSII+ board. No soldering is required; the wires from the ETX RA drive motor, and the wires for the DEC and focus motors, are inserted into screw-down blocks. Once installed (see the photo on the left below), you will have great new capabilities with your ETX; even Meade added these capabilities to the ETX with the new model ETX-90/EC.
 Prior to the MSII+, I was using the JMI MotoFocus for electronic focusing (no vibrations due to focusing by hand) and the Microstar 1 for dual axis drive control. Unfortunately, this meant having to use two handcontrollers. With the MSII+, the new handcontroller and circuit board support electronic focusers. No more fumbling around juggling two controllers! Thanks Scopetronix. As you can see on photo 1, the handcontroller has four buttons (diamond pattern) to control the RA and DEC drives, and the two focus buttons (lower right). On the left of the controller is the RA drive ON/OFF switch. An LED illuminates to indicate when the drive is ON. Between the switch and the focus buttons is a small knob to control the focus motor speed. Unlike the JMI MotoFocus handcontroller, the MSII+ unit allows you to focus at the slowest speed.
Since installing the MSII+ it has been mostly cloudy at night in my location so I've only worked with the new model a short period. But during that period I have seen that the factory setting on the RA tracking speed (which is adjustable) tracked perfectly, as observed through the 9.7mm eyepiece (128x). And, as I discovered with the Microstar 1, having electronic control over both RA and DEC makes slewing around or doing minute corrections a simple task of pressing a button. This means there are no vibrations induced into the object being viewed or when doing piggyback astrophotography.
For some examples of what can be done when adding a camera piggyback on your ETX and then tracking the sky using the Microstar, see the Astrophotography - Sky page. If you want to do piggyback astrophotography with your ETX, the Microstar is a must-have. If you just want more viewing pleasure from your original model ETX, adding a Microstar IIE or II+ will be money well spent. The Microstar II line is another quality product from Scopetronix and is highly recommended.
Read on down this page for my original comments and some other user comments on the Microstar 1 and see other Microstar II+ user comments on the Accessories - Miscellaneous page.
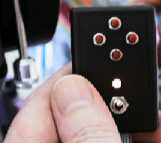 Two things need to mentioned upfront. One, installation of the Microstar 1 will void your ETX warranty as you have to cut wires and remove the factory-installed RA drive electronics. Two, not everyone will need a Microstar. With that said, everyone can benefit from the Microstar as it provides full motorized control of both the RA and DEC axis for slewing and image tracking corrections. If you do piggy-back astrophotography you will really benefit from adding a Microstar. The hand controller (or paddle) is shown in the photo on the right, with buttons for left/right and up/down movement, a toggle switch near the bottom of the paddle to turn the RA drive on (for normal tracking), and a red LED (over exposed in the photo) above the switch to indicate when the RA drive is on. But is it easy to install and use? I'll discuss the installation first.
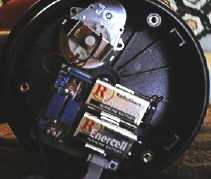
If you can remove the ETX baseplate to install the normal RA drive batteries and cut wires, you can install the Microstar. It is that easy. There is no soldering or drilling required, and everything is included when you receive your Microstar, including two small screwdrivers, two 9-volt batteries, and some spare O-rings and double-stick pad for the DEC motor attachment. 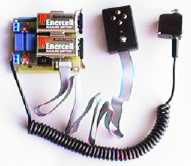 The photo on the left shows all the components as shipped. It comes with the cables connected and the batteries installed so that you can check out its operation as soon as you unpack it. A 10-page installation and operation manual is included and a FAQ (Frequently Asked Questions) page is available on the Microstar web page. The installation instructions are easy to follow and the total installation time is short (it took me a little over one hour but I was taking lots of photos of the installation process, doing some experimenting, and correcting one problem which I'll mention shortly).
The first thing to do before beginning the actual installation is to perform a "pre-installation checkout" of your ETX. The Microstar manual goes into considerable detail on how to check out your RA and DEC movements with several techniques for correcting DEC problems (RA techniques are available on many web sites, including this one). My ETX passed the RA test. For the DEC test I had some minor increase in friction near the end of each DEC slow motion run. I loosened the two screws on the DEC mount as suggested in the techniques and that helped a lot. Now there is barely detectable friction at both ends of the run and since I don't expect to be moving the scope via the motor when at the end of the run I decided this was OK.
The next thing I had to do was to repair a broken wire. A wire going into the DEC motor connector was broken right at the connector. Apparently it shifted a little in shipping or was moved in my unpacking. (Blessing has determined the culprit and corrected it in new production runs.) It was easy to strip off some insulation and reattach the wire to the connector.
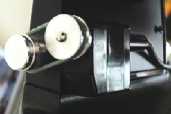
 Next the ETX baseplate is removed, revealing the factory-installed RA drive circuit board (as shown in the photo on the right). You unscrew four small screws holding the board to the base (keep the screws to attach the Microstar board) and the cut the two wires from the board to the RA drive motor. The Microstar manual says to cut the wires about 1/4-inch from the board to leave an indication as to where they were attached on the original board (should you wish to re-install the Meade board) and to provide enough wire to reach from the motor to the Microstar circuit board when mounted. I decided that 1/4-inch was not enough should I decide to remove the Microstar (although having used the Microstar for a few nights I can not image wanting to remove it!). So after I eyeballed the length of wire needed, I left about 1-inch on the Meade board. I almost made a serious mistake; the remaining wire length from the motor almost did not reach the RA drive connector on the Microstar board when it was mounted. Fortunately it did reach but I recommend that you follow the Microstar installations and only leave 1/4-inch.
 Once the Meade board was removed it was simple process to install the Microstar board in the same location, using the same four screws. Next came the most challenging portion of the entire installation process: connecting the RA motor and DEC motor wires to their respective connectors. The connectors are on the left side of the board as shown in the photo on the left. Normally the RA wires would have been easy to attach but my shorten ones were very difficult to make the bend and insert into the connector. The DEC connector would have been a problem no matter what. That connector (lower left corner of the board) is very near the wall of the ETX base and so there is very little room to maneuver the wires and insert them into the connector. Using needle nose pliers to hold the wires I was finally able to get them inserted. Blessing has since determined that the wires should be connected before the board is mounted and I concur.
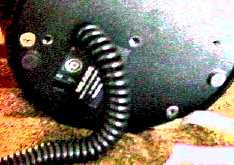 Now that everything is reconnected you use the paddle to verify that everything works. It did. The baseplate is then reattached. The paddle ribbon cable is run through the side of the baseplate and the DEC motor cable comes out the RA Drive ON-OFF switch hole (now empty since the Meade board has been removed).
Next, I mounted the ETX back on the JMI Wedge.  At first I was concerned that the DEC motor cable would interfere with the mounting but I was wrong. Since the ON-OFF switch had to be accessible when the ETX was on the wedge, the cable feeds through the same open area without any problem.
 Then I attached the DEC motor. It attaches in the same location as the JMI MotoDec (which I had to remove). Also like the MotoDec, the Microstar uses an O-ring around the drive motor pulley and the DEC slow motion knob.
This completed the installation. So how well does the Microstar work in actual use?
I used the moon as my first target. Tracking in both RA and DEC was smooth although there was some initial lag in RA (mentioned in the docs). The RA motor "spins down" back to normal tracking speed when the button is released. It sounded disconcerting at first but it seemed OK. The DEC drive is a little quieter than the JMI MotoDec. With the paddle held such the cable goes down, pressing the left button causes the panning to move left as the object is viewed in the eyepiece and pressing the right button pans right on the object. Pressing the top button pans upward on the object and pressing the bottom button pans down. This was true in both the normal eyepiece position on the top of the ETX and with an eyepiece attached to the Shutan Wide-Field Adapter at the rear port. The speed of the slewing (as shipped, although it can be adjusted) was a nice rate, neither too fast to see what was moving past your eye nor too slow as to be cumbersome. It was a very natural and pleasurable experience. During one exceptionally clear night with very steady seeing, I toured the moon using the 9.7mm eyepiece in combination with a 2X Barlow Lens (providing 256x). Even at this high magnification, the moon's image was steady and showed no vibrations due to the motors or drive movement. In short, the Microstar worked flawlessly.
I then tried some prime focus and piggy-back astrophotography, using the Microstar to provide drive corrections in both DEC and RA as needed. Long duration (several minutes) prime focus astrophotography is not one of the ETX's strengths but I keep trying anyway. I mounted my Pentax Spotmatic at the ETX prime focus and tried to move the scope in declination. The O-ring kept slipping on the DEC slow motion knob. The problem, as pointed out by Jordan Blessing, is that "all the weight just jams the drive nut against the threads and the dec shaft against the thrust surfaces. This isn't too good for your ETX period." But I did manage a few shots (results will be posted when the photos return from PhotoCD processing) using the Microstar to adjust RA tracking while guiding (or trying to) with the finderscope. Obviously the finderscope is not ideal for guiding so I don't hold out much hope for successful long duration prime focus photos. But, piggy-back astrophotography is another matter entirely.
I mounted the Spotmatic on the ETX using the JMI Piggy-back Camera Mount. I used a 9.7mm eyepiece for guiding. The JMI mount includes a counterweight to balance the ETX with the camera mounted. Adjusting both DEC and RA using the Microstar during the exposures worked well. Using the Microstar for keeping the guide star centered was a joy. Now I need an illuminated reticle!
[8/23/98] Some photos have now been posted on the Astrophotography - Sky page.
The only "problem" that has appeared during my initial use of the Microstar 1 is that occasionally the RA drive would not engage when slewing, although it continued to properly track the object. When this occurred it was difficult to correct minor tracking errors. According to Blessing, "If this was during a reversal from east to west or vice versa it is slop in the geartrain (see the troubleshooting faq about more on this.). If the scope was unbalanced westward and was also pointed from the zenith to the western horizon area it could still be gearslop." This is not something that the Microstar can correct and I did notice that if I held the left or right button down long enough movement would finally occur. In any case, this "problem" does not detract from the utility of the Microstar.
Based upon my initial impressions of the Microstar and its use, Jordan Blessing has designed a valuable addition to the growing number of ETX-only accessories. If you want the convenience of motorized slewing while doing visual observations, the Microstar 1 is the only accessory that has both RA and DEC controls (the JMI MotoDec slews declination only). If you want to do piggy-back astrophotography of the night sky, the Microstar becomes a necessity to correct tracking errors, whether due to an approximate polar alignment or tracking errors in the RA motor, which while good enough (usually) for visual observations, is not adequate for long duration exposures. For a limited time, the Microstar 1 is available (direct from Blessing) at $179.95 plus $5 priority mail. The ETX is a fine telescope but does lack some features of larger, more expensive scopes. Adding a Microstar will be money well spent if you want more convenience from your ETX.
[10/24/98] I recently added a Celestron Micro Guide Eyepiece to my eyepiece collection for use with the Microstar to improve guiding for piggyback astrophotography. Using this illuminated reticle eyepiece made correcting for drive errors even more of a pleasure with the Microstar. I will post the new piggyback astrophotos on the Astrophotography Gallery - Sky page when they are PhotoCD processed. One other interesting item to note about the Microstar: the drive ON/OFF LED is bright enough to be used to illuminate a watch for timing checks. I found this very handy during the exposures. Having had the use of it for several months now, I can honestly say I would have been extremely happy with my purchase had Jordan not provided one for evaluation.
For a perspective from another Microstar 1 user, this was sent to me just after I finished my initial write-up.
Sent: Saturday, August 1, 1998 20:27:54
From: gbass@taconic.net
I've been awaiting your review of the MicroStar 1 and thought I would send my initial observations of the device. I think anyone who is interested should certainly visit Jordan Blessing's web site. In my opinion, he is a person who says what he means, and who means what he says. There is no hype there. I think he gives a perfectly honest assessment of what the device can do. His "Installation and Operation Manual" are extremely clear - it is well written (I'm tempted to say, by a "real person") and it was easy to follow. The first thing any buyer will have to do is get the RA and DEC axes in working order. If they bind, or jerk, or slip - well, that's certainly not the fault of the MicroStar 1. Mr. Blessing includes detailed instructions for the smoothing of the DEC axis (which I had never attempted before) which worked like a charm. He refers buyers to information (like the hanger bolt modification in "guest contributions" of your site) on the WEB to fix RA problems. After attending to both problems, I'm quite satisfied that I am now seeing much more of the MicroStar. I can now pan smoothly at high power across the moon. For me, this is akin to purchasing a new scope. I can think of no other modification that could add so much value to my ETX. Although I've owned it for over a year, and have spent quite a bit of time observing, with the ability to pan smoothly in both axes, I'm experiencing another world of viewing. To move the image without touching the scope is worth the price of admission. I never want to touch the DEC or RA slow-mo knobs again! In fact, I don't have to. Now I can really enjoy the optics.
This is a device that will reveal the weaknesses in RA and DEC motion inherent to the particular telescope it's installed on. As I mentioned above, Mr. Blessing's instructions on DEC smoothing are clear and easy (not to mention necessary) to follow. I've been tweaking the "hanger bolt fix" for a few more hours now. I thought I'd fixed the tracking problem because the scope would track for an hour with only a few minutes of error. That was, however, inside the house, on the tripod, AND after I'd tightened the nut so much that the scope would not track at all (so one might appreciate how glad I was to see the numbers when it did move). But, I'd never actually been able to get out and look carefully at how the tracking was accomplished. When I finally did, given the purchase of the MicroStar, I discovered that the tracking was accomplished in a very jerky fashion. The MicroStar will not eliminate that. Only careful observing and adjusting the tension on the nut of the hanger bolt (backing it off a quarter turn - observing - backing it off a quarter of a turn) finally fixed the problem. I am now a happy observer. I would urge those who are still having some difficulties to observe a distant target, in comfort, during the day. Don't know why I didn't think of that simple step earlier instead of waiting for a clear night which was too long in coming (and which also brought misquitos that destroyed all the patience necessary to finish the job). Watching the scope track in the daylight with the 9.7mm lens (or the highest power one has) will reveal a lot (even the peeling paint on a house across town). Once that RA jerking was fixed, the MicroStar 1 also tracked smoothly.
I do look forward to your review, Mike, because you are a much more seasoned observer and have much more stringent observing requirements given your interest in photography. As for now, I'm a very satisfied customer. I can't imagine going back to the knobs. My capacity to observe has been raised to a new level.
Best regards, and thanks for keeping up this great site.
Alan Marwine