TRIPODS
Last updated: 20 April 2020
|
"Blinky" LEDs (05/17/05) TriWedge (02/18/01) Advanced Field Tripod for ETX-125EC (05/03/02) Shutan ETX Easy-Mount (04/1/00) Scopetronix Tripod Clamps (12/28/01) Camera Adapter for ETX Field Tripod (02/16/99) Meade ETX Field Tripod (08/7/00) Celestron CG-3 Tripod (09/12/98) Bogen Tripods (02/28/99) Bogen Quick Release for Tripods Tripod Mounting the ETX |
ScopeStuff Dovetail Bar for ETX Models (04/20/20) Meade #884 Tripod (02/19/02) ETXpert mounting plate (03/08/10) Meade ETX-125EC Table Top Legs (02/4/00) JMI Megapod (03/18/01) Binocular Mount & ETX (03/24/99) Manfrotto tripods (11/8/98) Orion Sky View Deluxe EQ (11/26/98) JMI Wedgepod (01/9/99) JMI Tripod and Equatorial Wedge (02/16/98) JMI Equatorial Wedge (06/14/98) |
Shutan Camera & Video has terminated operations as a dealer. Shutan accessories mentioned here may or may not be available from other sources.
| Accessory | Manufacturer | Model | Price |
| #884 Advanced Field Tripod | Meade | #884 | $200 |
 Ken Krolikoski (kkrolikoski@isquared.com) reports: "The brick and mortar
Discovery Store had the 884 in stock for $199. It has
steel(883-aluminum) tubular legs and is adjustable in height 25" to 44".
(883-34" to 54").It appears much sturdier than the 883. See pictures
attached. Comes with carrying bag(883-none)."
Ken Krolikoski (kkrolikoski@isquared.com) reports: "The brick and mortar
Discovery Store had the 884 in stock for $199. It has
steel(883-aluminum) tubular legs and is adjustable in height 25" to 44".
(883-34" to 54").It appears much sturdier than the 883. See pictures
attached. Comes with carrying bag(883-none)."


Mike here: I saw one in person the other day. It is definitely sturdier than the #883. The only potential problem I noticed was that the sliding rod for the latitude adjustment does not have a securing collar and could slip and let the telescope rapidly tilt to 0 degrees. Something to watch out for.
Martyn (martyn@starmail.co.za) reports:
"Yesterday my tripod #884 arrived. Am I glad I got it!!! I had some
reservations with respect to being able to sit and observe due south,
but other etxers had assured me that I would have no problem. And
indeed, it is no problem. The tripod is rocksolid, easy to adjust and
did I mention ROCKSOLID?
The scope tilts over the north leg, but there is no danger of the
whole set up tip over at all. And it looks sooooooo good! #884 and
etx90 obviously belong together, it's true love between them.
Until now I managed quite nicely with gardentables but now...this
tripod has provided me with the freedom to set up the etx anywhere. I
can take it to dark sites, escape obscuring trees or buildings. It's
just amazing how this tripod improves the useability of my ETX90RA.
The softbag that comes with it is a nice bonus I think.
The tripod is quite light - inspite of it's sturdiness - and when
completely collapsed quite small too, very easy to carry around. This
compactness also means that when the legs are completely extended, the
tripod is not quite high enough for someone my size(1.75m) to
comfortably observe while standing. In my case this is especially so
but then again I normally observe while being seated anyway.
The tiltplate does not have a hole through which I can access the
on/off switch. The scope rests on the tiltplate with three litle
rubber feet. The bottom of the ETX base therefore does not touch the
tiltplate. This enables me to attach a string to the on/off switch and
operate the switch by pulling this string.
Otherwise I switch on first and then mount the scope. I do not really
want to drill a hole in the plate as I first intended.
Anyway, I am extremely happy that I now have the tripod and am very
anxious to start using it. I will be posting my experiences as soon as
I have them.
Martyn (martyn@starmail.co.za) provides this update:
"The new #884 tripod I acquired recently is working just fine. I have
now used it several times with the ETX 90RA and I like it alot. It gives
solid support, even with fully extended legs. You will however still
want to use a clothespin for jitterfree focusing. The RA control for
manual tracking and RA lock are much easier to reach than when the scope
is on a table. The latitude adjustment works very well and locks very
securely, setup is very quick and easy. The scale can be read even in
darkness (as long as there is a little ambient light). When the tripod
is tapped there is some movement in the eyepiece ofcourse, but it dies
out really quickly - intantaniously almost.
As I have mentioned before, the tripod is a little low for standing
observations, even when the legs are fully extended. The legs spread
apart quite far but that means stability. Be careful though when
carrying it through the house like that, the legs transfer any bumps
through the legs quite efficiently. It is quite well possible to have a
normal chair positioned above one of the legs and observe comfortably
while seated.
The accessory/spreader tray has six 1 1/4 inch eyepiece slots...very
nice!
The leg-connector has a nice flat surface that can be used to store
things - the metal lenscap for instance. It can also be brilliantly used
for placing a level on top of it to level the tripod. (this especially
if you have mounted the scope allready).
The carrying bag is a really nice bonus, I like it.
A minor quibble: Some eyepieceslots on my tray are too small to actually
accept the eyepieces, and some have an extremely tight fit. This does
not promote a really quick eyepiece change. I end up placing eyepieces
on top of the tray, easy to imagine what can happen. But I think a shave
of the black finish inside the slots will open them up a bit. All in
all, not really a big problem.
This is much better than using a gardentable, I observe much more
comfortable than before. I am really, really glad I got this tripod.
Thanks to those of you who took away my doubts about the usability of
this tripod while being seated in a chair.
Final note for ETX90RA owners, there is no hole in the tiltplate through
which you could reach the on/off switch. So switch on before you mount
the scope, or else drill a hole or attach a string to the switch. I
decided to just switch on before mounting the scope...much more trouble
free.
|
|||
| TriWedge | N/A | N/A | $288 |
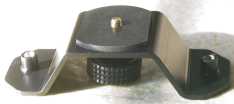
 Ian Darlington (idarlington@madasafish.com) reports: "After seeing inquires regarding the triwedge tripod I thought I would add my comments. I bought a triwedge & ETX125 in June and have found the tripod to be excellent (if a little expensive). The tripod itself is based on an aluminium surveying
tripod with the addition of a accessories tray. The wedge itself is made form 6mm steel (and has a bubble level attached), on mine the holes for the ETX thumb screws needed filing open a bit to make mounting easier . The wedge can be adjusted about between about 20 and 80 degrees latitude. Alternatively you can rebuild the wedge to give a level plaform (see pic) for alt - az tracking, I've recently changed back to polar after installing 2.1ek. Basically the triwedge looks about 1000% more stable than the Meade tripod and a 125 balanced on top doesn't look like it will fall over. A well made and solid piece of kit, but unfortunately missing micro-adjust for altitude & azimuth.
I got the tri wedge from Green Witch (www.greenwich-observatory.co.uk) here
in the UK (based near Cambridge), I was about 199 or so."
Ian Darlington (idarlington@madasafish.com) reports: "After seeing inquires regarding the triwedge tripod I thought I would add my comments. I bought a triwedge & ETX125 in June and have found the tripod to be excellent (if a little expensive). The tripod itself is based on an aluminium surveying
tripod with the addition of a accessories tray. The wedge itself is made form 6mm steel (and has a bubble level attached), on mine the holes for the ETX thumb screws needed filing open a bit to make mounting easier . The wedge can be adjusted about between about 20 and 80 degrees latitude. Alternatively you can rebuild the wedge to give a level plaform (see pic) for alt - az tracking, I've recently changed back to polar after installing 2.1ek. Basically the triwedge looks about 1000% more stable than the Meade tripod and a 125 balanced on top doesn't look like it will fall over. A well made and solid piece of kit, but unfortunately missing micro-adjust for altitude & azimuth.
I got the tri wedge from Green Witch (www.greenwich-observatory.co.uk) here
in the UK (based near Cambridge), I was about 199 or so."
|
|||
| ETXpert mounting plate | John Marion | N/A | $99 |
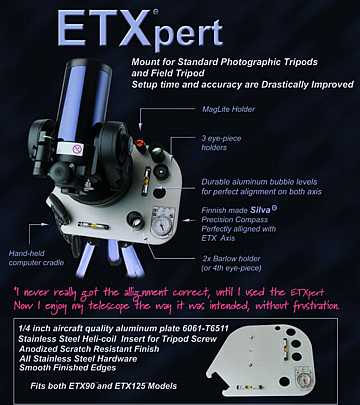 John Marion (johnmarion@xxv.net) announces: "We have developed what we believe to be the best mounting plate for the
ETX 90 and 125. It's primary purpose is for proper alignment. Added to that
is the added benifit of holding holes for lenses and computer controller and
mag light. It is common knowledge that in order for the hand-held computer
controller to work properly, it is important to have the telescope perfectly
level and facing true North. It seemed that I was fumbling around quite a
bit trying to align the scope to North and get it to be level in both axis.
Merely placing the measurement devices against the body of the telescope
proved to be inaccurate as well as very cumbersome.
John Marion (johnmarion@xxv.net) announces: "We have developed what we believe to be the best mounting plate for the
ETX 90 and 125. It's primary purpose is for proper alignment. Added to that
is the added benifit of holding holes for lenses and computer controller and
mag light. It is common knowledge that in order for the hand-held computer
controller to work properly, it is important to have the telescope perfectly
level and facing true North. It seemed that I was fumbling around quite a
bit trying to align the scope to North and get it to be level in both axis.
Merely placing the measurement devices against the body of the telescope
proved to be inaccurate as well as very cumbersome.
I contacted a friend of mine who manufactures high strength parts for aeronautic use. In fact some of his work is in space right now. He really took on my challenge with enthusiasm. Within just a few days he handed me the finished piece of work with a big smile. The first time I held it, I thought, how beautiful, such smooth edges and silky finish. I was impressed with the look, but still needed to put it to test. And that it did without any flaws. So nice... to align the tripod head and telescope with such ease. One hand, instead of "I wish I had four". So nice to see the telescope sleuth through the sky with accuracy; a first for me. This mount is for alt/azm use. Of course we decided to produce ETXpert for what seemed a void in the vast array of accessories for the ETX models. The cost is $99. John Marion
Please feel free to call us today at (810) 727- 3601, to order. Peter Rossi (peterrossi@lucent.com) reports: "I use one of the EXTpert mounting plates for my ETX-125EC. I love it!! It is just so handy. The 2 levels and compass make it a snap to set the telescope up. The extra shelf space with the holes to hold eyepieces is a very nice idea also. The ETXpert is an excellent mounting plate."
John Bond (jbond@gis.net) reports: "The phone # listed is no longer available, and my email to John Marion goes unanswered. I would like to purchase the ETXpert mounting plate or something similar, for an ETX90, any sugestions."
William Taylor (billt812@hotmail.com) adds: "I ordered the ETXpert mounting plate and received it as advertised. The correct phone number is: |
|||
| Advanced Field Tripod for ETX-125EC Tripod Adapter for ETX-125EC |
Meade Instruments | #887 #889 |
$350 $70 |
|
Art Griggs (agriggs@pacbell.net) reports on the Tripod Adapter for ETX-125EC for those with a LX50 tripod. The adapter is included with the Advanced Field Tripod for ETX-125EC.
"What I wanted was a telescope with the optical qualities (high contrast, etc.) of a good ED Refractor with the portability of a catadioptric design. I had already "auditioned" Meade’s LX50 7 inch Mak for three weeks and found the OTA and its mount too heavy for my portability requirements. (Nearly 50 pounds but none-the-less, Meade’s 7-inch Mak is a beautiful telescope with excellent optics.) When I learned that Meade was intending to release a 5-inch version of its popular ETX, I immediately placed an order with The Nature Company. I was among the first to receive the new ETX-125EC and it proved to have none of the problems later reported by some owners. Even though I have yet to order the Autostar I have enjoyed using the 125 in its Alti-Azimuth mode, set up on a table at my "dark site" - the tennis courts (after hours) at my apartment. I quickly came to appreciate Meade’s gem but realized that it warranted a more convenient and stable platform (along with an electric focuser) if I were going to use the 125 at its higher powers. Having already owned the 90RA, I was reluctant to buy Meade’s Tabletop Tripod. The Deluxe Tripod looked to be not very stable and possibly even unsafe for the 125. I already owned Meade’s excellent LX50 adjustable field tripod and wedge so I developed a design for an adapter to join the ETX to the LX50 Tripod. But just before I took my design to a machine shop to have it built, Meade announced its own adapter for the ETX-125EC, Meade #889. I quickly ordered it and the electric focuser from Astronomics - I received both last month.  Meade Adapter Packaging Unlike most Meade accessories, like the Electric Focuser that come in a blue and white Meade Instruments box along with detailed instructions, all necessary attaching parts and the appropriate hex wrenches, the ETX Adapter arrived in a plain brown corrugated box with only the hand-written Meade part number on it. In the box were just the adapter (see above) and two small _ inch hand screws for attaching the adapter to the bottom of the telescope’s mount via the Deluxe Tripod mounting holes. There were no other attaching parts, special tools or instructions. The black die-cast adapter has six support pads molded into the top. It also has two _ inch mounting holes (for the hand screws); three _ inch threaded mounting holes and one _ inch threaded mounting hole (for Alti-Azimuth Tripod use); and three, 3/8-inch threaded mounting holes, one located in each of three mounting nodes located around the outer edge of the adapter. 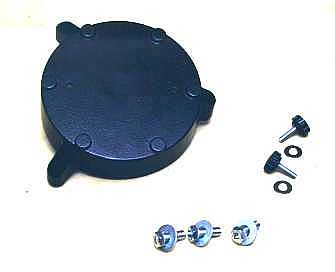 Meade’s Design When I was designing my own adapter, I had to remove Meade’s plastic cover from the telescope’s mount. (My adapter would have replaced the plastic cover. Since receiving the ETX, I have only used the more durable and dependable power source of an external battery — Whistler’s Power Station from Scopetronix. Therefore, giving up the AA battery compartment was not an issue.) With the plastic cover removed, I was able to mount the Meade adapter directly to the metal structure of the telescope’s mount and drive assembly. I accomplished this by purchasing three standard 3/8-inch diameter by 1-inch long course thread bolts, with washers, from Home Depot. (I would have preferred Allen head bolts but they were out of stock.) Three of the six support pads that are on top of the adapter mate up with the three standoff posts that support (and mount) the plastic cover. This along with the two hand-screw mounting points provides an extremely secure attachment that is free of any movement. Now I doubt that Meade "condones" this mounting technique and it may even affect their warranty. (You have to disconnect the two wires that attach the cover’s battery case to the electronics.) Without any Meade instructions I have no way of knowing. However, it is curious that three of adapter’s pads line up perfectly with the three stand-off posts and that they are the correct difference in height to make all five contact points (3 pads and 2 hand screws) match up. Of course you can also mount the adapter with the plastic cover in place but you will discover that you may want to remove the AA batteries first. Using the adapter means the batteries won’t be readily changeable. Given that and their relatively short life you may want to consider using an external power source. 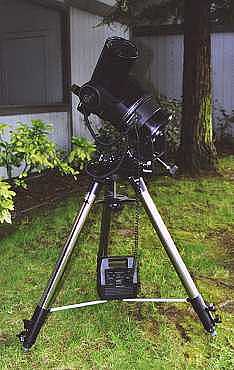
The end result . . . I have the portable, quality-optics* telescope in a stable, go-to mount that I was wanted and I can lift the entire assembly and carry it quickly outdoors. Note: I have written assembly instructions if readers want to contact me by e-mail. Finally, upon seeing the assembled ETX-125EC "Observatory" the lady in my life remarked that it was "sexy" - I don’t think I could ask for more!"
Jim Dishman (Jim@Dishman.com) adds: "Meade was kind enough to send me one of these tripods to evaluate. Follows is an honest evaluation of this tripod. Everything here is, of course, only my opinion. You should always judge for yourself before coming to your own conclusions. I will be writing my evaluation using polar alignment, but this tripod can just as easily be used for Alt-Az setup. The first thing I noticed about this tripod was the substantial weight difference over the #884 I had been using. At about 50 pounds, this weight makes for rock solid stability. The tripod came partially assembled in one large carton. I was a bit confused at first because there were 2 sets of instructions enclosed. Apparently there is an early version and a later version of this tripod. After doing an inventory of the enclosed parts, I determined that I had the early version. Assembly was very simple. The only thing that actually needed assembly was the wedge portion. The enclosed instructions are sufficient for anyone with minimal mechanical abilities to understand. I had absolutely no problem putting everything in order ready to use in less than 15 minutes. Using the supplied adapter, I was easily able to mount my ETX-125 (along with the steel base plate) to the wedge. Now for the usage portion There is no built in bubble level so I purchased a $2 bullseye level. Since this is a fixed height tripod, the first thing I became aware of was that you cannot adjust leg height to level the tripod.. But you can level the tripod a couple of different ways. You can make some wedge type shims and adjust 2 of the legs like that or simply by pushing inward, 1 or 2 of the legs. The tripod is heavy and stable enough to operate flawlessly even if all three legs are not in the fully deployed position. The latitude adjustments are accomplished using a socket head screw that adjusts the wedge position. It is a bit awkward to get to at first because you have to turn the screw with the supplied allen wrench. I think that some sort of knob to control the adjustment here would be better since, if you drop a black allen wrench in the dark, well, you get the picture. Another improvement I think is needed here is some sort of pinpoint/dial indicator so you can determine exactly what latitude the wedge is set to. The way it is now, you sort of have to judge which latitude you are on by centering the screw on the setting you want; close, but I like the visual feedback of a dial type indicator. The fine adjustment for azimuth was precise and easy to turn, making it very easy to fine-tune your setup in the azimuth. Aside from the minor things, setup was easy and remained stable throughout my viewing sessions. The bottom line WOW. What a solid tripod! There are a few VERY minor improvements that could be made, but overall, the #887 Tripod is a ROCK SOLID, stable, tripod for Polar and Alt-Az applications. Seemingly unaffected by minor winds and ground vibrations like the earlier lightweight aluminum units originally supplied for the ETX-125, I did not find any stability problems at all with this tripod. I feel this is one tripod that I will use for some time to come without having to make any of my own modifications to overcome design shortcomings as I have had to do with tripods of the past." |
|||
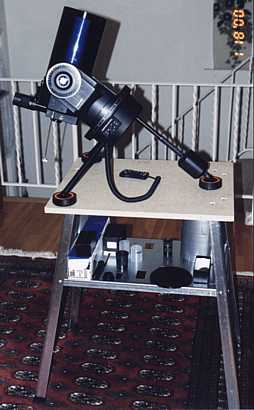
| ETX-125EC Table Top Legs | Meade Instruments | #881 | $59 |
 John Hanover (johnh@bdg8.niddk.nih.gov) reports:
"I recently purchased the Meade table top legs for the ETX-125EC from Pocono
Mountain Optics. The portability of the legs appeals to me. I guess I have
always admired the elegant simplicity of the legs as they originally appeared on
the Questar. The Meade unit ship as 2 fixed legs, two adjustable legs and a
heavy counter weight. The legs themselves are lightweight but reasonably robust
and appear to be well made. The counterweight was unexpectedly heavy. One
minor problem with the legs as shipped was that the carriage bolts in the legs
were too short and would not allow the fixed legs to attach properly. A call to
Pocono Mountain Optics quickly solved the problem. They told me to use an Allen
wrench to unscrew the carriage bolts slightly, thus extending them. This did
the trick allowing the legs to attach securely. I have since the 1/2" carriage
bolt with a 3/4" replacement from Home Depot ($0.79 for a package of three).
This allows several additional turns of the legs and makes me feel better; I no
longer worry about the threads shearing off and the scope toppling to its doom.
In use, the legs are wonderfully simple: just set the latitude and go. I used
them on Celestron vibration reduction pads and this further enhances stability.
They form a triange of 17" by 17" by 21" at my latitude of 39 degrees. The photo
shows the legs in use on a 32" inch high fixed observing table. This table is a
Power tool stand/ workbench from Home Depot ($29.00) which I have found to be
ideal for this purpose. It is very stable, fairly light and has a wonderful
tray below the main surface for accessories (even cutouts for 1 -1/4"
eyepieces!). I also use the table in alt-azimuth mode. I drilled two holes in
the 3/4" particle board surface. When placed on the plate supplied with the ETX
125EC, two carriage bolts secure the telescope to the top with thumb-nuts. This
is a very convenient table which allows access to the eyepiece from all
sides-great for those "Guided Tours" with the Autostar."
John Hanover (johnh@bdg8.niddk.nih.gov) reports:
"I recently purchased the Meade table top legs for the ETX-125EC from Pocono
Mountain Optics. The portability of the legs appeals to me. I guess I have
always admired the elegant simplicity of the legs as they originally appeared on
the Questar. The Meade unit ship as 2 fixed legs, two adjustable legs and a
heavy counter weight. The legs themselves are lightweight but reasonably robust
and appear to be well made. The counterweight was unexpectedly heavy. One
minor problem with the legs as shipped was that the carriage bolts in the legs
were too short and would not allow the fixed legs to attach properly. A call to
Pocono Mountain Optics quickly solved the problem. They told me to use an Allen
wrench to unscrew the carriage bolts slightly, thus extending them. This did
the trick allowing the legs to attach securely. I have since the 1/2" carriage
bolt with a 3/4" replacement from Home Depot ($0.79 for a package of three).
This allows several additional turns of the legs and makes me feel better; I no
longer worry about the threads shearing off and the scope toppling to its doom.
In use, the legs are wonderfully simple: just set the latitude and go. I used
them on Celestron vibration reduction pads and this further enhances stability.
They form a triange of 17" by 17" by 21" at my latitude of 39 degrees. The photo
shows the legs in use on a 32" inch high fixed observing table. This table is a
Power tool stand/ workbench from Home Depot ($29.00) which I have found to be
ideal for this purpose. It is very stable, fairly light and has a wonderful
tray below the main surface for accessories (even cutouts for 1 -1/4"
eyepieces!). I also use the table in alt-azimuth mode. I drilled two holes in
the 3/4" particle board surface. When placed on the plate supplied with the ETX
125EC, two carriage bolts secure the telescope to the top with thumb-nuts. This
is a very convenient table which allows access to the eyepiece from all
sides-great for those "Guided Tours" with the Autostar."
|
|||
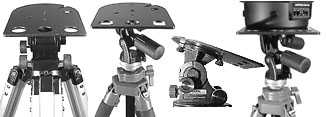
| 90mm ETX Easy-Mount | Shutan Camera & Video | N/A | $59 |
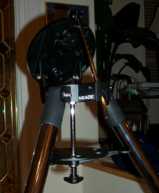
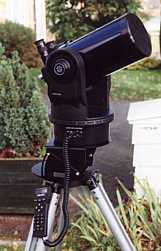
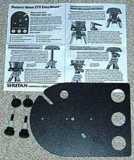 Shutan Camera & Video sent me one of their new 90mm ETX Easy-Mount tripod mounting plates to try out. This solid steel (not aluminum), 3/16-inch thick, plate goes between your tripod and ETX-90 (RA or EC) base. The Easy-Mount can be used with any sturdy photographic tripod, with or without a pan head, or it can be used with the Meade Deluxe Field Tripod. For regular tripods, the Easy-Mount allows you to securely attach the ETX-90RA or ETX-90EC, for polar or altazimuth use. An adapter plate is usually required when using a regular tripod, especially with the ETX-90EC, which does not have a central tripod attach hole in the center of its base plate, for better stability and security. When the Easy-Mount is used with either a regular tripod or the Meade ETX tripod, you will also get the convenience of three eyepiece holder "holes". The photo below (supplied by Shutan) shows the Easy-Mount attached to a photographic tripod as well as the Meade ETX tripod:
I attached an ETX-90EC to the Meade Deluxe Field Tripod with the Easy-Mount per the instructions that came with the Easy-Mount. In general, mounting everything was straight forward. While the original instructions had some minor errors, a revised sheet was received which clarified the
1. Steel, not aluminum (whose threads would not hold up) If you order from Shutan by phone (800-621-2248) and mention you saw it reviewed on "Weasner's Mighty ETX Site" you can get it for $49.95. A forthcoming ETX-125EC version will be available, for the same price, thus eliminating the need of Meade's metal plate which, for some, may be hard to get properly positioned between the tripod and base.


|
|||
| Megapod | JMI | N/A | $219 |
|
Frank Goldner (fgoldner@worldnet.att.net) reports: "Mike; You, as well as some of your readers, have mentioned several
times JMI's tripods for consideration for the ETX-125.
I recently purchased their MEGAPOD and am very pleased with it. It is
very sturdy and simple to set up, and I highly recommend it as an
alternate to the one MEADE produces at this time (approximately $230
with delivery to my east cost location).
JMI service is also great. After receiving the MEGAPOD I noticed that
the top tilt plate (used for polar aligning) was slightly curved. Upon
calling JMI, within a bit over a week I had a nice flat replacement.
Although JMI recommends using the extra base plate supplied with the
ETX125, I have found that when the ETX is mounted on the Megapod,
oriented for polar use but used in alt-az mode, that the three ETX
rubber feet just fit on the Pod's tilt plate, greatly simplifying the
setup without use of the extra baseplate.
Although the Megapod has a small bubble level, I find that a small
"torpedo" level is easier, and faster, to use applied directly to the
top surface (central region) of the mounted ETX base.
Lastly, there are some nifty blinking LEDs on the bottom of the
Megapos's three feet which can aid the viewer to miss the feet in the
dark. One has to be carful, however, not to turn them on accidentally
when stowing the pod.
Thanks again for facilitating all the useful info with your site and
best regards to all.
Frank Goldner, Bethesda Md."
Bob Thompson (110641.1527@compuserve.com) reports: "Received the "JMI Megapod," Shutan catalog number 8050556 ($230.00 plus $11.50 shipping) yesterday & tried it last night. It provides a very stable platform, but focusing is still a problem. It had two minor mechanical problems that were easily corrected: 1. Only one of the three LEDs would go on. This was because the slots that were cut into the leg extensions had not been cut quite long enough, so there was not enough room for the switches to go to the full "on" position. A couple of minutes with a metal file easily fixed that. 2. When the tripod was leveled with the bubble level installed, the base of the scope was not level. This was because the top of the wedge is not parallel with the plate that has the level. I used a torpedo level to level the wedge plate, then removed & reinstalled the bubble level to agree with the torpedo level. Meade & JMI agree that I should use the Steel Plate supplied by Meade with this tripod. I did so, but would prefer not to have the plate as one more loose item when setting-up in the dark. With the 125 it's already necessary to have one of the thumbscrews completely loose when putting the scope on the stand. Has anyone mounted the plate securely to either the scope base or the tripod wedge? If so, how was it done. I note that there are three small holes that line-up with the three FH screws in the base of the 125, but hole size does not match. Suggestions?" Mike Hadey (mike@mike-hadley.demon.co.uk) adds: "I promised feedback on my new JMI Magapod. I like it. Very easy to set up and use, very sturdy, vibrations damp out very quickly. I like the eyepiece holder with room to stick the Autostar on using Velcro. Well worth it in my opinion. I have been trying to use a modified quickcam express to try my hand at photo capture. With the ETX-90 the resulting image has a huge magnification factor and is thus subject to even the smallest amount of vibration. The Megapod has really improved this." |
|||
| Tripod Clamps | Scopetronix | N/A | $45 |
|
Gary Garland (gbgesq@earthlink.net) reports: "I just wanted to comment on the Scopetronix Tripod Clamps. I recently got my long awaited 125, and after reading about one poor new user's meade tripod collapsing, well, I knew I'd shake off my laziness and finally attach the clamps. They cost about $45 from www.scopetronix.com - it's been my (positive) experience that Scopetronix products are quality. I asked Jordan if he thought they would really make a difference, especially for the 125, and he felt they would and offered to take them back if i didn't like them. They arrived, and the 3 clamps and bolts were wrapped well in bubblepack. When you first take them out, you kind of wonder where the $45 went - they look like the should cost $5. They are neatly "bent" or folded to the shape of the tripod legs, and there is a hole at the top for the bolt, and a protruding area across from the hole to accept the bolt. Following the instructions, it took a few seconds to remove the screw from the inside of each plastic leg top - the clamp sort of rotates around the front of the tripod leg, and has velcro or felt inside to keep scratching down. When the clamp is rotated around the front of the outer "leg" of the tripd, the screw removed from the leg is now re-insterted into the back of the clamp and into the top of the movable part of the tripod leg, securing the plastic leg top and the clamp onto the tripod leg. (it's much easer to do than my explanation appears - it took about 1 minute per leg). Then the bolt is gently screwed onto the clamp, and the process is complete per leg. Total installation time - about 5 minutes.
I immediately noticed the clamp fit PERFECTLY, and moderate tightening of the bolt produced NO MOVEMENT at the top of the movable part of the tripod leg. The lower meade bolt must also be used - the clamp looks SIMILAR to the meade stock clamp at the bottom of the tripod, and the bolt superficially appears the same.
At the field with the installation, my tripod was MUCH MORE RIGID WITH THE 125 than it ever was with the 90. (I still had vibrations - perhaps from setting up on concrete).
In all, I can see the clamps are actually very good, and work as stated. It feels pricey to spend $45 to make a $200 tripod work as intended, but it does the job.
As an aside, I asked him if the Celestron dampers (also about $45) were worth it - he seemed to think so, but there's a limit to how much I'll spend on a tripod to make it work (also, I don't want to spend hours lugging more and more equipment and set up to make things work) - but it might be worth it to others."
Gary Garland (gbgesq@earthlink.net) adds: "I e-mailed Jordan (Mr. Scopetronix) as he mentioned his tripod nearly toppled with his 125 on it when left unsupervised overnight. He did NOT have the Scopetronix clamps on the tripod, however it was his belief that the tripod MIGHT STILL HAVE SLIPPED even with his stabilizing clamps - he's waiting for new legs from meade, and will report if they have an improvement. One suggestion he made to me would be to drill a small hole, and use a cotter pin as a safety to keep the leg from completely collapsing. I'm still quite satisfied with the Scopetronix clamp." Phil Chung (pwjchung@juno.com) adds: "I bought the ETX-90EC tripod clamps from Scopetronix. These are the clamps that attach to the upper part of the sliding leg. They claim that it greatly increases the stability of the ETX-90EC tripod. I received the 3 clamps and proceeded to install them following the enclosed instructions. I removed the screws on the plastic caps on top of the sliding leg. I then attached the clamps and was instructed to replace the screw through the clamps and back into the plastic. But the original screws were too short to fasten back into the plastic with the clamps in place. But a simple and cheap fix was to get the same size screws that were a bit longer - the correct size being #6 x 1" screws. With the new screws, installation was a snap. The clamps also look very nice on the tripod, like it was part of the original equipment. After installation, I placed the tripod on hard ground to test its rigidity. In the shortest position with the sliding leg almost all the way in, there was hardly any noticeable difference unless you move the upper part of the sliding leg manually. But as the sliding leg was extended, the clamps seemed to have more of an effect - probably since the upper legs have less to "squeeze" of the sliding leg. I haven't put it through any rigorous field tests but the clamps didn't seem to lessen the rigidity in any way and I figure it can only help the rigidity." Peter Rossi (peterrossi@lucent.com) notes this: "I have a caution for your faithful readers concerning the "Meade # 772 Carry Bag for the # 883 Deluxe Tripod". The 883 Tripod will NOT fit into the Carry Bag if it is equipped with "Scopetronix Tripod Leg Clamp Set" (Item CLMP). This is a real disappointment because the Leg Clamp Set really improves the Tripod's stability. I discovered this fact after my Son-in-Law gave me the Carry Bag for Christmas. I will just have to search for a larger bag for my 883." And then he added: "I have an answer to the, "883" Tripod that won't fit into the "722" Carry Bag, problem. I contacted Jordan Blessing of ScopeTronix fame to ask him about the tripod problem. The Leg Clamp Set is one of ScopeTronix's products. Jordan e-mailed me the very simple solution to my problem. The modification is very easy to perform and take approximately 15 minutes. Just reverse the center portion of each tripod leg. The bulges from the Leg Clamps are now on the inside of the tripod leg instead of on the outside. The "Meade # 883 Deluxe Field Tripod" equipped with the "Scopetronix Leg Clamp Set" now fits into the "Meade # 772 Carry Bag". I would like to publicly THANK, Jordan Blessing from ScopeTronix!!" |
|||
| Binocular Mount & ETX | T&T Binocular Mounts and Beyond | N/A | $60-75 |
| Jock Elliott (lightkeeper@sprintmail.com) reports: "I've found an inexpensive, highly stable mount for the ETX or ETX/90EC. Last year, I purchased a binocular mount and tripod from T&T Binocular Mounts and Beyond at the Northeast Astronomy Forum. When I purchased my ETX in November, I had no tripod, so on a whim I mounted the scope on the wooden tripod (made of recycled crutches) that came with the binocular mount. The ETX mount screws directly onto a 1/4-20 bolt on the tripod's 7-inch wooden head, where it can be used in alt/azimuth mode. A stabilizer weight hangs beneath the tripod to lower the center of gravity and keeps the scope/tripod combination rock-steady up to 180X. The only disadvantage: polar alignment doesn't work. I don't feel I have been inconvenienced by that, and I understand it is unnecessary with the ETX/90EC. The entire assembly is readily transportable. Just detach the stabilizer weight, close the tripod legs with the velcro strap that is attached, and park the assembly on your shoulder for walk-around movability. I keep my ETX permanently on the tripod in my garage, and I can be out observing in about 2 minutes. My experience with the wooden crutch tripod was overwhelmingly positive, but height adjustment is time-consuming, requiring manually lengthening the tripod crutch legs. Recently, I added another T&T tripod to my collection -- one made of recycled aluminum crutches. This tripod is lighter than the wooden model and the legs are click-stop adjustable -- very handy! I feel that either of these tripods make an excellent alternative to the far more expensive tripods, so long as you don't require an enormous range of height adjustment. The cost of the wooden tripod is $60.00 plus shipping and handling; the aluminum model is $75.00 plus shipping and handling. T&T Binocular Mounts and Beyond can be reached at 18 Strong St. Ext., East Haven, CT 06512 or phone 203-469-2845. I have no commercial connection with T&T, and I welcome email from anyone who wants to know more about my experience with these tripods." | |||
| Camera Adapter for the ETX Field Tripod | Scopetronix | N/A | $20 |
 Jordan Blessing of Scopetronix supplied his newly developed camera adapter for the Meade ETX Deluxe Field Tripod. This straightforward, well-made, adapter (shown in righthand photo) allows the Field Tripod to do double-duty. Remove your ETX and using the same mounting bolts, attach the Camera Adapter to the tripod in the same place as your ETX base was attached. Now you can mount your still or video camera to the tripod (see photo on left). Of course this usage is not as functional as with a regular camera tripod; since there is no panhead there is no easy way to point the camera in the direction you wish to shoot. You can Jordan Blessing of Scopetronix supplied his newly developed camera adapter for the Meade ETX Deluxe Field Tripod. This straightforward, well-made, adapter (shown in righthand photo) allows the Field Tripod to do double-duty. Remove your ETX and using the same mounting bolts, attach the Camera Adapter to the tripod in the same place as your ETX base was attached. Now you can mount your still or video camera to the tripod (see photo on left). Of course this usage is not as functional as with a regular camera tripod; since there is no panhead there is no easy way to point the camera in the direction you wish to shoot. You can  adjust the latitude setting and rotate the camera around its tripod screw but neither of these adjustments are as nice as with a panhead. So, if you need this capability you'll either already have or will quickly acquire a normal camera tripod (which for low-end models can cost the same or less as this Camera Adapter). But for the occasional camera use if you have the Meade Tripod and don't want a second tripod or don't want to carry a second tripod on trips, the Scopetronix Camera Adapter will work well. And unlike a low-end tripod, you'll have a very sturdy camera tripod that will handle a lot of camera! adjust the latitude setting and rotate the camera around its tripod screw but neither of these adjustments are as nice as with a panhead. So, if you need this capability you'll either already have or will quickly acquire a normal camera tripod (which for low-end models can cost the same or less as this Camera Adapter). But for the occasional camera use if you have the Meade Tripod and don't want a second tripod or don't want to carry a second tripod on trips, the Scopetronix Camera Adapter will work well. And unlike a low-end tripod, you'll have a very sturdy camera tripod that will handle a lot of camera!
By the way, Scopetronix also has a similar adapter ($25) that allows the new ETX-90/EC (which lacks the center tripod mount hole) to be used with a regular camera tripod. Check out their web site for more details. |
|||
| ETX Field Tripod | Meade | #883 | $170 |
I received tripods for evaluation from both Shutan Camera & Video and Meade Instruments Corporation. Shutan responded quickly to the desire of visitors to this site to have an early indepth review of this anxiously awaited accessory whereas Meade's shipment was delayed. In this review, I'll be comparing the Meade Tripod to the  previously reviewed JMI Tripod and Equatorial Wedge combination, and sometimes to the JMI Wedgepod ($189). I think this is a valuable comparison because these products are designed for use exclusively with the ETX and priced similarly. previously reviewed JMI Tripod and Equatorial Wedge combination, and sometimes to the JMI Wedgepod ($189). I think this is a valuable comparison because these products are designed for use exclusively with the ETX and priced similarly.
The Tripod comes in a large box and is well packed. A two-page instruction sheet clearly describes how to set up the Tripod and how to attach the ETX. Setup is easy. I had one minor hiccup when I went to mount my ETX. For some reason I had run the Microstar Dual Axis Drive Corrector declination control cable through the N/S switch hole instead of the ON/OFF switch hole. The manual clearly states to use the ON/OFF switch hole. The mounting plate on the Meade Tripod is solid and covers the N/S switch hole so I had to remove the ETX base plate, undo the DEC cable connection, reroute the cable through the ON/OFF switch hole, reconnect the wires, and reattach the base plate. Fortunately it all went well and I could then mount the ETX on the Tripod. When the ETX is mounted on the Tripod, you can access the ON/OFF switch but not the N/S switch. This is normally not a problem. With the JMI Wedge, and I presume the Wedgepod, the hole used didn't matter as both were accessible when mounted. If you have modified your ETX and need to access the N/S switch position, you'll have to change your modification or use another tripod. The ETX attaches to the Tripod head using two supplied bolts; these screw into the base plate of the ETX using the existing tripod mounting holes (same ones as used with the JMI Wedge). At first I was concerned that the ETX would not be secure at lower latitude settings due to the method of attachment to the Tripod head, however once I had the ETX mounted this concern was eliminated. The Tripod has two-piece aluminum legs versus three-piece for the JMI Tripod. This is only a problem in two instances: If you need the telescope to be at a convenient position while sitting, with no leg extension the eyepiece may be too high for some observers at some latitudes or for terrestrial use. Also, when collapsed for travel the Meade Tripod is longer than the JMI Tripod. Shown in photo 1 is the full height extension with the ETX mounted. The leg extensions are locked in place by a bolt. The instructions caution to not overtighten the The photo on the left shows the accessory tray (eyepiece holes are visible) and cross-brace. You must remove the tray using a screw knob in order to collapse the Tripod for storage or travel. I found the accessory tray too low for control paddles, which dangle down from the ETX (as can be seen in the photo). The tray is good for eyepieces, flashlights, and/or pads of note paper although the JMI Wedge will have eyepieces closer at hand. The cross-brace seems non-functional as a support as the pieces are still somewhat loose with the tray attached. They will keep the legs from spreading out further than they should but add nothing to the stability of the Tripod. The cross-brace on the JMI Tripod is more functional at enhancing stability. I found that images at high magnification will jiggle in light breezes or if the Tripod is tapped. The jiggles dampen out in a few seconds. The Tripod head has a bubble level attached and the north leg (south in the southern hemisphere) is marked by a large "N". There is an azimuth adjustment to slightly rotate the head horizontally to correct the north alignment. The only flat spot on the head to attach a magnetic compass to assist in polar alignment is about 1-inch by 1-inch. You can attach a larger compass on the accessory tray but that is subject to movement and positional change if you remove and In use I have found that the Meade ETX Field Tripod performs as well as my JMI Tripod and Wedge combination. For some reason I think the ETX looks more professional when mounted on the Meade Tripod but functionally there is not much difference. There are many good things to say about both. There are also some down sides to both. Your decision on which to purchase will have to be based on several factors. The Meade Tripod, like the JMI Wedgepod, is an ETX-only tripod. Nothing else will conveniently mount to it. So, unlike some other tripods, it will be a dedicated tripod for the ETX. On the other hand if you need a multi-purpose tripod, one of the Bogen tripods with or without a JMI Wedge ($119) may be your best choice. But if you can live with an ETX-only tripod and your latitude is between 20 and 90 degrees, I think you will be happy with the Meade model and will get years of service from it. Many thanks to Shutan Camera & Video for offering to send me a Tripod and then following through when Meade's shipment was delayed. Dealers like Shutan Camera & Video are a valuable asset to Meade and to buyers like us. Here are some other user comments, both pro and con: Ian Storrs (storrs@bellsouth.net) writes: "My Meade ETX tripod arrived today. Took 5 minutes to unpack and mount the scope. The tripod seems much more robust than the photo tripod I have been using so far. As if by magic, a break in the clouds and rain appeared at 9.00 p.m. so I took it out on the deck. The instructions on polar alignment are straight forward, line the leg marked N to north (I used a compass, they should have built on into the leg !) and set you latitude - that took several passes - too many knobs and levers in the dark ! Anyway, I pointed the scope at Jupiter and the difference in clarity and steadiness over the photo tripod was amazing. I could focus without constant vibrations. It was fairly windy, and my apartment's 3rd floor deck seemed to be the main source of some very minor jitters - I suspect that a footing on solid ground would have performed even better. I eagerly turned on the tracking motor, and to my surprise, Jupiter stayed locked in the center ! All in all I was pleased with the performance and ease of use of the tripod. So with the rain about to return, and after a couple of hours use, I give a tentative recommendation." From Peter (prc@riskconsulting.com): "Just wanted to let you know that I picked up the new ETX tripod. I got mine at my local Natural Wonders store. They told me they had just arrived. We've had solid cloud cover and rain here for the last two days, so I haven't had the chance to really test it yet. It does feel pretty solid though and set-up was simple, taking only 5 minutes. The spikes on the legs seem perfect if you're on grass, but I wonder how stable they'll be on pavement. On the plus side, I may be able to change my finder scope back from the 90 degree coversion. I'll let you know more once the weather breaks. The clouds finally broke tonight and I had the chance to try out the new tripod. I had mounted the ETX on it while still inside and simply carried the whole thing out to my backyard. Polaris was covered by clouds, so I just pointed the leg marked "N" to magnetic north using my compass ( I had previously set the tripod for my latitude). I swithched on the tracking motor and I was set. The tripod prevents access to (covering) the north/south switch leaving the motor switch the only one to flip. This is not a problem since the N/S switch is rarely changed and it eliminates searching in the dark for the motor switch. Tracking was excellent, the best I have experienced despite the questionable polar alignment. Vibration created by tapping the tripod or focusing steadied in 1-1.5 seconds. The mount was otherwise stable. The real pleasure was being able to sit in one of my deck chairs and see through the EP. At this height, though, I will keep using the 90 degree conversion on the finder. Some may find the "Fine Azimuth Adjustment Knobs" difficult to turn. This is fixed by loosening the bolt under the mount and reducing the tightness of the head. My initial assessment is thumbs up!" From MahlonH189@aol.com: "Also I too finally got the Meade tripod. It's quite a relief and very stable though a bit low on aesthetics. I'd certainly like Meade to come out with a carrying case for travel." From Paul Scheifer (scheifer@earthlink.net): "I checked out the Meade ETX tripod at a local storeand found it to be flimsy and cheaply made. Also, making the head permanently fixed to the tripod, so that the tripod can't be used with other heads for other purposes, is unforgiveable. I got a Bogen 3021 and a 3030 head for LESS MONEY. The difference in stability and quality is day and night. I would NOT recommend the Meade tripod. (I know they use the same tripod for other telescopes, but it's a cheap piece of junk just the same.) The Bogen set up is a little more of a pain in the ass to polar align, but so what. An easier polar aligned tripod that jiggles is useless. Also, the center of weight problem is solved by Steve's offset plate. (I hope; I haven't used it yet.) Also, one can do some marking etc.to make the Bogen setup go pretty quickly." From Brian Nakata (bnakata@cybcon.com): "This is a fairly well constructed tripod (made in Taiwan for Meade) that has a few astro-specific features that may make it more desirable than a camera tripod. One is a bubble level located on the top of one of the legs allowing easy leveling. Another is the "N" cast on the top of a different leg. This may sound like a trivial point, but the ETX mounts on the tripod in one of two ways as it uses the two outside holes (normally used for the center leg of the standard tabletop tripod) on the bottom of the scope. With the ETX mounted correctly, the leg with the "N" on top should point north. Doing that will get you a reasonable polar alignnment. Another nice feature is the built-in wedge to adjust for your latitude. It has a knob to finely adjust the "tilt" of the scope to align with Polaris. There are also knobs to "turn" the scope left and right a small amount to do the same. The tripod is reasonably stable, but I can imagine that a steady breeze would create intolerable vibrations. I like it a lot better than laying on the ground craning my neck to look at an object. It also comes with a circular tray that secures to the "braces" between the legs and holds 0.965" and 1.25" eyepieces. One thing I don't like are the two bolts used to secure the ETX to the tripod. They have nice finger-friendly plastic knobs on them, but are completely loose and not captive with the tripod. Don't lose them! It would have been nice to have them captive or have some threaded holes somewhere where they could be "stored" for transport. The unit is fairly light and is a great compliment to the portability of the ETX." David Helmk (fgravy@yahoo.com) adds his report on the Meade ETX tripod: "I have been using it for about a month now. I am really pleased with it, though I haven't tested it as much as others might. I don't polar allign the scope-- I like the simplicity and satisfaction I get from keeping the scope level and non-polar aligned, and just pointing to the objects I observe. Originally I was deterred from polar alligning because of the impossible angles created depending on where I was looking in the sky. So I hunt and point and adjust as objects drift. I can hear other ETX users smirking now. I had avoided buying the tripods recommended by the nature company-- cheap camera tripods with heads that never held the ETX steady enough when I tried them in the store. I bought the Meade tripod on faith and have been happy with its heavy-duty head and functionality. And when I get the desire to polar align, it seems like it'll be up to the task."
[7/22/00] 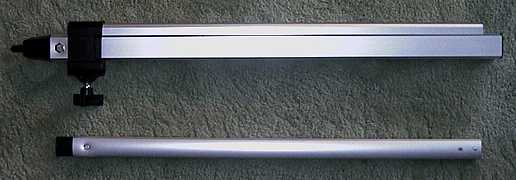
John (polulach@mixcom.com) reports: "I purchsed a #883 tripod this past May. I recently received the plastic leg plugs from Meade designed to prevent deformation of the aluminum legs by the adjustment bolts. Previously I had untightened/tightened the adjustment bolts many times and had NOT experienced any problem with slipping and there had been no apparent deformation caused by the bolts. But I wanted the leg plugs, to be on the safe side. I took the legs apart and soon learned that the plastic leg plugs had already been installed at the time of manufacture. So, if my experience is any indication, Meade has solved the leg slipping/deformation problem. I am very satisfied with the #883's performance and looks and recommed it highly!" |
|||
| Manfrotto tripods | Manfrotto | various | varies |
| From Rick Stankiewicz (stankiri@epo.gov.on.ca): "Highly recommend the Italian made "Manfrotto" line of tripods. They are a professional series of tripods and accessories of top quality. I personally own and would recommend the "basic tripod" Mod.#144. It is very sturdy and comes in black or aluminum finish (as do most all their models). There tripods for all budgets, but this model is more than adequate for the ETX. There are a variety of heads to choose from too. I use and would recommend the "standard head" Mod.#029. It features a "quick release plate" (#030) that can stay on the ETX and easily and securely lock into place on the head when in use. It also has two bubble levels built into it for easy leveling in the field. There are three large rubber grips for precise positioning and even handy degree reference markings on most axis's. All these features have made it easier to polar align the ETX. What is also nice about this tripod system is that you can get extra quick release plates for your camera or other video equipment. Other optional items to consider are the retractable "rubber/spiked adaptor feet" (#055SPK) for the tripod legs (depending on your field conditions) and a carrying bag (#144PBAG) or strap (#102) are really useful and all are available to fit this system. These are not cheap, but are definitely quality items. The above package would likely run about $300.00 CDN minimum." | |||
| Orion Sky View Deluxe EQ w/Accutrax drive | Orion | N/A | $350 |
| From Ray and Jeanie (rayreg@harbornet.com): "After using the ETX and it's problematic drive for the past year, I decided that looking for "advanced-techno" solutions wouldn't make it. Besides using the ETX as a basic, highly portable observing instrument, I also use it as the guide scope for piggy-back astrophotography. While my results with a 28mm wide angle lens on a Nikon are good (I would like to say astonishing, but I save that for Tony and Daphne's astro-photos), anything beyond a 50mm lens gets dicey. Not wanting to ignore or waste the optical quality of the ETX, I purchased an Orion Sky View Deluxe EQ mount with RA drive (about $350 total). The mount can handle up to 15 pounds, so with the ETX at 4.5lbs and the Nikon plus a 250mm at 4.2lbs, I figured the mount could handle it. Plus, the Accutrax drive is adjustable (to match, sidereal, lunar, planetary or solar rate). My first results using a piggy-backed 70-210zomm at 135mm for 12 minute exposure on M-31 proved very successful. And, it wasn't even polar aligned (using the polar alignment scope that comes with the EQ mount). I just approximated, using a compass and the mount's elevation scale. To me, this is a great combination. The set-up is quick (about 5 minutes for all of the tweaking necessary for polar alignment) and after a few minutes of checking for tracking rate with a 12.5mm x-hair eyepiece, you're all set for burning a roll of film. For observation with the ETX and Skyview EQ combo, it couldn't be more satisfying. No more straining to use the finder scope, particularly when observing toward the polar regions. There's no obstruction from the mount, the drive is smooth (no jumping Jupiters or slipping stars) and - here's the big advantage - if you change RA, you don't wait a minute for the drive to engage. It engages NOW! Declination adjust is very smooth and there's no stop. It will adjust as much as you want it too. The only disadvantage of the Sky View EQ Deluxe is the scale on the setting circles. The ETX RA is calibrated in 5 minute increments, the EQ in 10. The ETX declination scale is in 1 degree increments, the EQ in two minute increments. Using the 26mm eyepiece with its approximate 1degree field, this isn't a problem. Besides, the market will probably produce a "go-to" computer system for this mount in a few months (for a ripe price, no doubt). Well, I'm happy with the set-up. Folks who have viewed Saturn and four of its moons with the ETX are astonished. And, I find no end to it's limits in testing it on deep sky material."
From Jeff Bryson (jbryson@magicnet.net): "I have enjoyed your web page and gotten a lot of help and information from it. I have just put together a web page (http://www.magicnet.net/~jbryson/etx.htm) for the ETX set up I have. I think others who visit your web page may find the information on the Orion SkyView Deluxe EQ mount interesting." |
|||
| JMI Wedgepod | JMI | N/A | $189 |
| From Kenneth George (kvgeorge@hotmail.com): "I just picked up a JMI wedgepod for $199 as advertised in the latest issue of ASTRONOMY magazine. After reading the reviews of their wedge, I must say that I had my doubts. However, this device has surpassed my expectations. It comes with a bubble-level, a place for 4 eyepieces, and a spot for holding a moto-dec/moto-focus controller. The wedge is very sturdy and will not bend under the weight of the ETX. Also, once I moved the wedge to the proper LAT. for my area, it didn't budge. I could even adj. the wedge from 0 deg. to 90 deg. with no binding of the plate. The tripod is very sturdy and performed just as good as other devices of it's type. Since it's also a wedge by nature, the weight is centered over the tripod. The only thing that I found an inconvenience was that I had to turn on the motors before I mounted the ETX because the switches are hidden once on the wedgepod. All in all, I must say that I really like this device --- especially since the ETX field tripod is so hard to find!"
|
|||
| CG-3 Tripod | Celestron | CG-3 | $99 |
| Susan Davis (sue@sue.net) reports "After noticing the rather mixed reviews that the $119 (plus tripod, or $199 total) JMI wedge was getting, and after balking at the $169 price tag for the Meade tripod as well, I stumbled across across another alternative. Celestron is discontinuing the CG-3 mount that they've been using for their FS-80 and FS-114, and Astronomics is clearing them out for $99, including 1/4"-20 mounting bracket. I have a nice, sturdy concrete table that I observe from using the tabletop legs at home, but out in the field, the CG-3 is great. The CG-3 replaces the tabletop fork entirely, so whether the reported wobbles from the JMI wedge are due to the wedge, the bottom plate of the ETX, or the plastic fork arms, it doesn't matter -- they disappear on the CG-3. There's no fork base for the optical tube to run into when observing the southern horizon, and I can get my head underneath the finder to find things up near the zenith. And I suppose it saves some wear and tear on the ETX tabletop mount. The wooden tripod that comes with the CG-3 is nice and sturdy; images remain steady in my ETX/CG-3 combination even in a fairly stiff breeze. The mount just comes to balance with the counterweight retracted all the way; I haven't tested it yet with a camera body attached. The Celestron telescopes on this mount are reported to be wobbly; the extra weight of the camera, forcing the counterweight farther down the balance arm, might make the mount less steady. But the ETX tube by itself is light enough that the CG-3 is more than enough mount for it, and I find it to be quite a bit steadier than the plastic tabletop fork. The negatives: First of all, there's no drive, so you need to keep centering things using the RA slow motion control. However, Astronomics is also closing out the CG-3's RA drive for $59, which still gives you a sturdier mount than Meade's tripod appears to be, for the same price. Or you could add a better drive, with a corrector, for less than the ETX corrector costs. I found that I had to screw in the 1/4"-20 mounting bracket very tightly in order to keep the tube from swiveling, but I suppose that that's a problem with any ETX tripod. The accessory tray needs to be removed in order to fold the tripod up, which is a minor annoyance. Finally, this is a closeout, and there are only a limited number available. For half the price of the JMI Wedgepod, though, it's a great deal. A new ETX buyer who doesn't care about the tabletop fork's portability, or who plans to always observe from a tripod, might want to consider the ETX spotting scope as an alternative and mate it with a small German mount such as this." | |||
| Quick Release for Tripods | Bogen | 3296 | $48 |
| Ralph Libby (RLibby@aol.com) reports: "I suspect that most of us ETX users have acquired a reasonably large tripod to most of the observing on, and have encountered a small amount of annoyance in attempting to fit the 1/4-20 screw of the tripod into the receptacle on the telescope. Help is at hand! Bogen (the tripod people) have a "quick release" mechanism for tripods lacking this feature. It is catalog #3296, and has the device for atttaching to the tripod as well as a mating part for the telescope. The adapter plate is $47.50..Most photo stores should have one. I fastened mine on to the tripod with a 3/8 16 bolt, the plate is threaded for both 1/4 and 3/8, but the "QR" plate that goes on the telescope (or camera) has a 1/4 " fitting. Installation is a breeze, and will take about 5 minutes. The only caution is to position the plate on the telescope so that the NS switch is along side the release plate, and not covered up by it. This is not for access, but it will put strain on the switch that was not intended. Now I can set up and take down in the dark, without saying any bad words!" | |||
| Equatorial Wedge Field Tripod |
JMI | N/A | $119 $119 |
 At my request, JMI (303-233-5353) recently sent me several products to try out and report on to readers of my ETX web site. Other users have commented on the Wedge. My comments here are not intended to negate theirs but are offered as additional information. [2/16] I have now purchased this JMI product. I find it useful. At my request, JMI (303-233-5353) recently sent me several products to try out and report on to readers of my ETX web site. Other users have commented on the Wedge. My comments here are not intended to negate theirs but are offered as additional information. [2/16] I have now purchased this JMI product. I find it useful.
The JMI Equatorial Wedge is a substitute for the ETX legs and can be used on a flat surface (but taking less room than the legs) or on a tripod. JMI supplies instructions for mounting the wedge on their Field Tripod or on a Bogen tripod. In the photo on the right, the wedge is shown mounted on the JMI tripod. The ETX can also be mounted directly onto the tripod for terrestrial viewing. The wedge is well-made of metal with three adjustable feet (for flat surfaces), a bubble level, and has four holes for holding eyepieces. There is also a slot for the MotoFocus or MotoDec Controller. The JMI tripod is a medium-duty one, with a cross-brace, and a flat surface that aligns to mounting holes in the wedge. Bolts are My initial usage of the tripod/wedge combination was on a very breezy night. With only one set of the tripod legs extended, the image was reasonably stable and unaffected by the breeze. The ETX eyepiece was also at a usable height. I also extended the legs all the way out but found stability slightly less in the breeze and the eyepiece was too high for comfortable use (for me). The tripod can also be used with neither of the leg extensions out (as shown in the photo at the top) but I found that position too low for me. I did have one problem with the latitude adjustment locking bolt: I had thought it was tight enough and it may have been but it did slip once due to the extra weight of my Pentax Spotmatic when it was mounted at the ETX's Prime Focus. A word of caution: check this bolt before adding something heavy at Prime Focus. So far, I like using this combination instead of my table-on-wheels. I do miss all the flat surfaces of the table, which held papers, accessories, cameras, binoculars, etc., but I'll come up with some alternative since the tripod/wedge/ETX combination is actually easier for me to move. [12/23] I added a small but accurate Boy Scout magnetic compass to the bottom plate of the wedge as an aid in polar aligning the setup. I finally had a clear enough night to locate Polaris and align the setup to the earth's axis. Once I got the ETX aligned (see the MotoFocus and MotoDec comments for some new information about minor nuisances when polar aligning), I mounted the compass square to the front latitude brace mounting bracket. I then used the compass alignment indicator to show the proper alignment of the needle when pointing to magnetic north. Now when I setup the ETX with the tripod/wedge at my location all I have to do is align to magnetic north. Of course, changing locations drastically will change the magnetic variation but for home this technique works well. An additional comment: some wedge users have noted the wedge flexing during use. I have not seen this problem with the wedge mounted to the tripod. There is a flat base on the tripod to which the bottom flat base of the wedge securely attaches. This provides some extra strength to the wedge. I'll add more comments about the wedge and tripod as I use them more. |
|||
| Equatorial Wedge | JMI | N/A | $119 |
| Warren Bryant, Jr. (wgbryant@flash.net) reports: "Our ETX is currently sitting atop a JMI Equatorial wedge, which in turn is sitting atop a camera tripod. I have to say that I'm not thrilled with the wedge. The point of attachment between wedge and tripod is surrounded by a substantial amount of flat metal, which seems to warp and rebound when pressure is applied to the scope, resulting in a very wobbly image whenever changes in focus, declination, or breathing occur. This is not to say that I wouldn't recommend the wedge to potential buyers, considering that nothing else that I've seen on the market does what it does....it just doesn't do it very well. I intend to experiment with various methods of stiffening the wedge's attachment point, and will report back. If others have encountered this problem and solved it, you could save me a little time and perhaps resultant frustration with a timely e-mail."
Jeffery V. Ball (ball3@MARSHALL.EDU) adds: "I had written up a review of the JMI wedge but noticed Warren's post beat me to the punch. I have modified my review in order to address some of his comments. I recently purchased the ETX Tom Harnish (katetom@znet.com) reports: "The JMI equatorial wedge works fine. Nice and stiff sitting on the tripod, no problem with flexing. Included bubble level is a nice touch, will add compass as you suggested. Holes for eyepieces at San Diego's 33 degree latitude are essentially worthless as they fit so losely I was worried eyepieces would fall out if the tripod was jarred. Will try adding some rubber U-channel to tighten things up. Had trouble opening the wedge to 33 degrees because of a quality control problem at best and a design problem at worst. Had to force it some, but it works. Doubt I could use it south of here without disassembly and some work with a file." Wayne Hale (WayneH7974@aol.com) reports that some quality control problems continue at JMI. His wedge did not have the latitude scale attached. Fortunately, he lives close to JMI's location so he was able to return to their facility. "They were terribly embarrassed about the slip up, they quickly put a scale on my unit and I was out the door in a few minutes. To be fair, I had called them that morning and asked if the Tripod and Wedge were ready as I'd be in within the hour to pick it up. One of the girls at the desk may have grabbed it off the line, before it had gotten inspected. Other than the missing scale, the unit was all there, all of the mounting hardware, bubble level, rubber feet, instructions (such as they are). I didn't think to look closely at the unit either when I picked it up so I guess the bottom line is I'd hesitate to give them a black mark for a fairly minor oversight. I was impressed with the sturdyness of the tripod and the large mounting surface to accept the wedge. I'd say their system pretty much precludes the tripod for being used for anything else than holding the ETX though. On the other hand, I'd guess it is a lot more stable than a standard tripod with only one mounting screw holding the wedge on the head or platform of a normal tripod. I looked at several Bogen tripods and they were almost twice the price, not including a head which was another $75. For the money, I think JMI's tripod and wedge is a pretty good buy. I was impresseed with how heavy the metal was for the wedge, I sort of envisioned some flimsy aluminum with a lot of flex but if anything the Wedge looks like a very sturdy unit to support a relatively small amount of weight. One thing I may suggest to JMI would be making the eyepiece holes slightly larger in diameter and maybe putting a piece of nylon material like we use on space craft to carry wire bundles through bulkheads. I don't like the idea of sliding the eyepiece into a metal hole and perhaps scratching the finish. A small thing but it would be a nice addition to an otherwise good product." As an aside Wayne provides a little insight into JMI: "I mentioned that I had read reviews on this ETX web site. The lady at the desk (Angel) seemed familiar with it. I asked why they didn't have one of their own, she said they were thinking about it but hadn't gotten around to designing one yet. There appears to be more than just one or two people working there, I saw at least 4 or 5 in the office area, plus Jim appears to have a closed door type office behind everyone else. The staff were all friendly and looked like everyone was very busy. I was sort of surprised at the level of activity, I wouldn't have thought there was that much call for a relatively specialized set of products. I purchased their $10 video which is sort of a catalog of their products, some of the material is a little dated and they spend a lot of time discussing the features of their eyepiece mounts, the Moto Focus line and their 18" telescope. They qualify right up front that there are no professional actors but the quality of the tape is fairly good and the message seems up front and to the point." Ray Porter (dragon@email.unc.edu) adds: "I recently purchased and Orion EZFinder and a JMI Wedge for my ETX. Let me say right up front that I am very pleased by these products. The combination makes polar alignment a breeze. The JMI Wedge is something I think is well worth the $119 price tag. I have the wedge mounted directly on my Bogen 3221 tripod. With the ETX correctly mounted on the wedge the N-S switch is easily accessible and the indicator arrow for the RA setting circles is right on top where it can be easily read (both of these were problems when I had the ETX on a Bogen 3030 tripod head). The combination of the wedge and the Bogen tripod give me the most solid platform I've had since I got the ETX last Christmas. The combination of the JMI Wedge and the Orion EZFinder make polar alignment a snap. My only real complaint about the wedge is that the latitude scale appears to be off by 2-3 degrees. I live about 4 miles south of Chapel Hill, NC, USA (a little under 36 degrees north). However, when I use the EZFinder to target Polaris and center Polaris in the main tube view by adjusting the latitude setting on the wedge, I get a latitude of a little under 33 degrees north. It looks like the latitude scale was simply glued on wrong. I believe, according to the literature and JMI's adds that the scale is supposed to go up to 60 degrees north. Mine, however, only goes to about 58 degrees north. Since the latitude scale is only a strip of paper printed with latitude markings and glued on the wedge's latitude leg, I can see how this kind of mistake could easily happen. I wonder if JMI will replace the scale with one that is correctly marked? The ease with which I can polar align using the EZFinder makes this, at most, a minor factor. The bubble level built into the base of the wedge also appears to be off somewhat. Since the bubble level is difficult to read in the dark with red light anyway, I've supplemented it with a small (about 2"), inexpensive level purchased at my local Home Depot. All if all, despite a couple of minor glitches, I am very pleased with both of these purchases." |
|||
| Tripod Mounting the ETX | |||
 The ETX tabletop mode (using the three legs included) makes for a nice, portable system. However, there may be times you want to mount the ETX on a tripod, for example, when you do not have a nice flat surface to set the ETX on. Any reasonably sturdy tripod should work; the Bogen models are highly recommended by other ETX users, although they can be expensive. I decided to see how well the ETX would work on a semi-sturdy tripod I have, and it is stable enough for general use. I would not want to try it under windy conditions, nor for situations where the tripod could be easily kicked over by someone in the dark. But with some careful use, mounting the ETX on a tripod can make your observing sessions more convenient. While I have only attempted mounting with the drive base, the ETX can be removed from the mounting fork and then directly mounted on a tripod. This would be good for terrestrial observations. The ETX tabletop mode (using the three legs included) makes for a nice, portable system. However, there may be times you want to mount the ETX on a tripod, for example, when you do not have a nice flat surface to set the ETX on. Any reasonably sturdy tripod should work; the Bogen models are highly recommended by other ETX users, although they can be expensive. I decided to see how well the ETX would work on a semi-sturdy tripod I have, and it is stable enough for general use. I would not want to try it under windy conditions, nor for situations where the tripod could be easily kicked over by someone in the dark. But with some careful use, mounting the ETX on a tripod can make your observing sessions more convenient. While I have only attempted mounting with the drive base, the ETX can be removed from the mounting fork and then directly mounted on a tripod. This would be good for terrestrial observations. |
|||
| Tripods | Bogen | N/A | varies |
| Cliff Newman (cnewman@inforamp.net) reports that he doesn't use the ETX legs any more since he bought a Bogen tripod at a local pawnshop for $85 Cdn. "I find it is so much easier to polar align, the viewing position is usually more comfortable and the whole thing is more steady. To polar align (this seems to work, tell me if I'm all wet) I attach the scope to the tripod using the centre 1/4 x 20 screw hole. I point in the general direction of the pole star; tilt scope's tube downwards until the Dec scale reads my latitude (43 deg N in Toronto); lock the tube; using the tilt head on the tripod l point at the pole star, turning the scope until it is centred in the scope. This gives me about 89 deg Dec which is the altitude of the pole star in my latitude. As I say this seems to work OK for me and I can keep a object in the field of view, but not centred, for an indefinite period. It does drift around a bit but that is a function of the rudimentary tracking motor which is definitely no good for extended photographic exposures, i.e. no more than a few seconds, if that."
Tom Harnish (katetom@znet.com) reports: "The Bogen 3211 tripod totally changes the whole ETX experience. Instead of balancing the little sucker on the brick wall, a rickety plastic patio table, or a wobbly camping table up in the mountains, the ETX can now be placed at (and easily moved to) a location that's easy to use. Just watch out for the legs in the dark. Trip over one and your ETX may go tumbling down. No, I didn't; but I'm scared to death I will. If you buy an ETX, in my not so humble but retrospective opinion, your first add-on should be a right-angle finder, then a sturdy tripod and wedge." Jose Manuel Fernandez (jose.manuel.fernandez@sap-ag.de) provides the following on Bogen tripods: "Hi, first of all I'd like to congratulate you and all your contributors on your excellent site; it help me decide on the ETX after a lot of pondering. I've had my ETX for 3 months now and am very pleased with it. I recently received a Bogen tripod as a gift and Id like to share some comments on it. The head I got with it is the regular photographic fixture with horizontal yaw and vertical inclination pitch controls. After taking it out on four occasions I can tell you this: Pete Andrews (pandrews@jhu.edu) notes: "I have just put the finishing touches on a review of using Bogen tripod equipment as a mount for the ETX. I thought that you might like to place a link to this http://azure.wox.org/~pandrews/astro/bogenmount/ review under the Bogen section of your tripod page. Thank you for taking the time to maintain such a useful site." |
|||
Go back to my ETX Home Page.
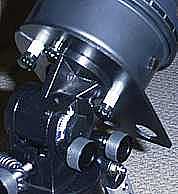 mounting modes. On the Meade tripod that I have, also supplied by Shutan, the plate mounting holes are about half a bolt screw width wider than the attach points on the tripod head. There is enough adjustment available that this was not a problem and the ETX/plate combination still seemed to be securely mounted. Shutan stated that this was to provide some leeway for different machining in the tripod heads. If you have an original ETX with the Scopetronix Microstar dual axis drive controller modification, you will probably have to modify where the Microstar cables exit the drive base or modify the Easy-Mount plate to ensure a proper fit as the Easy-Mount
 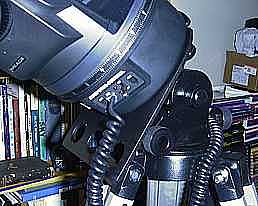 plate extends beyond the edge of the drive base. One other note about mounting: the instructions depict the ETX-90EC mounted in polar alignment mode but due to the offset ETX attach points, the ETX-90EC can not be placed in the proper Polar HOME position if you are using the Autostar computer controller as the base would be rotated 45 degrees from where it should be. For alt/az use with the Autostar, this will not be a problem, since the tripod can be rotated 45 degrees to compensate, nor will it be a problem in either polar or alt/az if not using an Autostar. The revised instructions point this out. The instructions also pointed out that any telescope mounted on a tripod will be more stable in alt/az mode where the weight of the telescope is directly over the center of stability of the tripod. There is a caution in the instructions about using the 1.25" eyepiece storage holes at low latitudes due to steep angle of mounting plate. At my latitude of 34° I felt I was about at the lowest latitude limit where I felt safe with eyepieces in the Easy-Mount. There is no rubberized or other protection on the hole edges so there is no friction to prevent eyepieces from slipping out if the plate is too vertical.
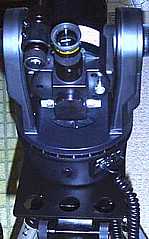 In use, I found that the ETX-90EC seemed somewhat more stable than when attached directly to the Meade tripod. This is probably due to the wider area of contact when using the Easy-Mount versus the smaller Meade tripod head. Plus there was the convenience of the eyepiece holes. If you do not have the means of building your own plate as described on the
 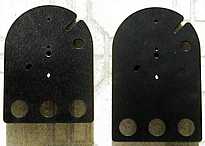 Shutan has now replaced the original Easy-Mount with a new, slightly larger one that works with both the ETX-90 and -125 models. The price (and the discount mentioned above) are the same.
The photo on the right shows the size difference. It mounts in the same fashion as the previous model as shown below:
Shutan has now replaced the original Easy-Mount with a new, slightly larger one that works with both the ETX-90 and -125 models. The price (and the discount mentioned above) are the same.
The photo on the right shows the size difference. It mounts in the same fashion as the previous model as shown below:
 Bill Ramsey (ka8wtk@raex.com) adds: "Here are some pictures of the JMI Megapod in case anyone out there has not
seen one yet. Also shown are some modifications I made and passed along as
suggestions to JMI.
The first photo is the ETX 125 mounted on the Megapod using the originally
supplied mounting plate. Next is a shot of the mounting method. As stated,
the ETX can be slid off and on without removing the hardware. This plate
worked fine for Alt/Az operation but would not allow the ETX to be properly
polar aligned.
Bill Ramsey (ka8wtk@raex.com) adds: "Here are some pictures of the JMI Megapod in case anyone out there has not
seen one yet. Also shown are some modifications I made and passed along as
suggestions to JMI.
The first photo is the ETX 125 mounted on the Megapod using the originally
supplied mounting plate. Next is a shot of the mounting method. As stated,
the ETX can be slid off and on without removing the hardware. This plate
worked fine for Alt/Az operation but would not allow the ETX to be properly
polar aligned.
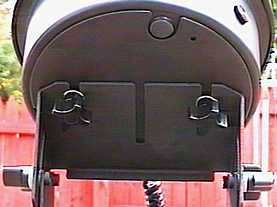
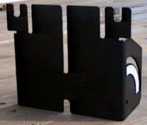 to remove the mount screws from the ETX at setup and tear down. I liked the
other method better and didn't want to drop hardware in the dark, so I
modified the original plate.
This photo shows the original plate with an additional aluminum plate
added on top. This made the mounting surface longer. A trip into the shop
to remove the mount screws from the ETX at setup and tear down. I liked the
other method better and didn't want to drop hardware in the dark, so I
modified the original plate.
This photo shows the original plate with an additional aluminum plate
added on top. This made the mounting surface longer. A trip into the shop
 and I had holes and slots in the new combination. Now all I need to do is
slip the rear mounting screw through the hole in the plate and slide the
entire unit back until it stops. Loosen the screws and the ETX will slide
off without removing hardware.
The last modification is to the threaded rod that tightens the leg
stiffening plate. When the locking nut was loosened, it would run out of
and I had holes and slots in the new combination. Now all I need to do is
slip the rear mounting screw through the hole in the plate and slide the
entire unit back until it stops. Loosen the screws and the ETX will slide
off without removing hardware.
The last modification is to the threaded rod that tightens the leg
stiffening plate. When the locking nut was loosened, it would run out of
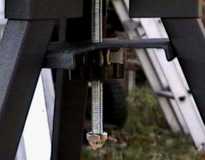 threads before I could rotate the triangular stiffener. A longer piece of
threaded rod and a cap nut fixed that.
I hope others find this information useful."
threads before I could rotate the triangular stiffener. A longer piece of
threaded rod and a cap nut fixed that.
I hope others find this information useful."
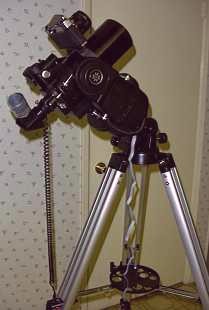 bolts but I found the proper tightness hard to determine. When I first set up the Tripod and tightened the bolts to what I thought was adequate, after attaching the ETX one of the leg extensions began to slip. I retightened the bolt and the slippage stopped. But if you frequently adjust the Tripod height you may find yourself either worrying about slippage or overtightening the bolts. The JMI Tripod uses more conventional tripod leg flip-latches which seem more secure.
 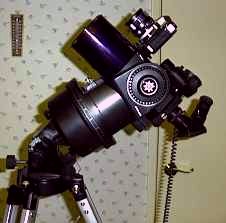 reattach the tray. Once you have the ETX mounted you adjust the head for your latitude. The large knob on the left of the head in photo on the right is the fine latitude adjustment bolt. There is large locking bolt on the side of the head (not visible in this photo) that you unlock while holding the ETX. You then move the ETX until the pointer on the latitude scale (shown in
  lefthand photo at about 34 degrees) is near your latitude and then you use the fine adjustment bolt to accurately set it. I found that setting the latitude to lower than my real latitude and then increasing the setting using the fine adjustment was the best method to get an accurate setting. This ensures that the weight of the ETX is against the fine adjustment bolt and that when the latitude lock is engaged, the ETX is held securely in place at all angles. As seen in photo on the left, the latitude scale goes from slightly less than 20 degrees to 90 degrees. The scale is graduated every 5 degrees except from 70 to 90 degrees, although every one degree would have been better and possible given the size of the scale. There is no fine adjustment available between about 75 degrees and 90 degrees. The JMI Wedge latitude adjustment scale is large and goes from about 20.5 degrees to 59 degrees with divisions every one degree. The JMI Wedgepod goes from 0 degrees to 90 degrees and also has divisions every one degree.
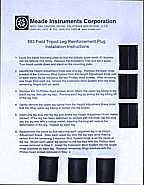
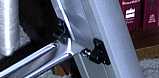 reassemble the tripod. It is straightforward if you follow the one page of instructions that Meade provides (shown on the right, along with the three plugs you'll use and three extra plugs). You first remove the center brace by removing one the hinges on each leg (shown on the left).
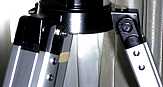 You then remove the legs from the head by removing the two screws on the leg tops (two on either side, as shown here).
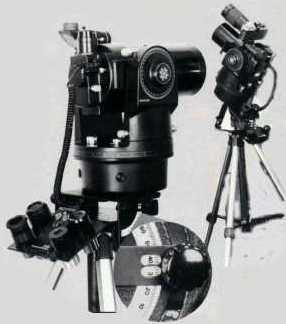 Here is a scanned photo from a recent JMI advertisement. I hope this helps everyone.
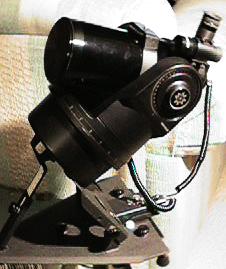 supplied to securely mount the wedge. When the ETX is properly mounted on the wedge (as shown in the photo on the left), the combination is sturdy and easy to move. In the next photo on the right, the latitude adjustment scale (from about 20.5 degrees to 59 degrees) is visible (although overexposed). The ETX seems stable throughout this range. This photo also shows the correct mounting of the ETX to provide access to the drive motor switch. I am emphasizing the correct mounting because the instructions as currently supplied are somewhat unclear as to how to mount the ETX. You insert two of the three supplied bolts into
 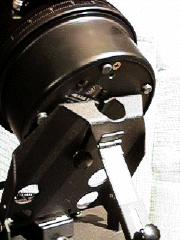 the two rear-most 1/4" screw-holes in the base of the ETX. You then slide these through the slot in the wedge and tighten the screws when the ETX is in position. The next photo on the left shows an incorrect mounting since the drive switch and eyepiece holders are not accessible.

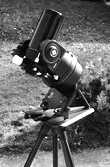 as a quick setup second scope as well as a guide scope for LX200. So far I have used the ETX approximately 6 times for visual use only. I also purchased a Bogen 3211 tripod with a 3047 panhead. The setup was really pretty stable. I just had a problem with the ETX being so far off of the center of the tripod when viewing with a polar alignment. This prompted me to phone JMI regarding their equatorial wedge for tripod. Their initial response was that the wedge was made exclusively for JMI's tripod. After about two days, JMI returned my call indicating that
 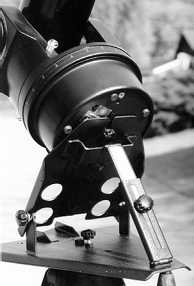 they had received so many calls for a Bogen adaptable wedge that they had modified the wedge for Bogen's. I placed the order for the wedge and it arrived about 2 weeks later ($99.00 w/o shipping $119 with bubble level). My first impression was that the wedge was very well made and of all steel construction. The instructions were not very complete, but it doesn't take long to figure out how to mount the ETX and attach the wedge to the tripod. I have never used the 3 leg attachments with the ETX so I do not have a comparison to that setup. Warren Bryant reported wobbliness with image on the wedge. This is true. I believe this is largely from flexure in the ETX mounting plate rather than flex at the wedge-tripod attachment point. This wobbliness is probably going to be very difficult to get rid of except with the 3 leg attachment mode of viewing. I noticed it with my panhead setup as well. Gently focusing usually reduces this effect enough so that you can achieve good focus. I have not been viewing under windy conditions. I am sure this will effect the image after achieving focus. The wedge is much easier to setup for me compared to the panhead + tripod. I rarely have a wall or sturdy flat surface to take advantage of the 3 leg setup. The wedge has 4 built in holders for 1.25" eyepieces and a holder for a Motofocus hand paddle. In the figure on the right you can see that the wedge sits in a groove in the mounting plate. Two thumbscrews are inserted into the two holes used for the legs on the bottom of the ETX. You can place these screws in a way that positions the "on/off" and "north/south" switches in an easily reachable place at the front of the scope. Something you cannot make out in the picture is the adjustable latitude scale on white paper that seems to have a laminated film over it to protect from moisture. There is an additional thumbscrew on the bottom of the wedge mounting plate to help secure the wedge more rigidly to the tripod and prevent any rotation. The wedge initially is screwed onto the tripods panhead mounting bolt."