SkyShed POD Zenith Table (PZT):
Construction, Installation, & Use, page 2
Posted: 18 April 2016
Updated: 9 August 2019
PZT Installation
Jump to the latest update (08/09/19)
My POD door is on the south side of the observatory, so I made the decision to mount the PZT on the north side of the POD. The first part of the installation was to attach the top brackets for the table support. An existing bolt at the top of the POD wall was removed, a bracket was placed over the wall, and the bolt was re-inserted. Well, that was how it was supposed to go. Unfortunately, there was a little problem. Actually, four little problems. The holes didn't line up with any of the brackets:


The solution (per Wayne at SkyShed) was to use a 3/8" drill bit and make the holes larger. I had to do that for all four brackets. Here is an example with some drilling started:

Notice the gap that appeared between the bay sections with the bolt removed. Once the four holes were enlarged and the brackets in place (with help from the wife and CFO) it was possible to reduce the amount of the gaps at all four locations, with the result that all the brackets fit fine. Here's one:

With the brackets installed I applied some sealant behind the bolt heads to seal up the larger holes. My POD Roller Desk passes over the top brackets with only a little extra push required.
The next part of the installation I did was to attach the three Quick Release Brackets (QRB) from the Hardware Kit in the POD. Here is one of the brackets installed and removed (so the dome can be moved on and off the PZT):


I added a 3/8" rubber cap to the end of each of the QRB handles, as seen above on the left.
I did the above installs, which took about 2 hours, while waiting for a table varnish coat to dry.
The last installation preparation had to wait until after rains left the area (or so I had thought). Once the rain was out of the forecast and the sky clearing I went to the observatory to install the four bottom support rod brackets on the POD. They required new holes to be drilled at the bottom of the POD walls. Just as I was completing the installation, which took about 90 minutes, sprinkles of rain began falling, with a brief rainshower a few minutes after I left the observatory.
Here are a couple of the bottom brackets installed:


The left photo above shows the allen key braced on the bracket so that I could tighten the bolt nut from inside the observatory. The right photo shows the sealant I applied to prevent any rain from getting into the observatory through the new holes.
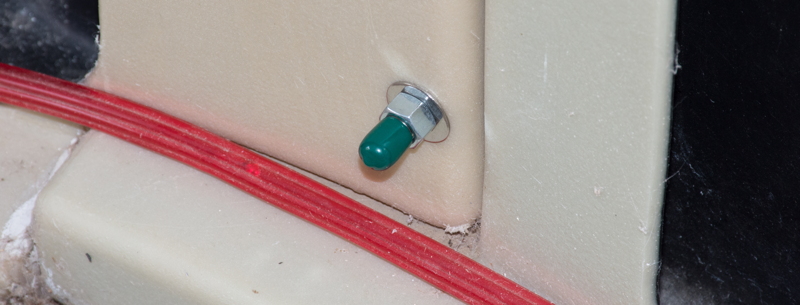
I covered the exposed bolts inside the observatory using 3/8" rubber caps (same as used on the QRB handles):

This photo shows a top bracket and a bottom bracket:

Here's the set up to install the table at Cassiopeia Observatory:

Mounting the table required some help from a couple of friends:

Thanks Bill and Jim!!!
As during table assembly, it was necessary to pre-drill the screw holes. It took the three of us about 2.5 hours to mount and secure the table to the top brackets and support rods. Then two of us took about another hour to add the three ramps onto the table and attach the four dome bumpers at the end of the table.
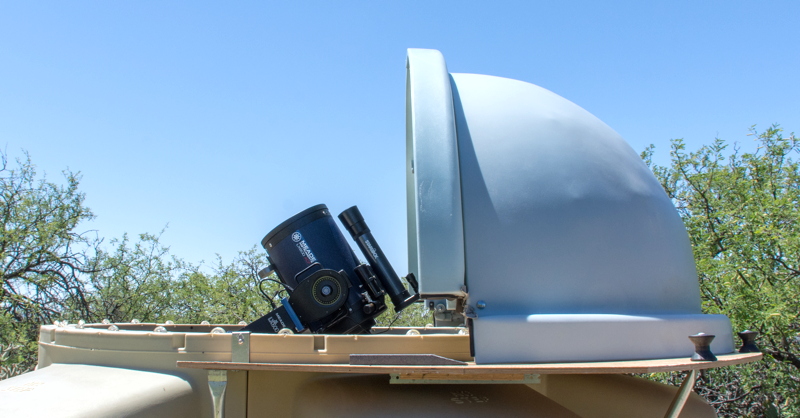
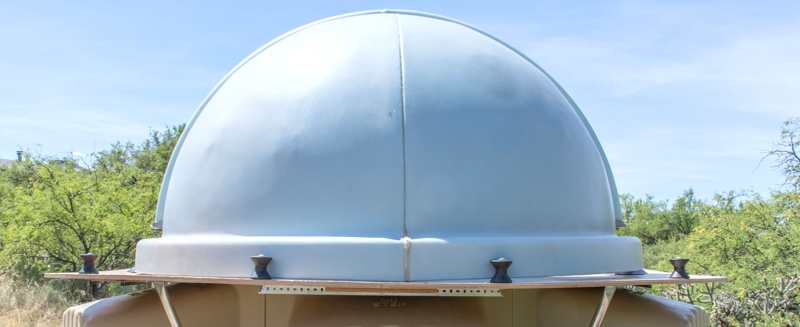
These photos show the observatory with the PZT, the dome opened, and with the dome moved to the PZT:


This side view shows that the telescope can now be slewed to view the zenith:

Here is a closeup of two of the rubber bumpers:

With the dome on the PZT there is an area on the table that can be used to place books, charts, and accessories:

Just don't forget to remove anything placed there before moving the dome back onto the POD.
PZT Use
I could easily move the dome on and off the PZT by myself. First the three dome brackets were removed using the QRBs. To move the dome onto the PZT from inside the POD just took some lifting and pushing on the left and right dome sides to get the dome onto the side ramps. Once that was done it was easy to push on the center of the dome to get the dome all the way onto the PZT. The easiest way to return the dome to the POD wall was to go outside of the POD and push on the center of the dome from the back end of the PZT until it was almost at the wall. Then I moved inside the POD and alternately lifted and pulled on the left and right sides of the dome until they were on the wall. Then it was easy to use the handles (trowels) to lift and guide the center of the dome onto the wall. With the dome fully back onto the wall the QRBs were used to reattach the dome brackets. After just a few times at doing this it would take me about 5 minutes to unlock the dome and move it onto the PZT. Then another 5 minutes to move the dome back onto the POD and lock it. I am certain that the times will be reduced as I get more proficient at the process in the dark.
One caution about using the dome handles (trowels): I found that pulling on the handles to try to move the dome from the back of the PZT would put a lot of stress on the bolt inserts in the dome. I was concerned that I would pull the inserts out. However, by pushing on the center of the dome from the outside until it was near the wall eliminated this concern. I would then use the handles to provide a little leverage to raise the dome on to the POD wall.
These short videos (made with an iPhone 6s Plus on a windy day) show how the PZT is used. Please allow time for videos to load. Videos will appear in a new browser window.
Removing and reattaching the Quick Release Brackets (0m42s; 5 MB):

Click or tap on image to view video
Opening the dome, moving it to the PZT, moving it back to the POD, and closing the dome (3m52s; 27 MB):

Click or tap on image to view video
Summary
The PZT is an excellent add-on that any POD owner with a permanent installation should consider. If you are working alone and don't have a lot of woodworking skills and tools you may find the table construction somewhat daunting. But if I can do it, anyone can do it. The PZT is well worth the cost and time involved, and I highly recommend it. I wish I had installed a PZT years ago!
Update: 21 April 2016
After using the PZT for a few sessions I began to contemplate moving the center two bumpers to allow the dome to be moved further onto the table. The dome was not reaching the outer bumpers so I knew I had some margin of safety. I decided to do it.
Here you can see the original configuration of the dome and center bumpers:


I removed the center two bumpers and moved the dome further onto the table until it reached the edge of the table. I placed the two bumpers against the dome at the edge of the table. That moved the bumpers 30.5" from the center of the table edge. I drilled new holes for the bumpers. Here is the new configuration:


The dome now moves about an additional 2 inches to the north, giving a little more Zenith access.
Go back to Page 1
Go to page 3, PZT Re-Do.
Cassiopeia Observatory Home Page
Copyright ©2016, 2019 Michael L. Weasner / mweasner@me.com
URL = http://www.weasner.com/co/Reports/2016/04/PZT/index2.html
