Review - ScopeBoss iOS AutoStar II App
Posted: 17 February 2015
Updated: 31 October 2015
![]() ScopeBoss, v1.0
ScopeBoss, v1.0
by John Grismore
iOS (iPhone and iPad)
$9.99
This review was originally written based on use with an Apple iPhone 5s. When I updated to an iPhone 6s Plus, a review update was needed to show how ScopeBoss works on the larger phone. Jump to the iPhone 6s Plus discussion.
ScopeBoss is an iOS app that provides a complete AutoStar II handset on your iPhone or iPad, and I do mean COMPLETE. Anything you can do with the real handset you can do with ScopeBoss. And there are several things that you can't do with the real handset that you will come to appreciate in ScopeBoss.
ScopeBoss requires a Wi-Fi connection to your telescope, such as that provided by the GC Wi-Fi Adapter or the Southern Stars SkyFi Adapter.
I have been beta testing this iOS app with my GC Wi-Fi Adapter for many months and have worked closely with the developer to make it as useful as possible to users of AutoStar II controlled telescopes. Consequently, my review is somewhat biased, but I hope you'll overlook that as you consider everything this app can do.
Basic AutoStar II Operations
When ScopeBoss is launched you will see your familiar AutoStar II handset (iPhone on the left and iPad on the right) with the same display and all the same keys:


At the bottom of the ScopeBoss screen is the nav bar. You tap Main, Slew, Btn/Menu, Connect, or More... to display other screens in the app.
The app is universal, although using it on the full-size iPad may feel rather unnatural due to the iPad size. Using ScopeBoss on an iPad mini may feel more natural, but using it on an iPhone most directly mimics the size of the real AutoStar handset.
Until you connect ScopeBoss to your telescope via your Wi-Fi adapter, the app displays "ScopeBoss Not Connected" as seen above. To connect ScopeBoss to your telescope you use the Connect button at the bottom of the screen to display the connection screen (left below). You enter the IP address and Port number for your Wi-Fi adapter and tap "Connect to Scope". If the connection is successful you will see the screen on the right. If the connection is not successful check your Wi-Fi settings in the iOS Settings app and verify the information you entered in ScopeBoss.


After the connection is made ScopeBoss will show the AutoStar display, just like the real AutoStar. Venus had been selected using the real AutoStar and ScopeBoss showed the display on the left below. Pressing and holding the ScopeBoss Mode key brings up the Mode display (at right), just like on the real AutoStar.


Tap M on the ScopeBoss keypad and you can enter Messier Object numbers and GOTO them, just like on the real AutoStar. Here's the sequence for M42:


Note the left and right arrow buttons on the entry screen to help with correcting entries. On the real AutoStar you would use the left/right slew arrows.
Just as if you were using the real AutoStar handset, you can enter and GOTO objects using the Main screen in ScopeBoss.
Slewing the Telescope
Slewing your telescope with ScopeBoss is exactly what you might expect. On the "Slew" screen there are four large arrow buttons that you tap and hold to slew the telescope in that direction. You can also set the slew speed and whether or not to reverse the horizontal and vertical movement directions. Optionally you can display the current pointing coordinates at the top left by tapping on them; the display will show none, RA/Dec, or Alt/Az. The iPhone is on the left and the iPad on the right:


There is also a Stop button if needed, although just lifting your finger from the touch screen arrows will stop the slew.
The arrows work fine for slewing and every ScopeBoss user will feel comfortable using them. But you have a touch screen that can respond to gestures with your finger, so why not slew that way. ScopeBoss provides a slick "Gslew" capability where you just slide your finger (or thumb) across the screen to slew the telescope in the direction your finger is moving. Raise your finger from the screen and the slewing stops. iPhone on the left and iPad on the right:


I really like the Gslew mode. Once you get used to using it you will probably not want to use arrow keys again. It is intuitive and and does not require that you look at the device to locate a different arrow key to change the slew direction. I was even surprised at how well gesture slewing worked with the large iPad 3. The larger surface area seemed to give me even more control over how I slewed the telescope.
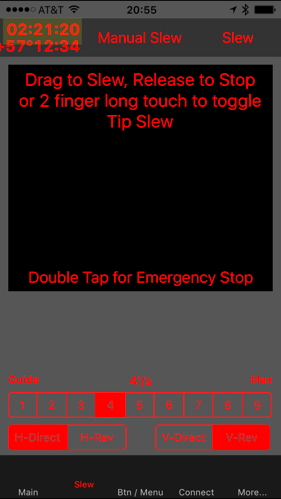
There is a third slew mode available in ScopeBoss: Tip Slew. This mode uses the accelerometers in the iPhone and iPad to determine the orientation of the device:


With this mode of slewing you tip (or tilt) the device in the direction you want to slew the telescope. For example, tilt the top of the iPhone downward to slew the telescope down; tilt it to the left to slew left, and return it to level to stop slewing. Tip Slew takes some practice to get precise control over slewing, but it is easily mastered. You just have to be careful to not get excited by the view you see in the telescope and start waving your arms around, or you will slew the telescope all over the sky! I found that holding the iPad steady was actually easier than with the iPhone.
Shortcuts to AutoStar II Functions
ScopeBoss has several shortcuts to AutoStar operations to make using your AutoStar controlled telescope a little more convenient. Tap "Btn/Menu" in the nav bar to bring up this display:
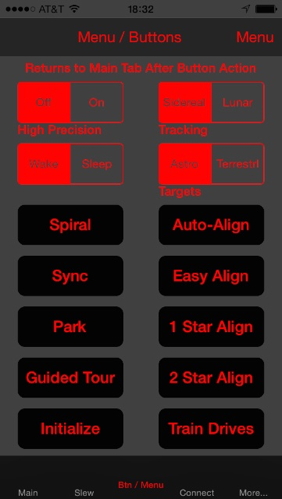
You now have quick access to several frequently used commands that you would normally have to drill down the AutoStar menu tree to reach.
If you prefer to use the menu tree for any AutoStar operation, you can still do that by tapping "Menu" at the top right of this display to get a hierarchical listing of the menu commands, a small portion of which is shown here:
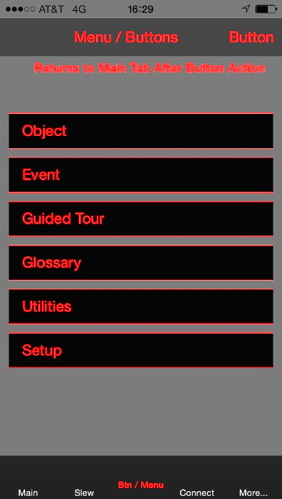

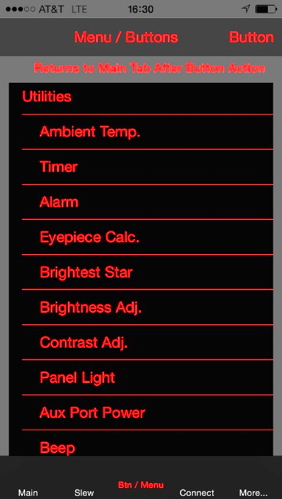

Just tap the menu item you want. Tap "Button" at the top right to get back to the shortcut buttons.
Other useful shortcuts are available by tapping "More..." in the nav bar:

You can quickly "Go To Coordinates" in either Alt/Az or RA/Dec (depending on the telescope mounting mode) as seen at left below. You can get the current pointing coordinates by tapping "Current" as seen at right below.


Tap "Go To" and the telescope will slew to the entered coordinates. A handy feature of this is that you can get the Current position of the telescope (say pointing at a comet), then use another method to GOTO an object (say a star for focusing your camera), and if you then return to the "Go To Coordinates" screen, the stored coordinates (say of that comet) are still there for you to GOTO to return to the original position.
If you have an electric focuser attached to your telescope that the AutoStar can control, you can quickly get to the focus controls from the More screen:

For the expert AutoStar users who want to send specific commands to the Autostar, that can be done from the "Manual Command" screen:

Also in the "More..." section is the app Preferences (left) and Help (right):


The "Test" item on the top "More..." screen will show a log of commands that ScopeBoss has sent to the AutoStar. This can be useful for debugging problems with your telescope or with the app.
Summary
ScopeBoss puts the AutoStar II handset on your iPhone or iPad. The AutoStar II handset is large and somewhat heavy. If you have the wired AutoStar then you are tethered to your telescope. ScopeBoss can replace your handset and will allow you to wirelessly control your telescope. To learn more about how to use ScopeBoss, the developer has a video online.
ScopeBoss is available in the Apple App Store. If you already have and use a Wi-Fi connection with your AutoStar II controlled telescope, the $10 you spend on ScopeBoss will greatly expand its convenience. If you don't have a Wi-Fi adapter, ScopeBoss is a good reason to get one. Having ScopeBoss on your iPhone/iPad also makes an excellent wireless backup if your Wired or Wireless AutoStar II ever fails. The extra capabilities of ScopeBoss might even excite you enough to make it your preferred telescope control handset.
I highly recommend ScopeBoss.
NOTE: I receive no compensation from sales of ScopeBoss. I am just a happy user of ScopeBoss. You will be too.
The first thing that becomes obvious with the large iPhone 6s Plus is that the phone is wider than either the wired (left) or wireless (right) AutoStar II handcontroller:

The ScopeBoss screens resized properly for the larger screen size:


ScopeBoss worked fine with the new iPhone 6s Plus (iOS 9.1). The only real problem I had was when using Gslew to slew the telescope.
With the iPhone 5s I could easily hold the smaller iPhone with my right hand and gesture slew using my right thumb, allowing for one-handed operation. With the large iPhone 6s Plus I could not do that. I had to hold the phone with my left hand while slewing using my right thumb. That problem may not affect all users of the iPhone 6s Plus and is certainly not a problem with ScopeBoss.
Comments are welcome using Email. If you are on Twitter you can use the button below to tweet this report to your followers. Thanks.
Cassiopeia Observatory Home Page
Copyright ©2015 Michael L. Weasner / mweasner@me.com
URL = http://www.weasner.com/co/Reviews/2015/ScopeBoss/index.html