
Review - Starry Night Pro Plus 7 - Page 3
Posted: 14 January 2015
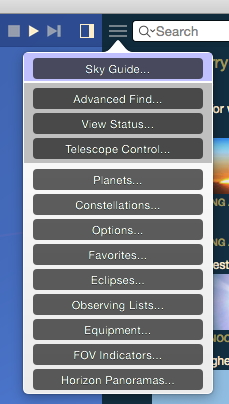
Using Starry Night Pro Plus (continued)
Many desktop planetarium programs have useful tools beyond just showing you how the sky appears at various dates/times. I'll discuss some of the tools in Starry Night that I found useful.
The Side Pane can show astronomical events. The events can be rise/set times of various objects, times of Jovian moon events (transits, etc), lunar phases, eclipses, meteor showers, etc. These are what appeared in the Side Pane for the day I was working on this review:

There are some discrepanies in the Users Guide vs version 7.1.2 of Starry Night Pro Plus. Chapter 7 of the Guide says that "Events" can be chosen by using the Panes Shortcut menu, but I don't see "Events" in the window that appears:
Fortunately, as the Guide says, typing "events" in the search field will show the Events pane. The Guide also says you can click "Event Options" above the list of events to set various filters of events to be displayed. Unfortunately, there is no "Event Options" visible, nor is there any alternative way to get the described settings dialog boxes to appear, so I was not able to configure what events I would like displayed.
Starry Night Pro Plus can graph lots of data to see how the values change over time:
This (highly reduced) graph is showing the altitude of the Moon and Sun over time:
![]()
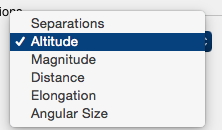
I selected to graph Separations to see the angular separation between Venus and Mercury, which I knew would be a little less than 1 degree on 10 January 2015 (the date I was graphing it). I added the two planets to the graph and changed to view their separations:

This is the resulting graph (highly reduced):
![]()
You can change the scale on the graph using the -/+ buttons above the y-axis scale on the left or using a mousewheel. This changes both the x- and y-axis scales simultaneously. Currently there is no way to change just one scale.
So, no graph appeared to show the separation of the two planets. Yet, the separation was 38 minutes, as seen in this angular separation measurement, another useful tool in Starry Night:

Starry Night Pro Plus can generate ephemerides for selected objects. Here is what is shown for Comet Lovejoy:

Discovered another bug; note that date in the generated values is displayed as "m/d/yy" and not "01/12/15". The same incorrect text appears in the exported TEXT file.
A very useful tool in many planetarium programs is to create Observing Lists for use at the telescope. Starry Night is no exception and offers many ways to build up a list of objects you want to observe. It offers some good default lists and you can easily build your own. Here you can see "Mike's Observing List, along with the default lists:

You can export the list (tab-delimited TEXT file) and print it for use at the telescope. Here is my list in Microsoft Excel:

There are some surprising inconsistencies in what is shown. No Altitude or Azimuth data (there was no way to select observing time for the list), no constellation for M42 or M31, and no distance data. What data is shown depends on what data is available in the object's database entry. You can not configure what data to show in your Observing List so you will have to manually delete unwanted columns from the exported file.
If you do not use a laptop at the telescope, you will want to export and print the list as there is no corresponding planetarium app (that I know of) on iOS or Android that can import Starry Night Observing Lists for use on a smartphone or tablet. (This is a nice feature of SkySafari on Mac, IOS, and Android.)
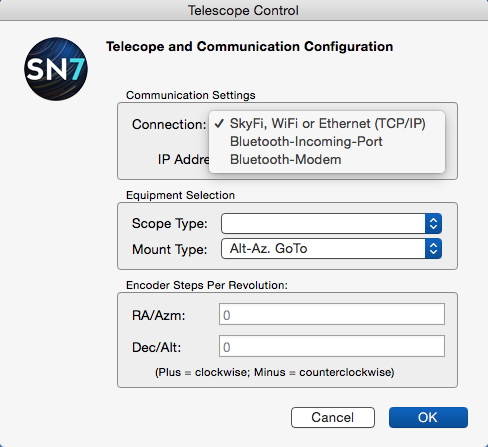
Starry Night Plus and Pro versions offer telescope control for most telescopes that have computer access. You can use RS-232 Serial, BlueTooth, or Wi-Fi to make the connection (only available connections appear):
I do not use a computer in the observatory so was not able to use Starry Night Pro Plus to control my Wi-Fi connected LX200-ACF. One exciting capability of Starry Night Pro Plus is satellite tracking. I frequently photograph the International Space Station (ISS) through my 8" telescope. Satellite tracking capability is built-in to the AutoStar handcontroller system. Other telescope systems may also have this capability. But if your telescope does not offer satellite tracking, then using Starry Night to control the telescope to track a satellite is a great feature (that I wish SkySafari Pro for iOS had!).
Starry Night Pro Plus lets you add your equipment to the program. By doing this you can set up field-of-view (FOV) and magnifications to determine the exact area of star charts and objects that will be viewable with your equipment. Here is the default set of FOV indicators:

And here is how a star chart with the Rigel QuikFinder (misspelled in the program) FOV appears:

By the way, you can correct the misspelling of QuikFinder.
You can save and view specific sky configurations in Starry Night. Here is the default set:

When you select a Favorite, the star chart changes to show the saved date, sky chart, and selected objects, as seen from the location that was in-use at the time the Favorite was saved. From that view you can then do all the other operations on the objects.
One other bug I noticed is that when the date/time is changed when some objects or Favorites are viewed, the time or time zone does not seem to properly reset when you return to your Home or Saved location and select Now for the date/time. Quitting and relaunching the program clears this bug (until it reappears).
You can save many types of data and images from Starry Night for future use. You can also add data and images for objects. Here is how you add a new (not yet discovered) moon of the planet Mars:

Adding other objects is similar.
I mentioned earlier that a default horizon image was used for my Home location. The program includes a wide selection of photorealistic panoramic images from actual locations around the world that you can select to use for your observing location. Of course, if you are not observing from "Durham Castle", you probably won't use that panorama. You can also change "Cloud Panoramas". The manual discusses how to make a customized horizon. You edit the height of points around the horizon to match your real horizon. I was hoping to be able to import the same horizon PNG file I use with SkySafari Pro on my Mac and iOS, but no easy import capability is available. The Users Guide says to visit "http://www.astronomysupport.com" for more about adding customized horizons, but that URL just redirects to a search page at the Simulation Curriculum Corp web site. Fortunately, there is a section on the search page that discusses photorealistic panaromas. One of the links there provides instructions for creating the two files needed, one using Photoshop and the other a TEXT file, and how to add these files to Starry Night, but the process is not as simple as what I was able to do for SkySafari Pro.
Unique to Starry Night Pro Plus is the ability to display the sky using an all sky photomosaic image. This provides a photorealistic view of the sky at wider FOV values, instead of using computer generated star images. This is Orion with computer generated stars:

Orion using the AllSky CCD Mosaic (with the default settings):

You can control how the photorealistic image is displayed:
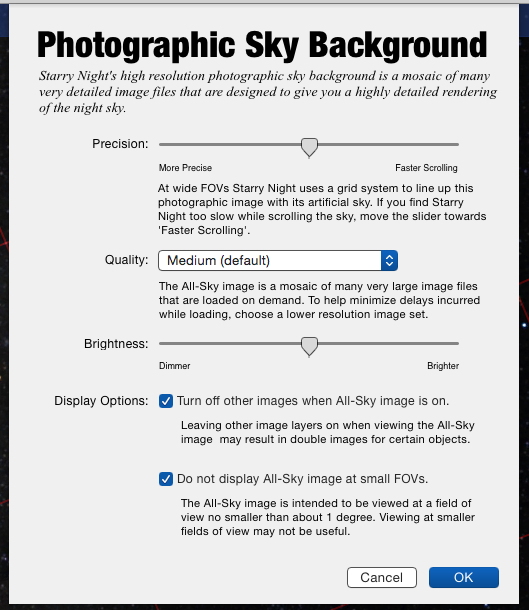
This is Orion at high quality and maximum brightness:

Very impressive. As you zoom in, more image data is downloaded (if set for automatic download). Here is the Horsehead Nebula with the FOV set to 2°:

As you can see can, the image has degraded quite a bit. Expanding the FOV shows a better image. Here is the Flame and Horsehead nebulae viewed at 7° (typical for 7x50 binoculars, as if you could actually see the Horsehead with small binoculars) as displayed in the full Starry Night window:

You can easily turn the AllSky display ON and OFF using its toggle in the Side Pane:

I will likely leave the AllSky CCD Mosaic turned ON for most of my Starry Night use.
Summary
I have only touched on a few of the capabilities and features of Starry Night Pro Plus in this review. There are some bugs in the program, as discussed in my review, but none are serious (crashers). I do wish that more user settings, including info window positions and Side Panel configurations, were saved in the "default" file to facilitate use of the program. Starry Night is updated frequently so it is likely that the bugs I reported here will be fixed in future releases. (In fact, many have already been fixed by the developer. Thanks!)
The Users Guide does not always match the version of the software. And since the Users Guide covers most all versions of Starry Night, there are times when it is confusing whether the feature discussed in the Guide is actually available in the version you have. Since printed documentation is no longer supplied with the software, the Users Guide that is accessible from within the program should match the version of the software being used.
The Starry Night series of desktop planetarium programs have a long and very successful history. Starry Night Pro Plus offers essentially anything and everything that you could want. If you need to determine what's visible tonight (or on any night past or future), plan an observing session, check out how the sky looks from almost any location in the universe, view the 3D positions of stars and galaxies, control your telescope, display specific astrophysical data for objects, and more, Starry Night Pro Plus is definitely the program for you. Check the Starry Night web site to see which version of the program is best for you.
Go back to Page 2.
Go back to Page 1.
Comments are welcome using Email.
Cassiopeia Observatory Home Page
Copyright ©2015 Michael L. Weasner / mweasner@me.com
URL = http://www.weasner.com/co/Reviews/2015/Starry_Night_Pro_Plus/index3.html