Last updated: 11 January 2004
|
Last updated: 11 January 2004 |
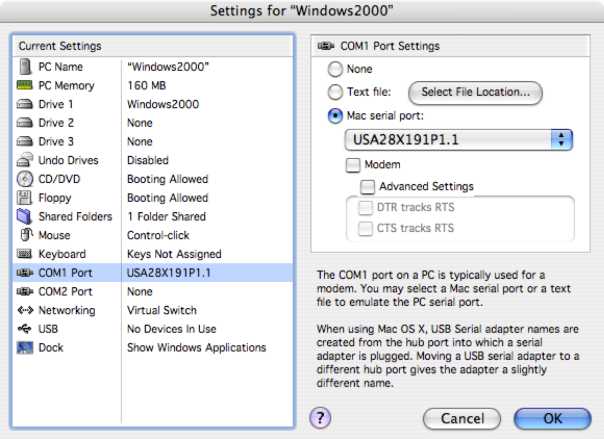
It was NOT enabled in the VirtualPC USB settings (only the LPI should be enabled), as seen here:

I launched the Autostar Update application 3.61 and verified it could connect to the Autostar #497; it did and showed that version 3.0Ee was installed. So I launched the Autostar Suite application to try to update the Autostar.
But first I wanted to verify the connection to the Autostar from the Autostar Suite application. I connected via the serial port and I was able to slew and focus the ETX-125 using the "Control Panel" in the application. So I knew I had a connection. Unfortunately there was about a one second delay from the time I pressed a button on the Control Panel window to the time the telescope reacted. This only occurred when starting; stopping was instantaneous.
Since communication was working I selected "Update Autostar" from the Telescope menu. This launched the Autostar Update application. But no connection to the Autostar was made nor did the update automatically start. I guess Windows applications can't tell other Windows applications what to do like Macintosh applications can using Apple Events. (We Mac users are spoiled by the power of our OS...). OK, so I have to do this manually. I tried to get the Autostar Update application to connect to the Autostar but it couldn't find the comm port. Probably because the serial port was in use by the Autostar Suite application. So, back to the Autostar Suite to disconnect it from the Autostar. (Integration? Hum... More on this port contention later.) Back to the Autostar Update application, which successfully connected to the Autostar. I selected to update via the web using my wireless connection. It took 20 minutes to complete and when it was finished the Autostar was at version 3.1Ee.
Remember my earlier question about Tours? Well, while the Autostar was being updated I noticed that my test tour appeared in the Library (local) window in the Autostar Update application. So now I know how Tours get into the Autostar. It would have been nice if the Autostar Suite manual was clearer about this. I then quit the Autostar Update application.
Back to the Autostar Suite application. The Starmap will continuously update its display if you select "Auto Track" WHILE connected to an aligned Autostar. To test controlling the Autostar I opened the Remote Handbox, which allows access to all Autostar controller functions. The next image shows the Controller.
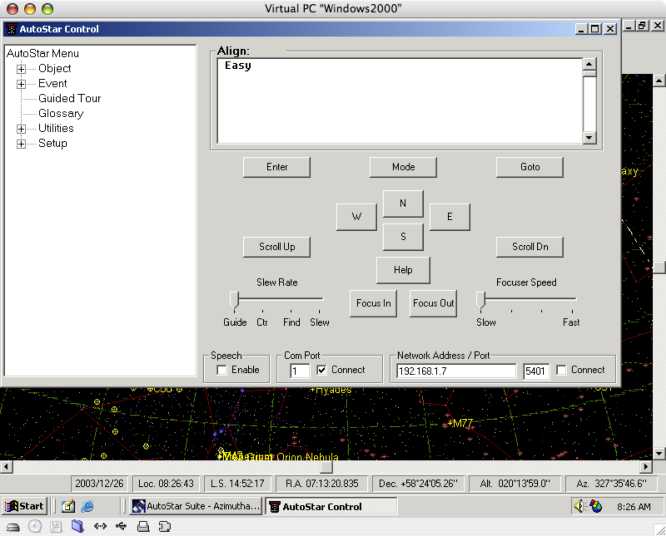
When I first brought up the Remote Handbox it would not connect to the Autostar. Oops, the Autostar Suite still had the comm port. This Remote Handbox is a separate Windows application so it was necessary to disconnect the Autostar Suite application from the Autostar before using the Remote Handbox application. Once that was done I was able to use the Remote Handbox to go through all the steps necessary to do an Easy Alignment and select and GOTO to objects in the Autostar. The Autostar display was echoed in the Remote Handbox window. In fact, when I enabled speech in the Remote Handbox the application would read the contents of the display to me. That's a nice touch. I was able to slew and focus the ETX using the buttons on the Remote Handbox. Starting and stopping response was instantaneous.
Unfortunately with the Remote Handbox communicating via the serial port, the Autostar Suite starmap Auto Track feature is not available since the comm port is not available. But once I disconnected the Remote Handbox and reconnected the Autostar Suite, the starmap would track the Autostar position and could be used to select and GOTO an object.
Fortunately, Meade provides a nice way around this port contention issue. There is a "network" control capability that allows control of the Autostar Suite from another Windows computer running the Autostar Suite. These computers can be on your local ethernet network or on the Internet (if you open any firewall you have). But perhaps the most important capability for most users is that a single computer can use this "network" to allow all the Autostar Suite applications to share the single comm port.
When I enabled the "network server" I initially was unable to connect to it. In the Autostar Suite application you select to use the Network Server and then enter your computer name or IP address and a password. The first time the connect dialog box appeared it had an incorrect IP address. The manual said to use "your Windows computer name"; but that didn't work for me either. Dick Seymour had previously suggested using the "loop back" address of 127.0.0.1; didn't work either. So I tried using my Windows 2000 IP address 192.168.0.20); no go. It was at this point that I discovered another documentation error. The manual says that if you don't enter a password in the network server configuration dialog box (it actually says to use an "empty string"), you won't be prompted to enter one when connecting. But I was being asked for a password. So I configured the Network Server to have a password and then I was able to successfully connect to it. Apparently, the default password is NOT an empty string but the documentation doesn't tell you what it is. I then changed the password to an empty string and my next connections were made without being asked for a password.
I switched back to the Remote Handbox to try the network connection. It was still set to use the serial port. I turned that off and turned on the network connection. The Autostar beeped and the Remote Handbox screen said "Initializing..." and nothing else. The Autostar itself still showed "Saturn", which was the last object I had selected. Once I did a slew on the handbox (real one) the Remote Handbox display updated and properly showed what was on the Autostar display. Using the Remote Handbox, slewing was very slow to respond to button presses and the Remote Handbox display was very slow to update. Even some clicks on buttons were ignored. Typing in a Messier number was challenging due to the slow response. The Autostar display itself would update as I typed each number, so the data was being accepted by the Remote Handbox application and sent to the Autostar; it was only the computer side that was sluggish. This was much less responsive than when using the serial connection. I don't know if the VirtualPC emulation was the cause of this slower performance or if it is normal in the Network mode.
I entered "42" in the Objects->Deep Sky->Messier and did a GOTO from the Remote Handbox. The ETX slewed to where M42 would be (remember, I was doing all this in the daytime). Back in the Autostar Suite starmap, M42 was shown as the selected object (since Auto Track was enabled). So the "network" mode really works to avoid the serial port contention. Thanks to Meade for adding it!
Now it was on to the LPI. But first I used the Remote Handbox to put the Autostar into Terrestrial mode. It is worth noting here that some Autostar Suite application menu layouts are confusing. "Remote Handbox" is in the "Protocol" menu (where you select serial, modem, or a network connection). I hope Meade redesigns the menu layouts in a future update.
Go back to the previous section - Software - Starmap
Go to the next section - Lunar Planetary Imager (LPI)
Go back to the first section - Introduction
Return to the top of this page.
Go back to the Autostar Information page.
Go back to the ETX Home Page.