ASTROAID
Posted: 4 November 2012

AstroAid v2
iOS Universal app
$2.99
iLanga, Inc.
Users of AstroPlanner software will likely recognize iLanga and the developer Paul Rodman. AstroAid is one of his newest creations and is available from the Apple iTunes Store for $2.99. (See the iTunes page for a list of supported devices, with iOS 5 or later.) When I first heard about AstroAid (from Astronomy Technology Today magazine), I was intrigued. I contacted Paul and he provided me with an AstroAid redeem code for this review.
What is AstroAid? Simply put, it is a Field-of-View calculator for your telescope, camera/imager, and the combination of telescope + camera/imager. But that short description does not begin to describe its usefulness.
A few years ago, I manually created an Excel spreadsheet file to document the FOV with my 8" LX200-ACF and DSLR using various eyepieces and adapters. (If you want a copy to modify for your own equipment, you can download it.) Unfortunately, the file data is fixed to the eyepieces, camera, and adapters I use most commonly with my 8" LX200-ACF and does not provide FOV for other telescopes, optical aids, or adapters. There are other, more general, tools to calculate FOV for any telescope/eyepiece; some of these "simulators" and "charts" are available on the Helpful Information: Buyer/New User Tips page.
While I have my FOV Measurements file printed out and in my observatory, if I'm using one of my non-observatory based telescopes (the ETX telescopes, for example), the printout doesn't apply. This is why I got intrigued by AstroAid. I could have a very general tool that can be set up for all of my telescopes and cameras, and since I have my iPhone (and sometimes, my iPad) with me while at the telescope, I could quickly look up the FOV for any telescope, eyepiece, camera, and adapter. At least, that is what I hoped. How well did AstroAid meet my expectations? Read on.
A 23 page AstroAid manual is available for downloading, even before you purchase the app. I recommend you read it before setting up AstroAid. At the beginning of the manual, you'll learn more about the basics of AstroAid. Quoting from the manual:
It functions as an aid to visualising what you will see through your telescope or camera lens when you use a particular eyepiece and, optionally, an optical aid (such as a Barlow lens). You can also specify an imager or camera instead of the eyepiece, and AstroAid will show you what will appear in the imager's field of view.
The app computes a number of parameters for your telescope/eyepiece/imager combination, such as magnification, actual field of view, visual magnitude limit, pixel scale etc. and displays these values in tabular form.
Additionally, the application contains images of the 110 Messier objects and will show you what these objects would look like through the eyepiece (by suitably scaling the images). Apart from the Messier catalogue, the app also contains the NGC, IC and Caldwell catalogues, and can download images for each of the catalogue objects.
The app contains extensive lists of known vendor-supplied telescopes, camera lenses, eyepieces, cameras, imagers and optical aids. You can also create your own custom entries if your equipment isn't listed (for example, if you made your own telescope).
I first used AstroAid on my iPhone 4 (with iOS 6.0), as the iPhone is always with me. As described in the manual, you can add all of your telescopes, eyepieces, cameras/imagers, and optical aid, by clicking the appropriate icon on the home screen (I have already selected the LX200 and D7000 DSLR):

You can select from an extensive list of telescopes, eyepieces, etc, or you can add your own, up to eight additional custom eyepieces/imagers. Here you can see that I have selected the ETX-125 (but not yet indicated that I own the item, which will move the item to the top of the scrolling list for easy selection later):

When adding a custom telescope, you need to know two out of three: aperture, focal length, focal ratio. For eyepieces, you need to know the focal length and apparent field of view. When adding a custom optical aid, you need to know the magnification or focal length increase (decrease). To add a custom camera/imager you need to know the sensor size (number of pixels high and wide) and the pizel size (in microns).
When adding items, I was surprised to discover that you can't reorder the telescopes, eyepieces, etc. They are stuck in entered order. (Feature Request!) Many dedicated CCD imagers and DSLRs are included, but my Nikon D7000 DSLR was not, although older Nikon (and Canon) DSLRs are listed. There are also dedicated imagers from SBIG, Meade, Orion, and others. There is also a listing for a webcam. I manually added my Nikon D7000 DSLR. I entered 4.78 microns as the pixel size but the app rounded that up to 4.8. I expect that will slightly impact the FOV values for the camera. Some imagers show the FOV of both the imager and an off-axis quiding rectangle, as seen in this image from the AstroAid manual:

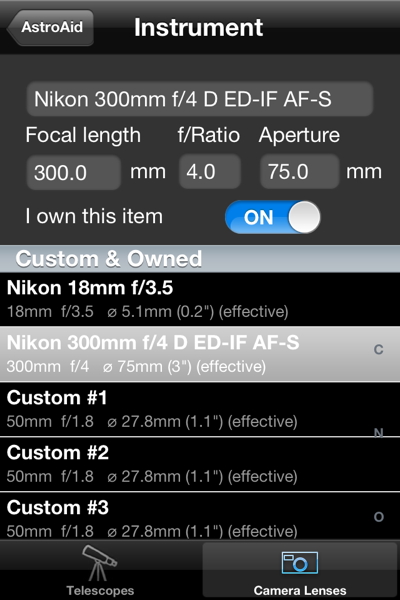
Unfortunately, my Meade OAG #777 (which I use a lot) is not on the included list and in v2 there is no way to add it even if I knew the parameters. (Feature Request.) You can also add camera lenses. Many are listed. I selected lenses that were close to the focal length of the zoom lenses I use with my D7000 DSLR. This is one such entry:

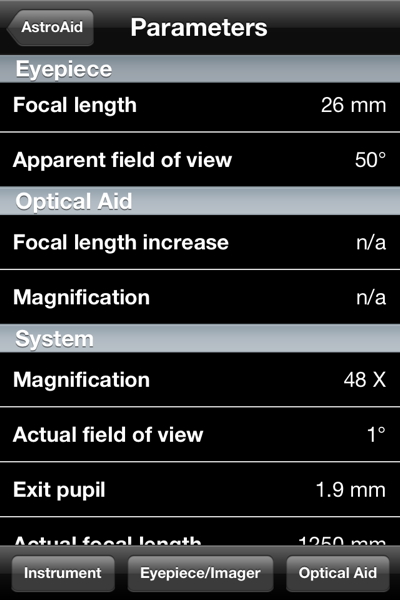
When you want to determine the FOV for an object, you select your telescope, eyepiece, camera/imager, and optical aid, by tapping the home screen icons, as appropriate. You can view the currently selected parameters by tapping the Parameters icon on the home screen. When you do that, a scrollable list appears.


To verify the FOV for my 8" LX200-ACF with the D7000 DSLR at prime focus, without the focal reducer (left) and with the focal reducer (right), I selected that equipment and viewed the parameters:


How did these values of 40.7' x 26.8' and 1.1° x 42.6' compare to my manually determined values that appear in my FOV spreadsheet? The spreadsheet shows 40'35" x 26'58" without the focal reducer and 59'48" x 38'13" with the focal reducer. The FOV calculated by AstroAid without the focal reducer is very close to the actual value. The calculated value with the focal reducer is close but not quite the same as I had manually determined. The difference is likely due to the way I manually determined the FOV for input into the spreadsheet and not due to an error in AstroAid.
I also compared the calculated FOV for my Nikon D7000 DSLR with 18mm lens:

to my manually determined FOV, as shown in my FOV spreadsheet, 70°09'45" x 51°54'17". The values are similar, well within my likely manual determination error.
To check the FOV with your selected equipment for a specific object, you tap the Field of View icon on the home screen and select your object from the built-in catalogs: Messier, NGC, IC, and Caldwell. As initially installed on your iDevice, the Messier catalog includes images for each object. When you select an object from the other catalogs, the image has to be downloaded (so you need an Internet connection). Downloaded images are small (0.2-1.2 MB, averaging about 0.4 MB, per the manual) and can be optionally cached for later use. There is a setting screen to configure the image download and caching:

This is a nice capability if you don't have unlimited data download with your cellular plan and/or you have limited memory on your iDevice.
To find an object in a catalog, you can scroll through the list or enter a search term. This screen shows M42, the Great Nebula in Orion, as it would be expected to appear when imaged using the 8" LX200-ACF with the D7000 DSLR at prime focus + focal reducer:

Note the information placed around the image letting you know several important values for your selected equipment. You can rotate the FOV to match the orientation of your camera/imager:

And this is how the Horsehead Nebula (IC434) would appear with the 8" LX200-ACF, D7000 DSLR, and focal reducer:

After I completed configuring AstroAid on my iPhone for my equipment, I tested the app while in my observatory. I viewed M57, the Ring Nebula, in the 8" with a 26mm eyepiece on the star diagonal. The FOV was smaller than what AstroAid showed:

But that didn't surprise me since I can barely fit a full moon (~0.5°) in the 26mm when on the star diagonal. I changed to the visual back and the FOV almost perfectly matched what AstroAid showed. I switched to a 9.7mm eyepiece on the visual back; the view matched very well.

With both eyepieces, the orientation shown in AstroAid matched what I saw through the telescope. However, there is currently no way in AstroAid to reverse the image orientation manually, as that is set by the optical design of the components involved. (Feature Request.)
There is a night mode, enabled by tapping the "moon" icon on the app home screen. That turns the display red.


The night mode screen image above has been edited to brighten the screen for purposes of the review. When I enabled night mode at night in my observatory, I could barely see the AstroAid screen, as more accurately shown here:

I had to use the iPhone system Settings to turn up the brightness all the way. Of course, that made other screens on the iPhone way too bright for use in the observatory. It would be nice if there was a night mode brightness slider control in AstroAid. (Feature Request!)
You can change the selected telescope, eyepiece, camera/imager, and optical aid from the FOV screen by using the buttons at the bottom of the screen:

You can change catalogs from the FOV screen using the galaxy icon at the lower right.
I also tested AstroAid on my iPad with Retina Display. With all my equipment entered into the iPhone, I SYNCed the phone in iTunes. I then SYNCed the iPad in iTunes to see if my equipment would be copied to the iPad. Unfortunately, my equipment from the iPhone version was not copied into the iPad version. I suspect this is not an AstroAid problem but an iOS restriction from Apple. So, I manually added all my equipment in the iPad version. If you have multiple iDevices, be prepared for multiple configuration sessions.
The iPad user interface has some layout differences to take advantage of the larger screen. Pretty much everything is shown on one screen in landscape mode:

In portrait mode you see the important information:

In portrait mode you have to tap the AstroAid icon at the upper left to show the equipment selection icons:

Editing is done via a "popover" screen:

Other than these differences, the iPad version functions the same as the iPhone version, except you get the benefit of having the much larger screen.
AstroAid is an excellent tool for anyone with a telescope and/or camera who wants to view or image DSOs. It has a well-designed interface and is very easy to learn and use. It will provide an accurate FOV depiction with eyepieces for visual use and camera/imagers for prime focus imaging. But what if your object is not in the database? In the current version there is no way to enter RA/Dec and display a star chart. (Feature Request!) And there are only Deep Sky Objects (DSOs); no planets or the moon. While having no planets in the app is understandable (but still desirable), it would be nice to have the moon (and planets) available, corrected for phase and current orbital distance. (Feature Request.)
And what about afocal imaging, like you might do with a smartphone or point-n-shoot digital camera, or even a DSLR? There are no smartphones or point-n-shoot cameras listed in the app, and if you think about it, none are required. When doing afocal imaging, which images what an eyepiece "sees", the FOV will be at most, the FOV of the selected eyepiece. It could be less than that, sometimes WAY less, depending on positioning of the camera lens and any zoom factor used. On the other hand, for wide-angle imaging, like you do with a DSLR and one of the selected lenses, AstroAid can calculate how much of the sky will be imaged. That could be useful for smartphones and digital cameras as well, but you would have to manually add the smartphone/camera as a custom imager/lens combination, since none are included with the app. (Feature Request.)
I did have one app crash on the iPhone but it was not repeatable. I also discovered one very minor display bug that was reported to the author and will be fixed in v2.0.1. If you know Paul Rodman, you know that AstroAid will continue to be well supported.
I highly recommend that AstroAid be added to your toolset if you have an iPhone, iPod touch, or iPad. For myself, I'll find AstroAid very handy when trying to view faint and small DSOs at the eyepiece and wondering just how big an object I should be looking for. And I'm going to love using AstroAid when planning my DSLR DSO imaging.
Go to the ETX site.
Go to the Cassiopeia Observatory site.