Review - 3-Axis Smartphone Adapter for Phone Scope Digiscoping
Posted: 5 August 2023
3-Axis Smartphone Adapter for Phone Scope Digiscoping
Accuview
$70
I had seen ads for the 3-Axis Smartphone Adapter for Phone Scope Digiscoping on Facebook. Since none of the other smartphone adapters I have reviewed are 3-axis designs, I became sufficiently intriqued to want to check it out. I contacted Move-Shoot-Move and they sent me an evaluation unit. And as always seems to happen when new telescope equipment is received, cloudy nights prevented me from doing any nighttime astrophotography for nearly four weeks.
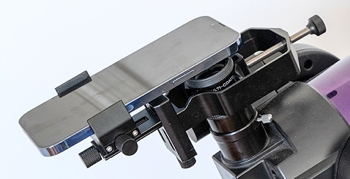
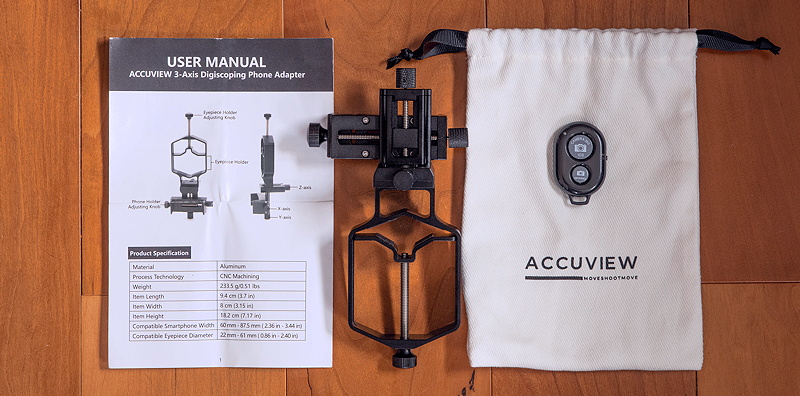
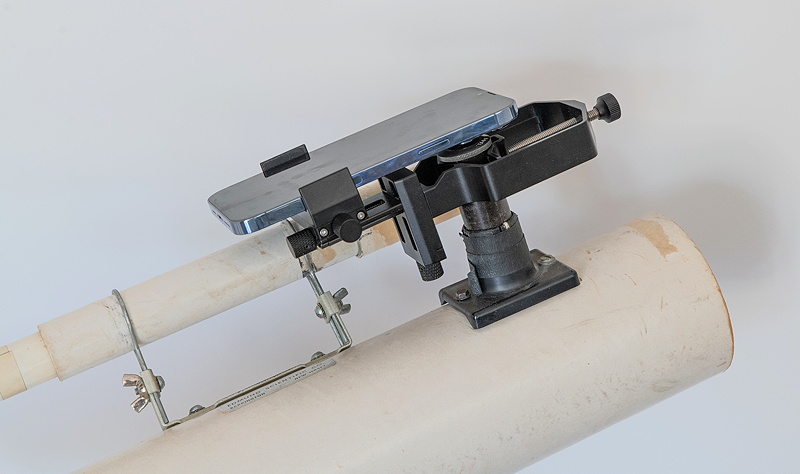
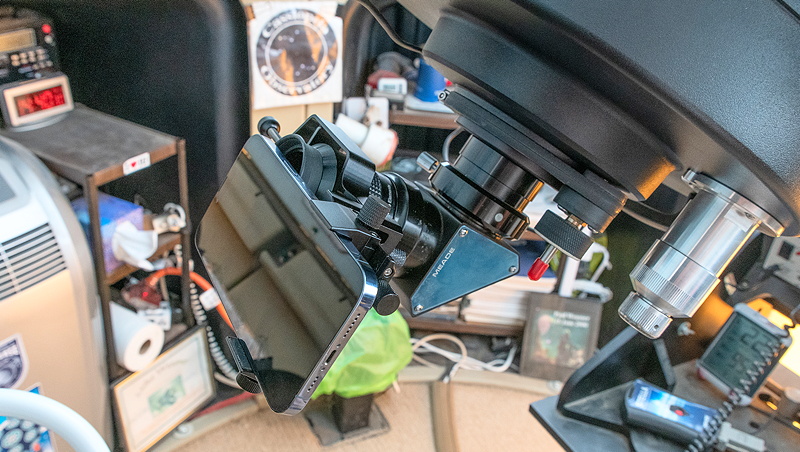
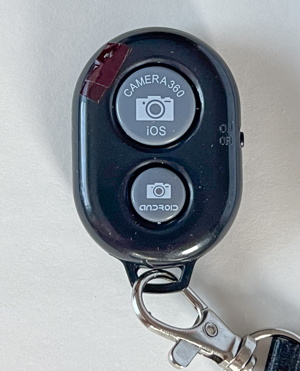
The Accuview adapter kit includes the all-metal (aluminum, somewhat heavy at 0.5 lb) smartphone adapter, a small Bluetooth remote shutter release (no lanyard supplied), a nice cloth case, and a small four page manual.
The manual includes an important tip about smartphone camera "macro switching". The manual does not address the LiDAR issue that I discuss in my article iPhone 13 Pro Max Afocal Photography LiDAR Issue. For my smartphone astrophotography I would need to attach my LiDAR Cover as described in that article. The manual describes how to attach the adapter to an eyepiece, the phone to the adapter, and how to use the three knobs to move the phone in the X, Y, and Z axes to get the "clearest view". It does not elaborate on what that means. Most smartphone adapters only provide phone camera movement in two directions to align the camera lens directly over the center of the eyepiece. But it is also important to have the camera lens at the proper distance from the eyepiece, usually at the eyepiece "eye relief" distance. That will ensure the maximum field-of-view illumination that is evenly lit. With a 2-axis adapter it is necessary to use the cumbersome process of sliding the entire adapter with the phone attached along the eyepiece tube until the proper position for that eyepiece is located. Alignment examples are shown later in this review. The manual also covers using the included Bluetooth Shutter Remote.
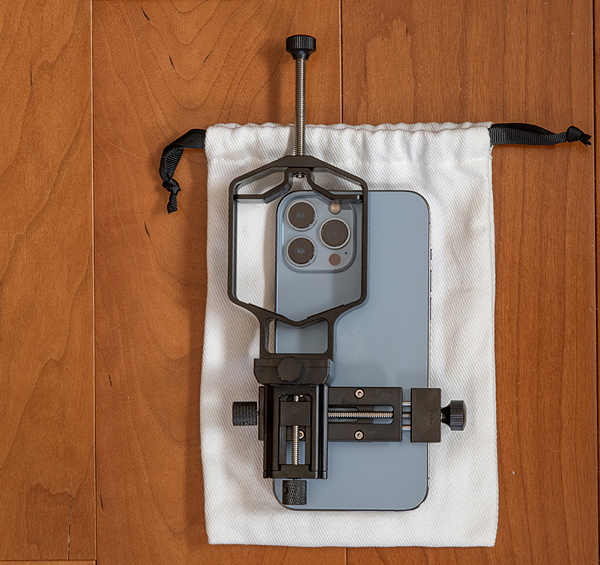
The product description says that smartphone widths of 2.36 inch to 3.44 inch and eyepiece tube diameters of 0.86 inch to 2.4 inch are supported. I tested the adapter with my iPhone 13 Pro Max and some 0.965", 1.25", and 2" eyepieces on some telescopes, as well as on 12x50 binoculars. I also tested the Bluetooth Shutter Remote with the Camera and NightCap Camera apps on my iPhone.
Before putting the adapter on a telescope, I attached my iPhone and used the X and Y axis adjustments to position the 1X camera lens at the center of the maximum eyepiece diameter adjustment. The phone was held securely thanks to the rubber pads on the adapter and there seemed to be enough adjustment movements that will allow centering the camera on all my supported eyepieces. Different smartphone camera lenses can be centered by using the X and Y axis adjustments.
I then mounted the adapter and phone on some of my telescopes and tripod-mounted 12x50 binoculars. For each eyepiece I tested, I first attached the adapter on the eyepiece to check positioning of the adapter. I found it best to hold the adapter vertical with the phone mounted and then I placed the eyepiece in the adapter. Shorter eyepieces would stay positioned, allowing me to tighten the bracket. For larger eyepieces I held the adapter horizontal with the phone on the bottom, then inserted the eyepiece into the adapter holder and tightened the bracket. I centered the camera lens over the eyepiece by using the X and Y adjustments while looking at a camera app live view. Once I was happy with this initial X-Y alignment, I inserted the eyepiece into the telescope's eyepiece holder with the adapter and phone attached. Next, I used the Z adjustment to get the proper distance from the eyepiece as seen in the camera app's live view. It was really slick and easy using the axis adjustments to get a precise 3-axis alignment. Normally, when doing afocal imaging, you first focus the eyepiece to your eye. You then place the camera over the eyepiece and set the camera to focus at infinity. I did these initial tests without focusing as I was just interested in the optical alignments at this point. (If your telescope mount is sturdy, once you have some experience mounting the adapter on an eyepiece you can leave the eyepiece on the telescope and attach the adapter on the eyepiece. You then place the smartphone in the adapter.)
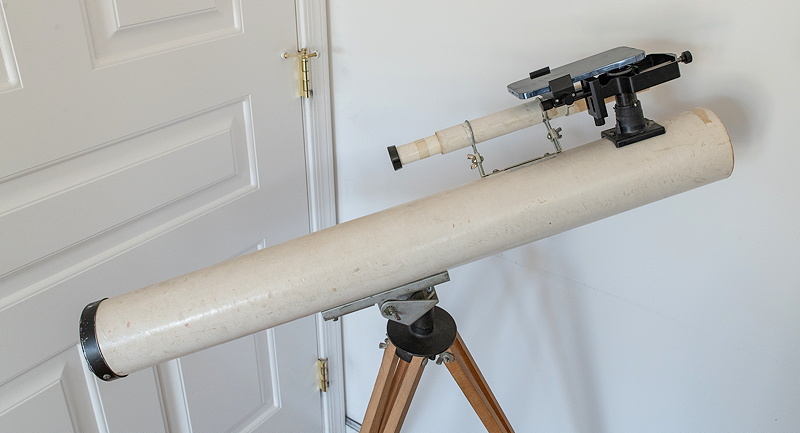
3" Newtonian Reflector
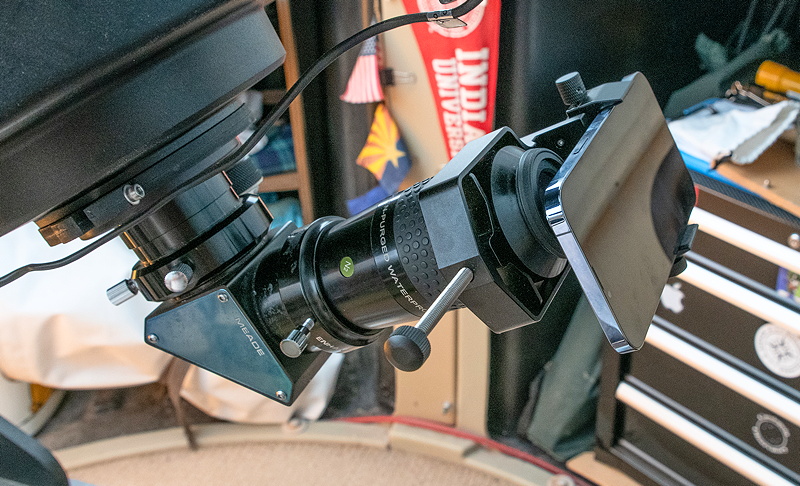
The Edmund 3" Newtonian Reflector telescope that I received in 1961 uses 0.965" eyepieces and so made a good test of using the adapter at the small end of its eyepiece size range. I was able to adequately align the phone on a 3/4" focal length eyepiece, as seen in these photographs.
ETX Telescopes
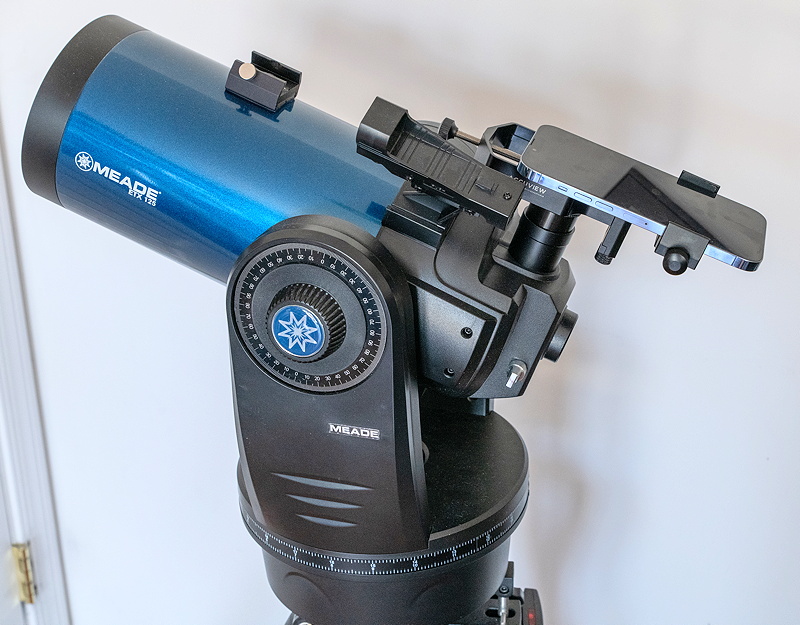
ETX telescope models use 1.25" eyepieces. Here is the adapter mounted on an ETX-90 and an ETX-125 Observer, both with a 26mm eyepiece. Two orientations are shown on the ETX-125 Observer to indicate how to avoid interference from the red-dot finderscope.
ETX-90, 1.25" 26mm eyepiece, portrait orientation

ETX-125 Observer, 1.25" 26mm eyepiece, landscape orientation
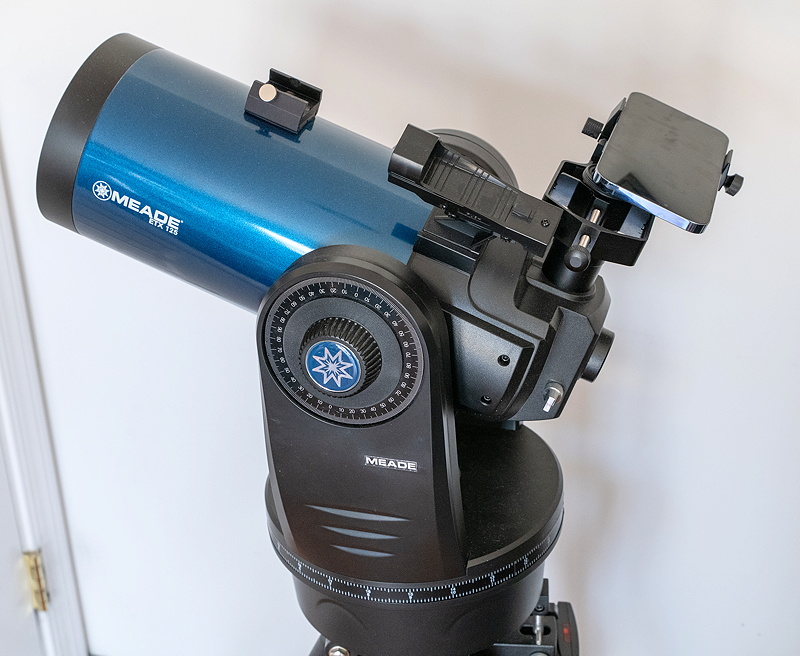
ETX-125 Observer, 1.25" 26mm eyepiece, portrait orientation
LX600 Telescope
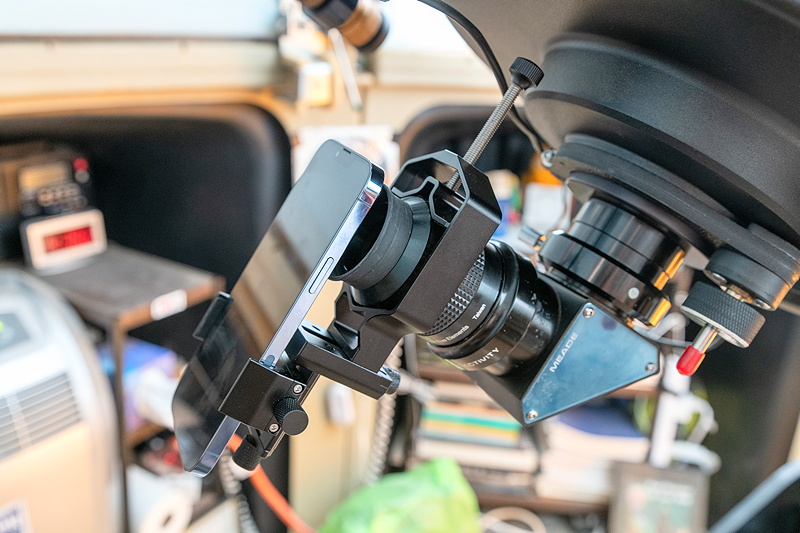
I tested the adapter on the 12" LX600 telescope in my observatory using a 2" 30mm eyepiece, a 2" 9mm eyepiece, and a 1.25" 15mm eyepiece. These eyepieces are the ones most frequently used for my smartphone astrophotography and provided good tests in the mid-to-large eyepiece size range of the adapter.
2" 30mm eyepiece, portrait orientation
2" 30mm eyepiece, landscape orientation
2" 9mm eyepiece, landscape orientation
1.25" 15mm eyepiece, landscape orientation
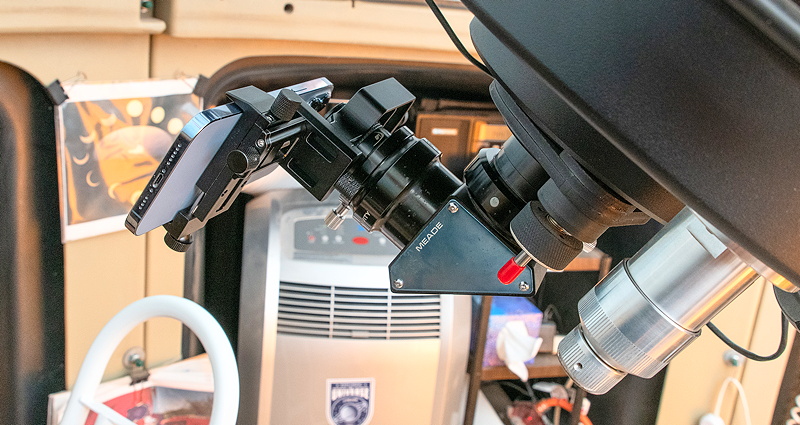
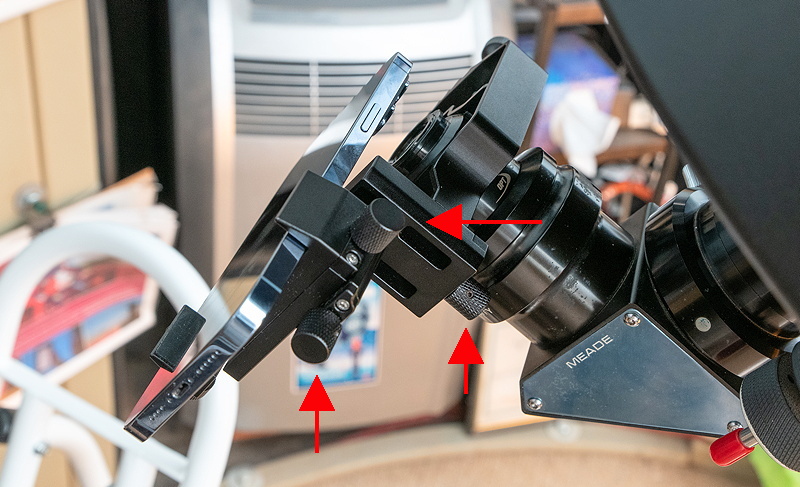
1.25" 15mm eyepiece, landscape orientation (X-Y-Z knobs marked)
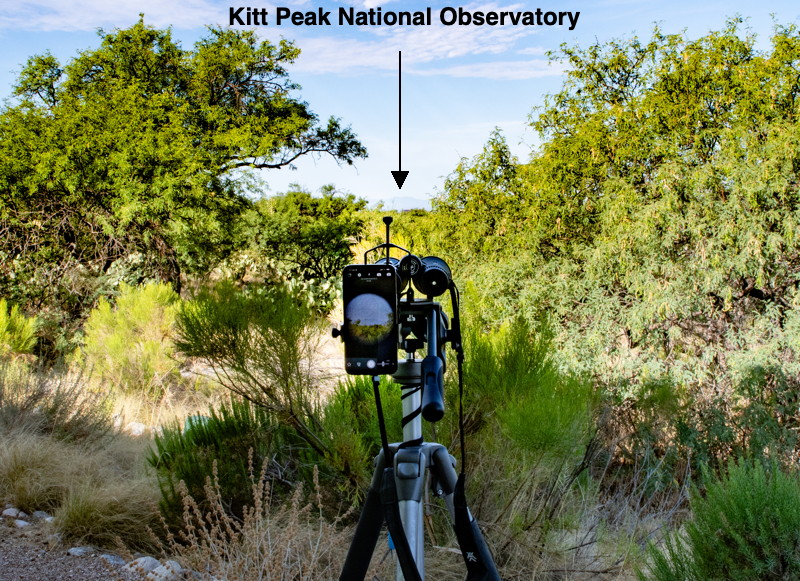
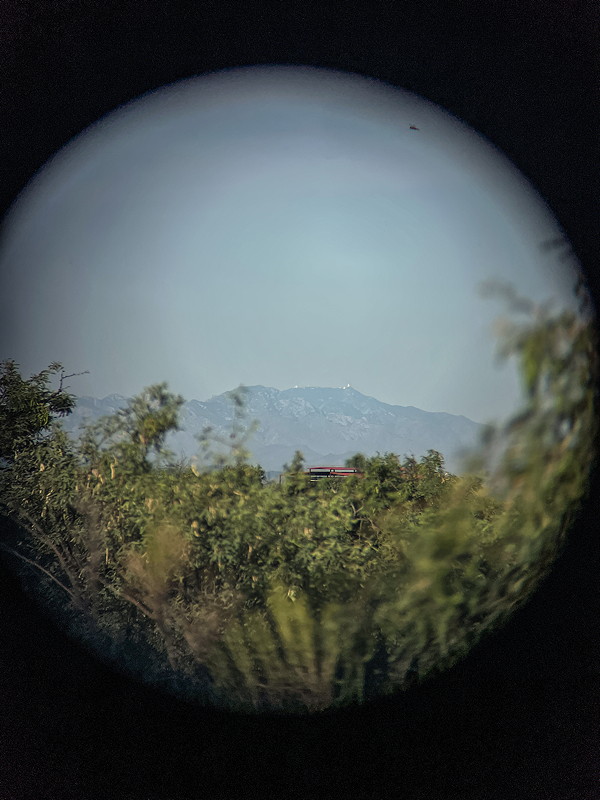
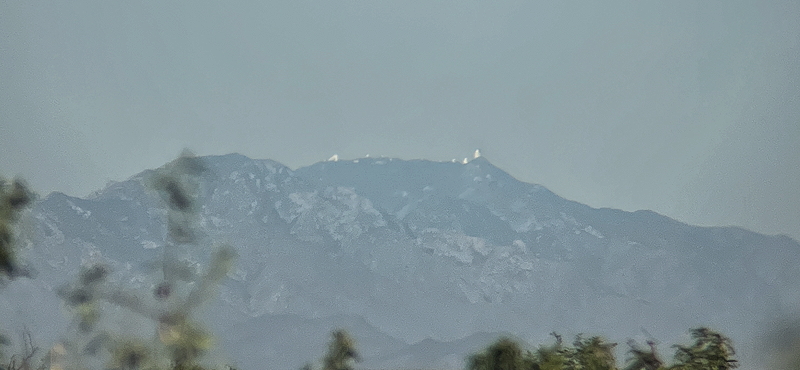
Binoculars
I mounted my 12x50 binoculars on a sturdy camera tripod and aimed it at Kitt Peak National Observatory, 65 miles away. I attached the adapter and phone on one of the eyepieces. The middle photo was taken with NightCap Camera (1X lens) using the Bluetooth Shutter Remote to trigger the phone shutter. The third photo is cropped and edited from the middle photo and shows some of the observatories on the mountain.
Most binoculars provide a diopter adjustment for one or both eyepieces by rotating the eyepiece(s). Smartphone adapters should always be attached to the non-rotating eyepiece, if available. This ensures that the adapter will not rotate from the weight of the adapter+phone. If you can't do that, mount the adapter vertically so that the weight "hangs down" and won't rotate the eyepiece.
When using binoculars you can look through one side with the phone attached to the other side. You can then use the remote shutter release to take a photo of what you are seeing while looking through the binoculars. This turns your normal binoculars into digital imaging binoculars. That can be handy at times.
3-Axis Alignments
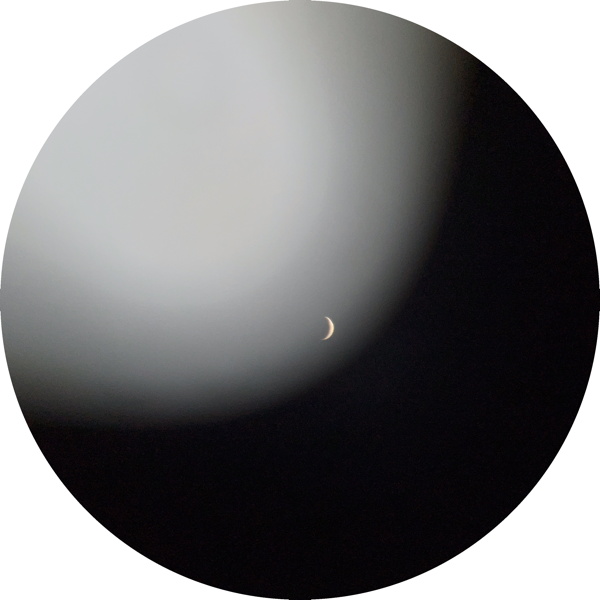
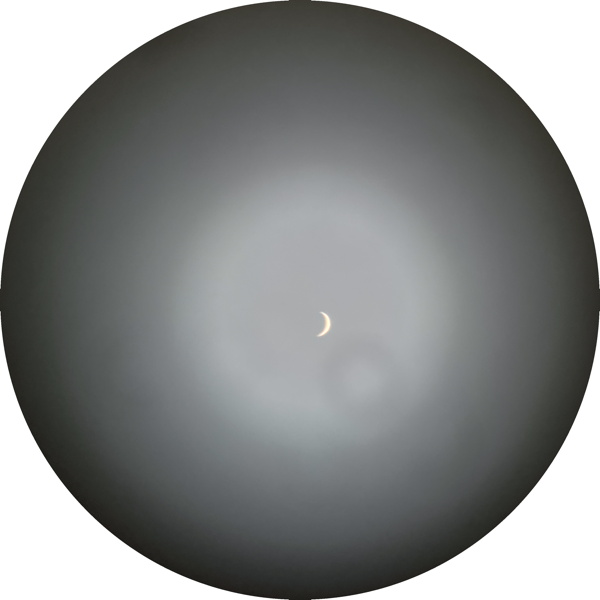
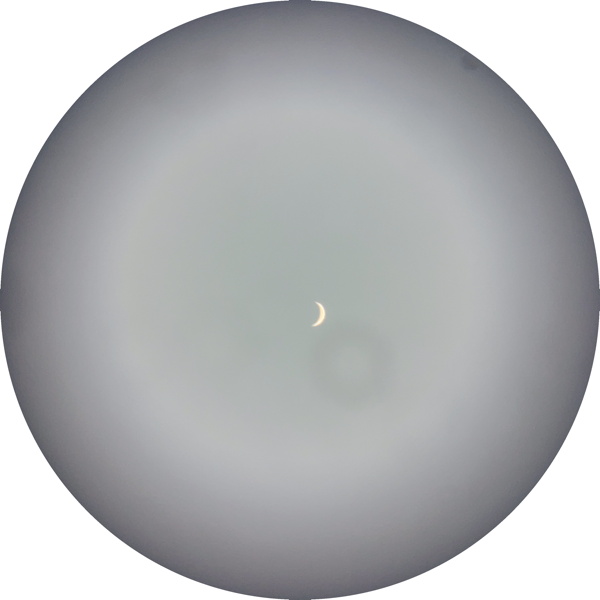
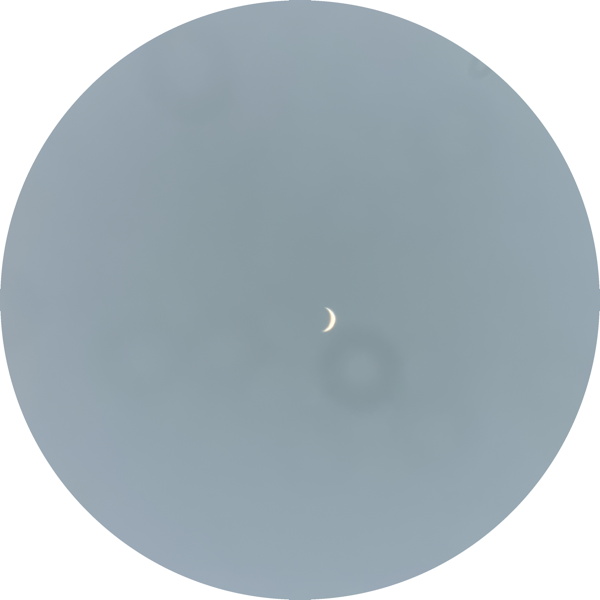
I used the 12" LX600, a 1.25" 15mm eyepiece (163X), and the planet Venus in a daytime sky to illustrate the importance of aligning the phone camera lens on all three axes. I first focused the eyepiece on the telescope to my eye. I then attached the adapter to the eyepiece. Next, I mounted the phone on the adapter and did X-Y-Z alignments using the NightCap Camera app's live view. These afocal images of the planet and surrounding sky show the importance of aligning in all three axes. (They also show the importance of a clean eyepiece to avoid "dust donuts".)
X and Y axes off-center
Z axis too close
Z axis too far
X, Y, and Z axis aligned
If you only use one eyepiece for your afocal imaging, you can leave the axis adjustments alone once you have them set and can then easily do future imaging. If you use multiple eyepieces, the adjustments will likely be different for each eyepiece. It would be handy to have an etched scale on the axes to provide repeatability, but lacking such a scale you can scratch markers on the adapter surface to indicate adjustment positions for each eyepiece. This repeatability becomes important when imaging Deep Sky Objects like nebulae and galaxies when the camera field-of-view will be dark, making it difficult to determine when the axes are precisely aligned.
Astrophotography Examples
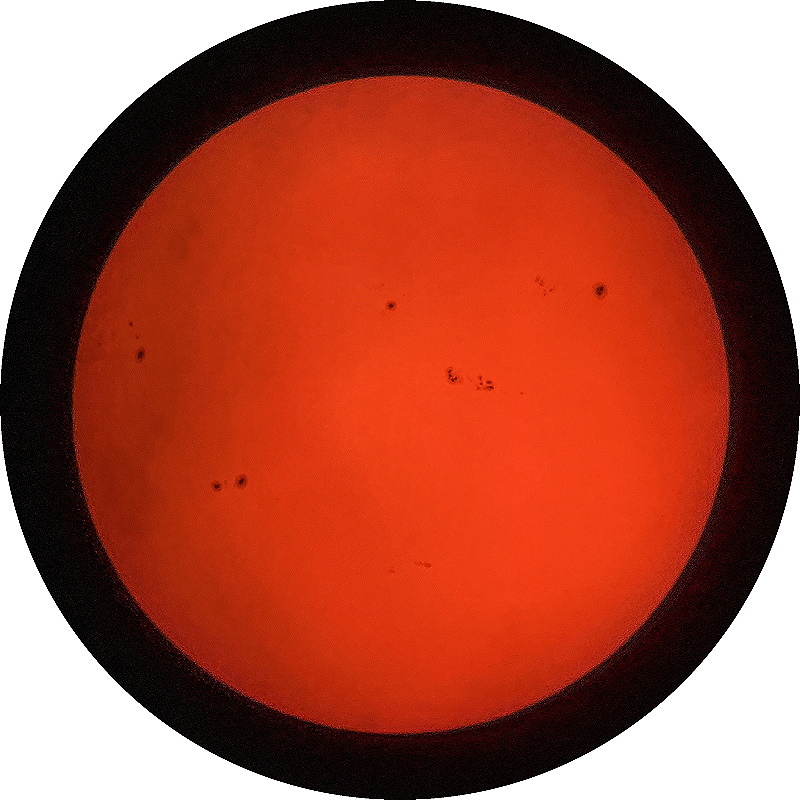
Using a 2" 30mm eyepiece (81X) and a full-aperture solar filter on the 12" LX600 telescope, I took this image of the Sun and several sunspots using NightCap Camera (ISO 34, 1/4400sec, 1X lens). I used the Bluetooth Shutter Remote to trigger the exposure. The Sun was behind a tree when I imaged it, hence the dark areas on the left and right sides of the image.
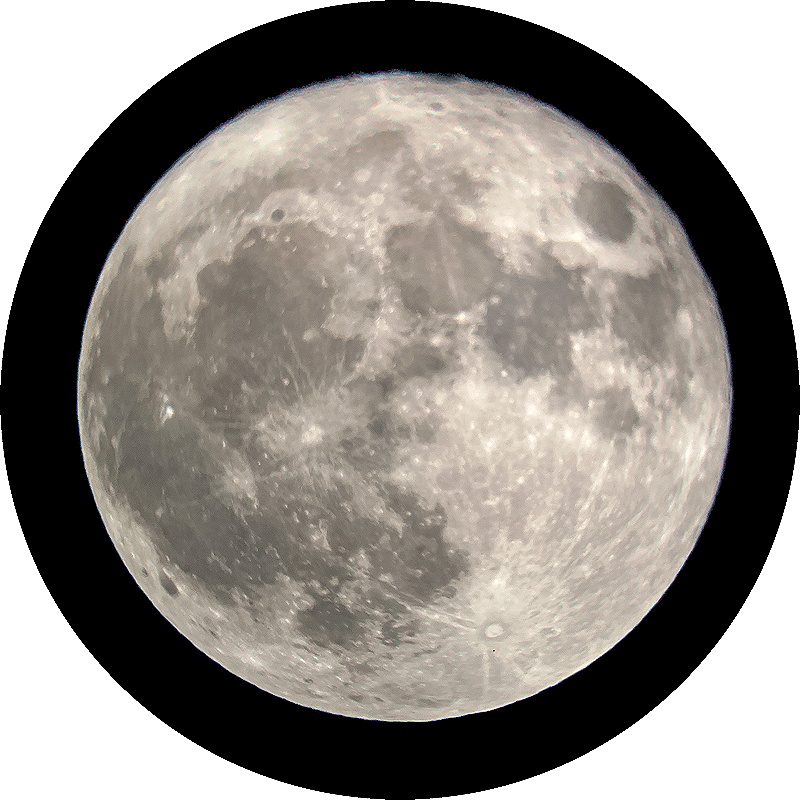
On a night when clouds were passing in front of the Full Moon, I took this photo through the clouds using NightCap Camera (afocal 81X, ISO 40, 1/10000sec, 1X lens). The Bluetooth Remote was used to trigger the exposure.
This afocal 271X (9mm eyepiece) image of the planet Venus is a stack of 2000 video frames taken with the iOS Camera app (slo-mo video, 240fps, 10 seconds, 1X lens). The Bluetooth Remote was used to start and stop the video recording.
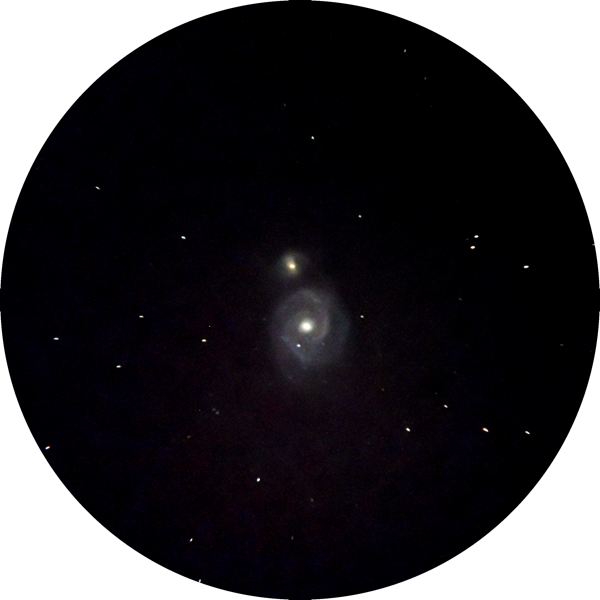
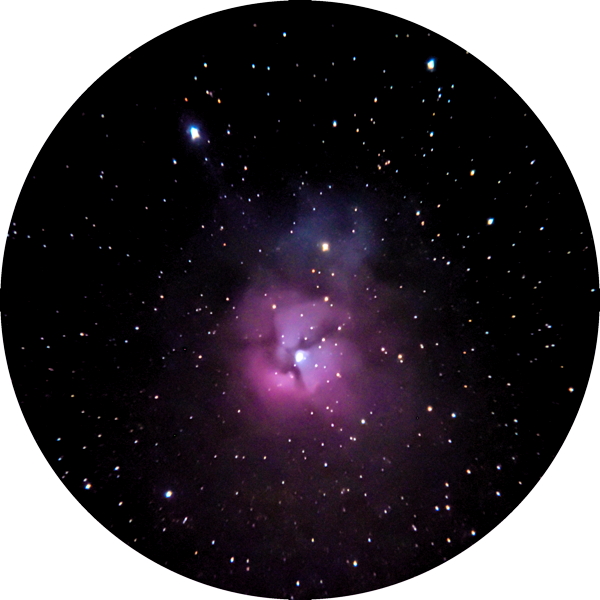
My final tests were to take images of some Deep Sky Objects using the 12" LX600 telescope. The images were taken with the NightCap Camera app on the iPhone 13 Pro Max. The Bluetooth Remote was used to trigger the exposure. I attached my LiDAR Cover on the iPhone before mounting the phone on the adapter. Exposure setting was Long Exposure, Light Boost, ISO 32000, 1 second shutter speed, 1 minute duration, 1X lens.
M51 (Whirlpool Galaxy (afocal 81X)
M20 (Trifid Nebula (afocal 81X)
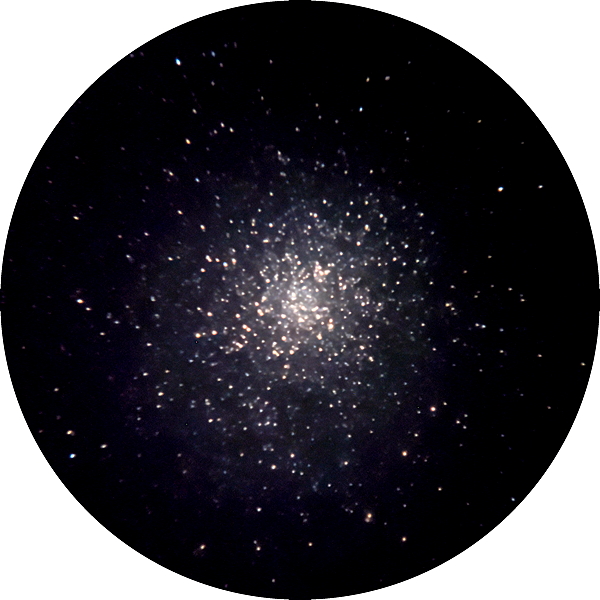
M22 (globular cluster (afocal 163X)
The Bluetooth Shutter Remote works very well. However, the blue LED at the upper left of the unit is very bright when it briefly illuminates as the shutter release button is pressed to trigger the shutter. That's fine when used in the daytime. However, it is so annoying when used at my dark sky location at night that I added two layers of "red lens" tape over the LED.
Summary
I was very impressed with how nice it was to use the Accuview 3-Axis Smartphone Adapter to precisely align the smartphone camera in all three axes. The axis knobs move the phone smoothly and easily. The well-designed adapter was securely held on the eyepieces I used and the iPhone was held without worrying that it would fall out of the adapter when the telescope was slewed. The adapter worked perfectly for the types of smartphone astrophotography I do. As it is now my favorite smartphone adapter, I will document my ongoing use of the adapter in future Cassiopeia Observatory reports.
The Accuview 3-Axis Smartphone Adapter should be usable on most telescopes, binoculars, and spotting scopes with most current smartphones. The combined weight of the adapter and phone may cause difficulties when used with some low-end scopes and/or non-sturdy telescope mounts. With small telescopes, it may be necessary to rotate the adapter to avoid axis movement interference from a finderscope or even require that the finderscope be removed. Unlike some smartphone adapters, the Accuview 3-Axis Smartphone Adapter from Move-Shoot-Move does not provide a camera tripod mounting mode, nor could I see any way to easily add that capability.
Most smartphone adapters do not include a Bluetooth shutter remote. In the past, I have usually used the Apple earbuds volume control buttons as a remote shutter release. I have also used my Apple Watch as a remote shutter release. But for those smartphone users who do not have earbuds or another release, it is very useful to have the Bluetooth Shutter Remote included with this adapter to avoid creating vibrations by touching the phone screen to activate the shutter button. The remote has an ON/OFF switch (don't forget to turn it OFF when done imaging) and includes a button battery. Pairing was simple and shutter triggering was reliable with the camera apps I tested.
The Accuview 3-Axis Smartphone Adapter from Move-Shoot-Move is at the high end of prices for smartphone adapters. However, with the important Z-axis adjustment and by including a Bluetooth shutter remote, it is a very cost-effective solution for smartphone afocal imaging with telescopes, microscopes, binoculars, and spotting scopes.
Comments are welcome using Email.
Cassiopeia Observatory Home Page
Copyright ©2023 Michael L. Weasner / mweasner@mac.com
URL = http://www.weasner.com/co/Reviews/2023/MSM_3-Axis_Adapter/index.html