How I Do Astrophotography, page 2
Posted: 29 August 2020
Updated: 28 August 2021
Focusing
Once the camera is mounted, whether it is a DSLR, point-n-shoot, or a smartphone, you have the challenge of getting the object in focus. If the object is bright, like the Moon, Sun (through a safe solar filter), or planets, focusing can be done by looking at the object in the viewfinder or on a "live screen" on the camera's display (if it provides that) or on the smartphone camera screen.
When doing afocal astrophotography you must first focus the object to your eye when looking in the eyepiece before mounting the camera. If you use glasses for distance seeing you should wear them when focusing to your eye. For afocal imaging the camera lens must be focused at "infinity". With some cameras, including smartphone cameras, zooming in or using a "macro" setting can help.
For faint objects or for more precise focusing, you need to use a focusing aid. There are two types of focusing accessories: a mask or a "wave interference" device. Currently, I use a "Meade Bahtinov Mask":
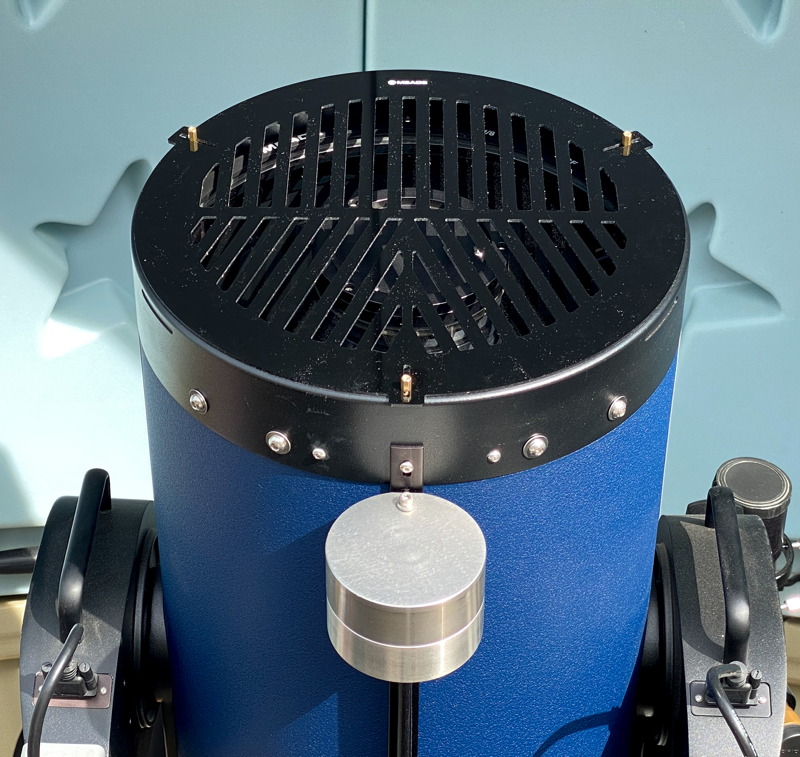
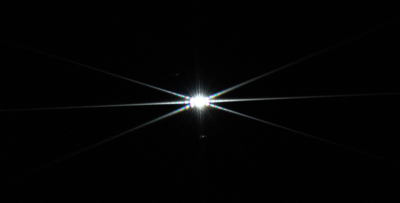
Using a bright star as your focus target you can easily center the bright central spike created by the Mask while viewing the star in the camera viewfinder or on its "live screen". Zooming in on the live view can help improve the accuracy of the focus.
An even more precise, but way more expensive focusing aid is a "wave interference" style focuser. I have used a Stiletto Focuser.

See my "Stiletto Focuser" review for information on how this focusing aid is used.
For telescopes that have it, once you have achieved a precise focus you should lock the focus position in place to prevent the mirror or focuser position from changing as the telescope is slewed from your focus target to your imaging target(s). However, just locking the focus may not be sufficient if you do a lot of imaging over a long night. As the temperature changes so does the focus position. A few degrees won't matter much, but if you focus shortly after sunset and then do more imaging around midnight, you will certainly want to refocus for those later images. If your telescope does not have "focus lock", then try to focus on a star near your intended imaging target to avoid shifts in optical components as the telescope orientation changes from one object to the next. My 12" LX600 telescope does not have a built-in Focus Lock so I added the ScopeStuff LX600 12" Primary Mirror Lock.
Filters can be attached to an eyepiece or elsewhere in the optical path. Doing so may or may not change the focus position. So check the focus with the filter inplace before imaging.
Checking images is easy by using the camera's display screen (if it has one). However, do not rely on that small screen to show you a very slightly out-of-focus image, even when zoomed in on the image. Many times I have thought an image was in-focus, only to discover that once the image was viewed on a computer screen it was obviously out-of-focus.
One other point about focusing. If you use an Off-Axis Guider like the Meade #777 Off-Axis Guider, you need to be certain the guiding eyepiece is focused at the same position as the camera. Using a parfocal ring you can adjust how far the eyepiece inserts. Focus the camera as described above when mounted on the OAG and then slide the eyepiece into the OAG eyepiece holder. Adjust the parfocal ring on the eyepiece tube until the stars in the eyepiece are in focus and then lock the ring in place on the eyepiece tube. The next time you insert the eyepiece into the OAG, it will be at the same focus position as your camera.
Camera Settings
With the camera mounted on the telescope and the image in focus, actually capturing a usable image will require adjusting some settings on the camera. Point-n-shoot cameras and smartphone camera apps may have very limited options for exposure settings. "Auto" settings may work for bright objects like the Moon and the brighter planets. If you find that the object is being overexposed in "Auto" mode due to the black sky surrounding the object, adding a Moon Filter (and/or other filters) can help. For faint objects, "manual" settings are a must. Trial-and-error with your specific telescope and camera will likely be required. I'll discuss what I do as a starting point for your imaging. You should make adjustments as needed. I will start with my DSLR settings, then I'll discuss settings I use on my iPhone.
For bright objects like the Full Moon I usually use an ISO setting on my DSLR in the range of 100-500. This allows for short shutter speeds to reduce the affect of atmospheric turbulence. Shutter speeds of 1/200 to 1/800sec are best. At other Moon phases when I want to capture shadows along the terminator, higher ISO values are required to keep the shutter speed fast. ISO 1600 or even higher may be required at times. When increasing the magnification, using higher ISO values and/or slower shutter speeds will be required.
For planets a lot of experimentation may be required. The planet's magnitude will determine what settings are required. High ISO values and fast shutter speeds are usually required to capture any details. Slower shutter speeds might be required but then atmospheric turbulence can blur out details. Planet astrophotography can benefit from using a video recording. You then stack the video frames (discussed in the Image Processing section below) or you can review the video recording and find the sharpest single video frame.
Deep Sky Object astrophotography is the most challenging, both to your camera and to you as the astrophotographer. Shutter speed is not a concern as the shutter is left open for seconds or minutes. Many DSLRs can do timed exposures up to 30 seconds or longer. For longer exposures, using the "Bulb" setting to leave the shutter open is necessary. I usually use ISO 6400, sometimes higher or lower, depending on the object brightness. As the ISO value is increased, "digital noise" is introduced into the image. Newer digital cameras will perform better at higher ISO values than older cameras. Exposures will vary from 30 seconds for stars or bright planetary nebulae to 1, 2, 3, 5, 10, or even 15 minutes for very faint objects. There is always the tradeoff of exposure length, ISO value, image noise, tracking/guiding accuracy, and object brightness. Bracketing the exposure settings is a good idea to provide the best chance of getting a good image that will require minimal post-processing.
I set my DSLR for raw image format at the largest image dimension available. The raw format provides the most flexibility during post-processing and the largest image dimension provides the most resolution in case I want to crop the image from the full-size frame. Raw images will be large files, >50 MB each for my D850 DSLR, so you will need enough storage space on the camera to handle multiple raw images. And of course, your computer will need to be handle large image files as well. If your camera does not have raw capability or you do not have image processing software that can handle raw images from your camera, use JPEG at the highest quality (minimum compression) setting. When doing video recordings, the files can be quite large, taking tens to hundreds of megabytes each, depending on the length of the recording, image quality, and image dimensions.
I disable in-camera Noise Reduction on the DSLR as I prefer to do noise reduction in software. Another consideration of in-camera noise reduction is that it doubles the length of the "exposure". For example, if the exposure is 2 minutes the camera will do a "dark frame" exposure of 2 minutes for a total of 4 minutes exposure. If the exposure is 5 minutes you have to wait 10 minutes to get use of the camera back. For a 10 minute exposure you have to wait 20 minutes. Another alternative for noise reduction is to take your own "dark frames" and use them during post-processing on your computer. Since I "play" at astrophotography that is more work than I typically want to do!
Most smartphone camera apps do not provide as much manual control over exposure settings as needed for astrophotography. For most of my iPhone astrophotography I use the iOS app NightCap Camera. For the Moon I usually set the ISO to 32 and set the shutter speed to show a properly exposed image on the live view. Bracketing the exposure settings is always a good idea. For stars, nebulae, and galaxies I will use ISO 6400 to 12500 in NightCap Camera with the slowest shutter speed available (which varies with the iPhone model; 1 second for the iPhone 11 Pro Max). For faint objects I will set Long Exposure and Light Boost both ON. I then will usually do a 1 minute exposure. NightCap Camera then stacks all the 1 second images (for the iPhone 11 Pro Max) on the phone for an effective exposure time of 1 minute. I have found that the 1 minute exposure yields the best images; going longer typically does not add any detail. NightCap Camera has many uses; it can be used when the iPhone is mounted on a tripod for sky photography or on a telescope for astrophotography. With smartphones that have multiple camera lenses, using the 1X normal lens is usually the best choice. This provides the fastest lens (lets the most light reach the sensor), which is important when photographing faint objects. Sometimes using a telephoto lens, either built-in or a clip-on lens, can be useful to increase the magnification. A wide-angle lens can be used for sky astrophotography. You can learn more about using a smartphone by watching my Smartphone Astrophotography talk video.
Tracking and Guiding
Before getting into the specifics of guiding during a long exposure there are some important things to consider when planning to get into astrophotography.
Not all telescopes are equipped with drive motors that move the telescope to track motion of the night sky due to the Earth's rotation. That does not mean that you can't do astrophotography, it just means that you may be limited in what you can image. You can still take photographs of the Moon, Sun (with a safe filter), and brighter planets. And you can do tripod-mounted or piggyback astrophotography of the night sky. Back in the early 1960s I imaged the Moon through my Edmund 3" Newtonian telescope that had no drives.

I also mounted a 35mm film camera piggyback on the telescope and manually guided on a star to image the constellation of Orion for 15 minutes (on a cold winter night in southern Indiana). The result was a beautiful color slide image of Orion.
If your telescope is mounted Alt/Az, then "field rotation" will be a problem as the telescope tracks the object. The degree of the problem will depend on the declination of the object, your Latitude, the image scale, and the length of the exposure. Here is a 10 minute exposure of the Andromeda Galaxy taken with a D70 DSLR and 300mm lens piggybacked on an Alt/Az mounted 8" LX200-ACF showing star trailing around the edge of the field-of-view due to field rotation.

Polar mounted telescopes (GEM or wedge) will not have this field rotation problem when the mount is properly polar aligned. For best results, especially for longer exposures, the mount should be "drift aligned". I would occasionally do a manual drift align of my wedge-mounted 8" LX200-ACF. Doing a manual drift align can take up to 30 minutes as you watch a star "drift" in the eyepiece, adjust the mount, watch the star again, make more adjustments, and watch the star. You have to do this using two stars and so it is a very time-consuming task. For permanently mounted telescopes you only need to do this once and then occasionally recheck the alignment if the mount was bumped. When I upgraded my observatory to a wedge-mounted Meade 12" LX600 w/StarLock I used the StarLock automatic drift align to precisely polar align the mount. The automatic drift align took just a few minutes. Getting a precise polar alignment should not detract you from doing astrophotography. Today's GOTO mounts can compensate for slightly misaligned mounts so just getting an approximate polar alignment can be sufficient.
Telescopes which have motorized drives, at least in Right Ascension, are more easily used for astrophotography. Without a drive, keeping an object centered as you fiddle with a camera is a constant battle. With a drive, even imaging the Moon and brighter planets is easier since you do not have to keep moving the telescope by hand as you take multiple images. For imaging faint objects a tracking drive is really required.
Before you can begin tracking, and possibly guiding, on your target object, you have to find and center the object in the camera's field-of-view. This is easy for bright objects when using a DSLR or camera with a "live view". However, faint objects or any object when using a camera without a live view are difficult to center or perhaps even find. A good GOTO system will help. If you don't have a GOTO telescope then you will need a properly aligned high power finderscope. No matter which you use you may still find that doing "framing exposures" is required. If I can not see the target object in the camera's viewfinder due to its faintness I will usually SYNC the telescope's GOTO computer on a nearby bright star or object, or even on the object itself as viewed through an eyepiece. I then slew to the focus star (when required) and back to the object. I will take a 1 minute ISO 6400 framing test exposure and check the resulting image on the camera screen to see if the object is visible, and if so, whether the framing is good. I repeat the framing test exposure until I get good framing.
Once the object is framed, it can be imaged. When imaging the Moon, Sun (with a safe solar filter), and brighter planets you are using very short exposures and so no tracking corrections are needed during the exposure. For bright stars and bright Deep Sky Objects exposures can be short enough to not need manual guiding corrections, depending on the sensitivity of your camera and the tracking accuracy of your mount. Most properly aligned telescopes, even Alt/Az mounted ones, can track accurately for 1 to 2 minutes. What looks like good tracking to your eye when viewing an object through an eyepiece, may or may not be accurate enough when imaging. For exposures longer than 2-3 minutes you will probably find that the image trails, either a little or a lot, depending on the drive, mount alignment accuracy, exposure length, and the magnification used. That's when you need to provide guiding corrections, either manual or with a guide telescope. With the 8" LX200-ACF I did manual guiding using the Off-Axis Guider (OAG).
While I worked on getting good object framing I also looked in the illuminated reticle eyepiece on the OAG for a suitable guidestar. The OAG "picks off" a small portion of the field-of-view and reflects the light to the eyepiece. This restricted view of the eyepiece means that actually finding a suitable guidestar can be a significant challenge. Sometimes I had to accept a less than desirable object framing to find a usable guidestar. Stars that can be easily seen in the reticle eyepiece are the best ones for guiding. But sometimes the only stars visible in the eyepiece are faint ones requiring the use of averted vision to keep it in sight. Faint stars may require that the star NOT be centered inside the crosshairs of the reticle, but instead positioned in a corner of the crosshairs. Very faint guide stars may need to be positioned a short distance from the crosshairs and then the same distance maintained during the guiding. Keeping a faint star in sight for 5, 10, or even 15 minutes can be difficult, but I found that it was an enjoyable activity, especially when the resulting image turned out good. If I could not find a suitable guidestar it was necessary to rotate the OAG to change the field orientation to hopefully bring a guidestar into view. Unfortunately, the OAG I used does not have a rotation capability; it has to be loosened from the telescope, rotated, and then re-tightened. That process can affect the focus, requiring a new focus test. I would repeat this until I located a good guidestar.
The actual process of making guiding corrections is simple if you have a handcontroller for the telescope that has very slow slew speeds available. With the AutoStar I use the slowest speed available called "Guide". Before starting the exposure I would check which handcontroller slew arrow key would move the guidestar in which direction in the reticle eyepiece. During the exposure I would monitor the guidestar in the reticle eyepiece. If a position correction was required I would make it by briefly pressing the proper slew arrow key. I would try to keep the corrections short, meaning that I tried to avoid having the star drift too far away from its initial position in the reticle eyepiece. Most times I would be successful, but sometimes not. The star may have been too faint to continuously monitor, or it may have drifted behind one of the illuminated reticle lines and disappeared. (The blinking illumination provided by the Rigel PulsGuide really came in handy when using faint guide stars.) If I lost sight of the star and could not immediately get it back into position I would end the exposure and start over, picking a new guidestar and even repeating the framing test exposure when necessary. Good manual guiding corrections during long exposures can make the difference in what is imaged. Small details in nebulae or galaxies can be blurred out by very small guiding errors. These details will be visible with accurate guiding.
Watching a faint (or even a bright) guidestar in an eyepiece for several minutes can be tiring if you are standing and hunched over the eyepiece. Get comfortable and use a chair or stool if possible. I have used a Starbound Observing Chair for many years.

Do not stare at the guidestar. Look away and even take short breaks from the eyepiece. Look up at the sky for a few seconds to refocus your eyes.
The above description of manual guiding is what I did for many years with good results. But in early 2016 that ended. One of the many reasons I upgraded to the LX600 in February 2016 was its integrated StarLock guidescope. Third-party add-on guidescopes typically require a computer (usually Windows based) to control the telescope. The StarLock communicates guiding corrections directly to the LX600 motors so no external computer is required. I no longer needed to do manual guiding.
Ideally, your imaging target will be well up into the sky, at least 20-30 degrees above the horizon. If the object is too low in the sky atmospheric turbulence will cause a guidestar (either for manual or automatic guiding) to dance around, creating guiding difficulties. And if the star in the eyepiece is moving around so are the stars that the camera is imaging, blurring out details. Poor seeing, whether due to low altitude in the sky or weather conditions, will affect guiding and imaging. Try to image when seeing is good. Of course, sometimes you have no choice but to image objects low in the sky or during periods of poor seeing.
Some telescopes provide a "Periodic Error Correction" (or PEC) capability. Once configured for a specific telescope this provides more accurate tracking, reducing (but not necessarily eliminating) the need for making guiding corrections. I did not use PEC on my 8" LX200-ACF but using the StarLock auto-PEC I do on my LX600.
Imaging satellites through a telescope is difficult but can be done. The International Space Station is large enough to show some details. Some GOTO telescopes have the capability to automatically track a satellite as it rapidly passes across the sky. However, this tracking is not very precise and usually requires making manual corrections during the pass. With a wide field of view (camera mounted at prime focus, typically), monitoring the satellite in a properly aligned finderscope is usually adequate. Using a slew speed of about 1/2° per second (key #6 on the AutoStar) is normally where I start for tracking corrections. Due to the rapid motion of the mount a fast shutter speed (/1600sec at ISO 1600) will be required to capture details of the satellite. When satellites cross the Moon or Sun you use the same exposure settings as you would use for the Moon or Sun. Whether you are tracking the satellite as it crosses the sky or imaging a transit, doing a video recording is the best way to quickly capture images of a satellite through a telescope. If your camera has it, using a fast "burst mode" of imaging can also be used.
Image Processing
Once you have acquired images, whether you are using a digital camera or a smartphone, you will probably need to do some image processing. The amount and specific processing needed will vary depending on the camera used, the image file format, and the object imaged. I learned a lot of image processing basics from "A Guide to Astrophotography with Digital SLR Cameras". I'll briefly discuss some of the techniques here but for a more indepth discussion check out the book.
As mentioned earlier, I prefer to shoot raw images with my DSLR as that provides me with the most control over the images. I discuss mostly still images here, but will touch on video recordings at the end. After an imaging session at the telescope I import all the images onto my computer. I use Adobe Lightroom software on my iMac for the initial imaging processing. I review the images, deleting any that are not good enough for further processing due to really poor exposure or bad trailing. I also normally delete the framing test exposures. The remaining images are the ones that will be further processed.
The next step is usually to adjust the "levels" of the exposure. As with many image processing applications, Lightroom provides several ways to do this, some simple, some more advanced. Adjustments are made as needed to the sliders for Exposure, Contrast, Highlights, Shadows, Whites, and Blacks until the preview image looks "right" to me. These adjustments will improve the brightness and contrast of the images to bring out faint details and/or reduce overexposed areas.
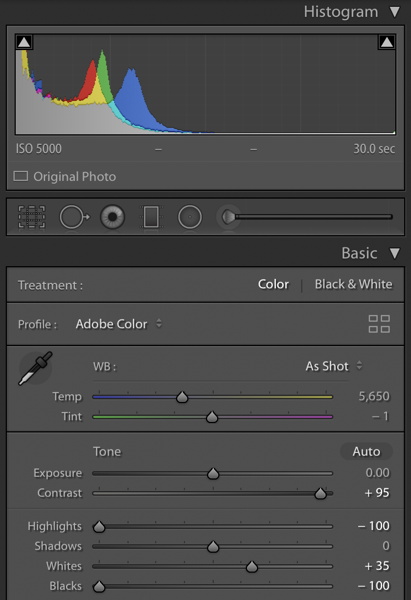
For Moon photos I may adjust the vibrance and/or saturation full scale, increasing it for full disk shots, decreasing for high magnification images. This will make the Moon image look better, if somewhat less natural. Once the "look" of the image is correct, I'll do any needed cropping and/or straightening of the image to best show the object. If "digital noise" is a problem, Lightroom (and many other image processing programs) can reduce it. Once image editing in Lightroom is completed, I export the image in JPEG full-size format for final editing in Lemke Software GraphicConverter. I use GraphicConverter for scaling reduction for web page presentation, some additional levels adjustments, image sharpening, and sometimes a little final color correction. Other programs have similar functions for photo editing.
A common editing technique is to move the outer sliders of a "levels" graph inward until they reach the "shoulders" of the curve (where the curve touches the bottom baseline). Doing that will properly balance the image for the captured light. Further adjustments can be done to improve the image as needed. I will sometimes do levels adjustments in each of the color bands (red, green, and blue) as well. That can remove or reduce unwanted sky background color from ground lights or from a long duration exposure. Other image processing that I'll usually do in GraphicConverter include sharpness and saturation adjustments. These two adjustments, levels and sharpening, are the simplest way to dramatically improve your astrophotographs, as seen in this sequence.
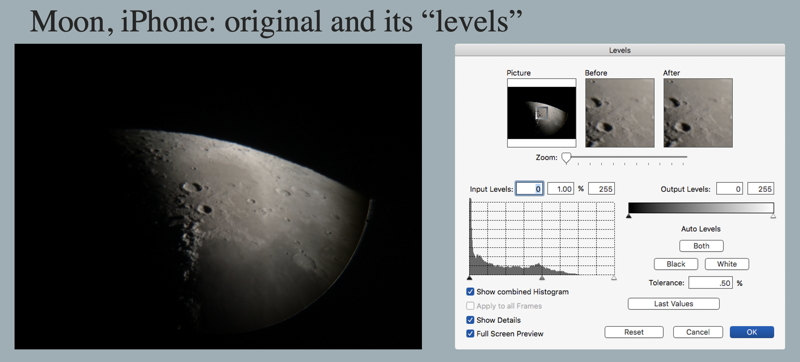
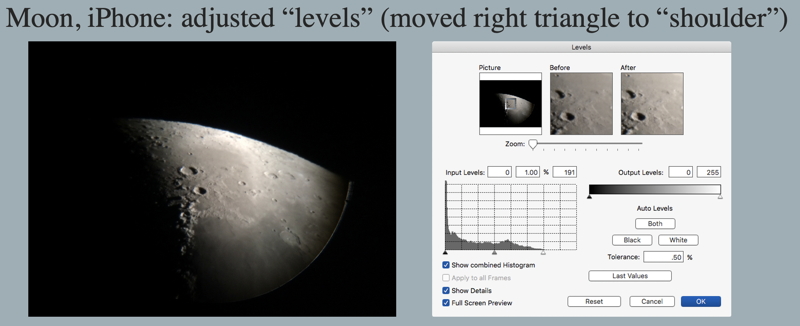
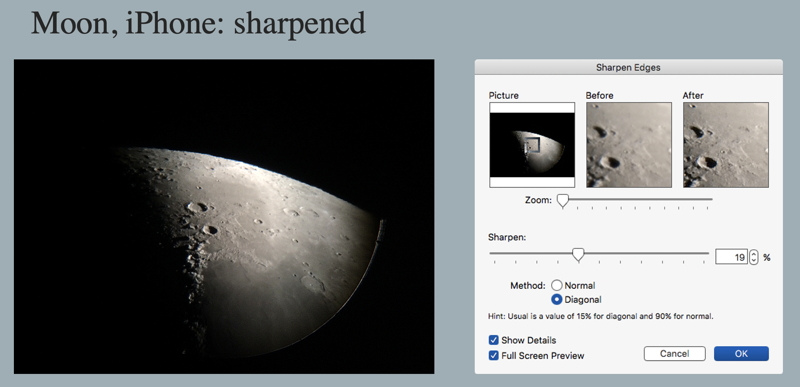
Note: many images that are posted on my web site are not the same quality as the originals. I typically reduce the final image JPEG compression to keep the file sizes around 250 KB or less. Using JPEG and keeping the file sizes small ensures that the images can be viewed by most Site visitors.
To show the benefits of my basic image processing techniques, here is an original raw image of the galaxy NGC3628 (Sarah's Galaxy), magnitude +10.2, taken at prime focus of the 12" telescope using a D850 DSLR (StarLock autoguided, 2 minutes exposure, ISO 5000) and the final edited image.
Original raw image
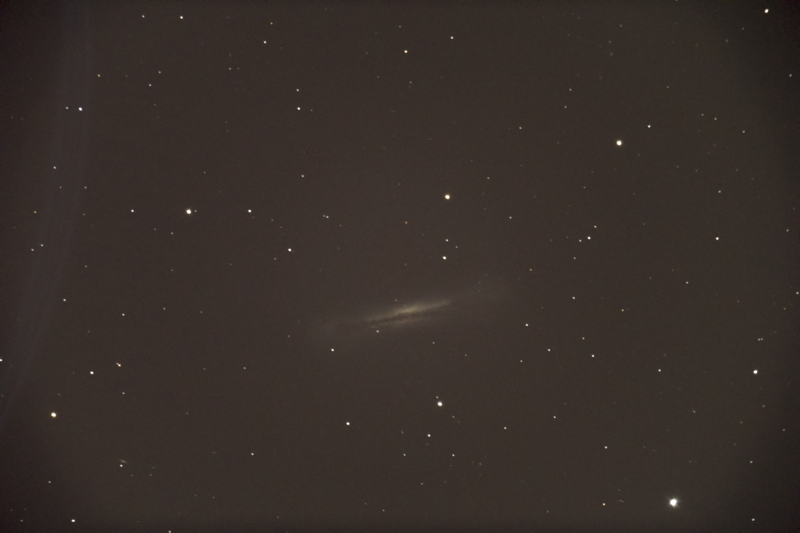
Final edited image
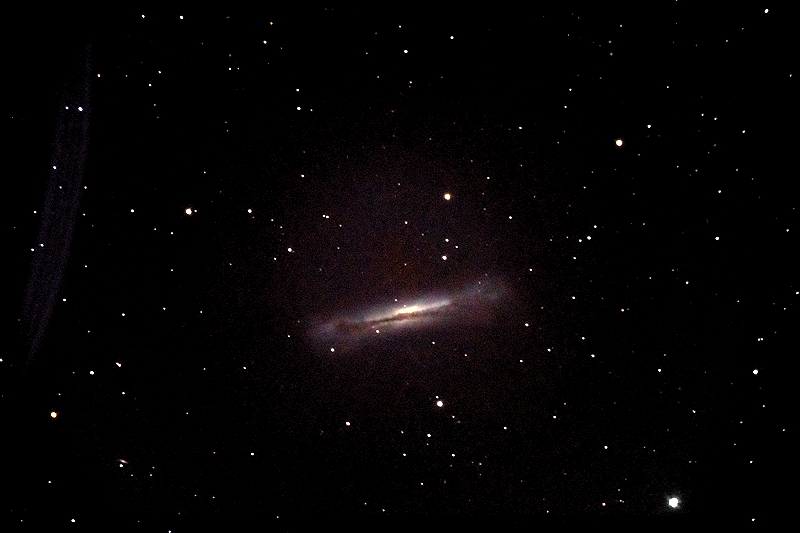
As you can see, the original raw image has been improved by image processing. Image processing CAN consume a lot of time, but a little can go a long ways to improving your astrophotography. Experiment with the tools you have available.
I normally do not stack single images or frames from video recordings. When I do I use Affinity Photo, Observatory, or Lynkeos, both for the Mac. Registax is a popular image stacker for Windows. Two very powerful astrophotography image processing applications are Nebulosity and PixInsight, both available in Mac and Windows versions. Once I stack images I will still process them further in GraphicConverter to prepare them for posting on the web site.
Accessories
There are several accessories that can make doing astrophotography easier or yield better images. I will discuss the ones I use.
For imaging the sky with a DSLR or point-n-shoot camera, especially with a long telephoto lens, aiming the camera at a faint object can be difficult. I use a ScopeStuff Red Dot Finder for SLR Hotshoe, seen here mounted on an extension bar, to assist in pointing the camera.
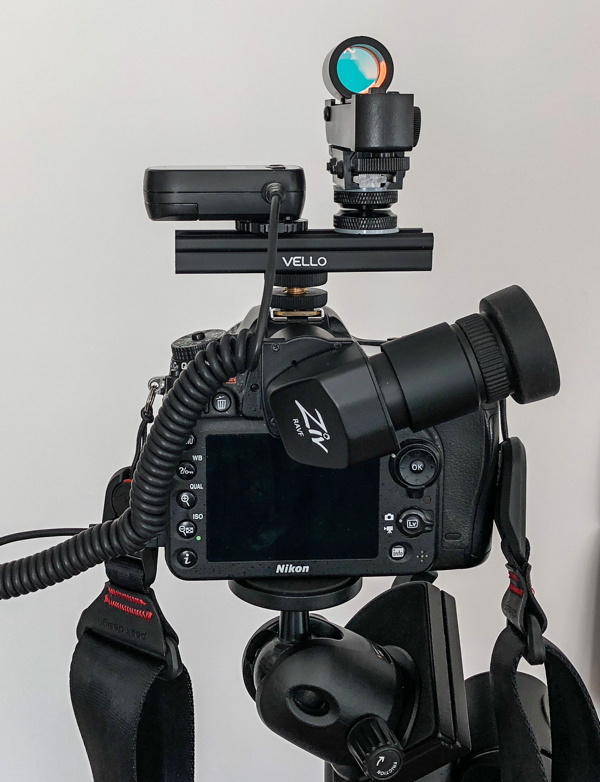
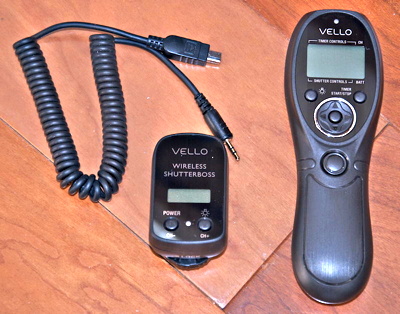
Mount stability is a consideration when doing astrophotography, especially with DSLR cameras, although it is important with any camera that has a mechnical moving mirror and/or shutter. An important feature of many DSLRs is "mirror lockup" to avoid vibrations from being induced by the mirror movement at the start and end of the exposure. You should avoid actually touching the camera to start and end the exposure, which can induce vibrations. Using a camera's self-timer to start the exposure is one way to avoid hand-induced vibrations. Another technique to avoid vibrations is to use the "Hat Trick" method. See my linked article for more details, but basically you cover the telescope aperture, open the camera shutter, wait a few seconds for any vibrations to dampen out, uncover the telescope aperture for the duration of the exposure, re-cover the aperture, and finally close the camera shutter. Even better is to use a remote shutter release. I use a Vello ShutterBoss wireless remote with my DSLR. With the ShutterBoss I can start/stop exposures without touching the camera. I can also do longer exposures than the camera itself allows and multiple images using the ShutterBoss intervalometer.
With the iPhone I use the included earbuds as a remote shutter release. I press a sound volume button to start the exposure and press it again to stop the exposure. Bluetooth remotes also work.
Whether imaging with a camera or a smartphone, there are times when using AC power is handy, especially for long duration astrophotography. I use an AC adapter with my DSLR, and if your camera has this capability and if you have AC available where you image, I highly recommend it. You won't have to worry about depleting battery power during the exposure.
The use of filters can help with astrophotography. Sometimes just using a Moon Filter will improve images of not only the Moon but of bright planets like Venus and Jupiter. Colored filters (blue, yellow, red, green) can also improve images of the planets. Keep in mind that exposures with filters will be somewhat longer depending on the amount of light transmission through the filter. Except for using a Moon Filter, I rarely use filters when imaging planets. I have used a ZWO Atmospheric Dispersion Filter to reduce and even eliminate the red and blue color fringes around the planet that will occur when the planet is low in the sky.
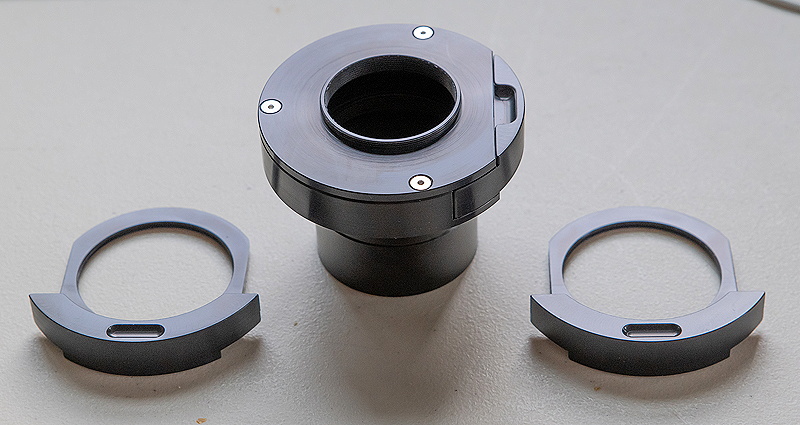
More advanced imaging of nebulae and some galaxies can be done using one of the many types of astrophotography filters. Some, like the Explore Scientific UHC Filter, reduce the effects of light pollution and will darken the sky while letting the light from the object be photographed. Other filters will allow only specific color wavelengths of light to pass through the filter and are very useful in areas with heavy light pollution. Some objects emit light in specific wavelengths, so using a filter designed to pass only that light can yield nice images (with some post-processing work). In 2019 I began imaging using the Optolong 2" HA SII OIII Narrowband Telescope Filter Kit. Individual images of an object are taken through two or three of the three filters and then merged into a final image. Very quickly I discovered that unmounting the camera from the telescope to swap the filter was a pain. I added a Starizona Filter Holder that allows the filters to be swapped by just sliding a filter tray out and in.
Summary
I hope this article has helped you understand how I do astrophotography with the equipment and software I have. The techniques mentioned will be applicable to most telescopes, cameras, and image processing software. I make no claims that my images are the best available (I know they are not), nor the best they can be (I don't normally spend hours in post-processing). But if my images and my techniques help you get started in astrophotography or improve your images, then the article is worthwhile. The size and type of your telescope and camera should not deter you from trying astrophotography. Even the small telescopes like the Meade ETX models can take some amazing astrophotographs with some experience, perseverance, and yes, luck. You can see examples of ETX astrophotography on the Astrophotography Gallery Archive on my ETX Site. You can see some of my astrophotography from Cassiopeia Observatory by clicking the "Photos" link at the top of this page.
Go back to Page 1.
Return to the Cassiopeia Observatory Home Page.
Copyright ©2020 Michael L. Weasner / mweasner@me.com
URL = http://www.weasner.com/co/articles/HowIDoAstrophotography/index2.html
